

Weather by Aircall
Overview
The Aircall Labs team builds applications on top of the Aircall Public API to enrich customer experience. The first released integration is a Weather app, Aircall Caller Insights will automatically display the weather, location and temperature based on callers' phone number.
We decided to open source its codebase, and to share every secret with developers.
GitHub repository is available here
Before getting started
Guide
As you can see, this page is split in two. Code explanation will be written here, in this left white pane. On the right side of the page is located a user interface allowing you to navigate in the Weather app codebase.
Technical stack used
The Weather app logic relies on a NodeJS web server. We used Express as a web framework, axios to send HTTP requests, winston as a logger and dotenv to load environment variables from a .env file.
As our main stack runs on AWS, we decided to use Docker and run the app with ECS. This part won't be covered in this guide.
As for the database, the only need we have is to store Company's authentication info (one API token and one webhook token). We decided to go with DynamoDB as it's fast, flexible and very easy to use.
Source tree
We followed a pretty straightforward source tree organization:
- 📁 ~/scripts/: some scripts used to init database
- 📁 ~/src/: where all the source code of the app is
- 📁 ./controllers/: handling incoming HTTP requests' logic
- 📁 ./libs/: everything that interacts with outside tools (like OpenWeatherMap)
- 📁 ./models/: Company, Insight Cards and Regions models
- 📁 ./modules/: JavaScript helpers
- 📁 ./public/: HTML, CSS and images
- 📁 ./utils/: exports basic functions
- 📁 ~/tests/: tests written with Jest
Install
Check the README.md file in the codebase and follow the steps described.
But in short, you’ll need to:
- Define all the ENV variables in a
.envfile - Get Aircall's OAuth credentials
- Install Docker & DynamoDB
- Run the app with Docker
Once the install is done and the stack is running, your web server will be available on http://localhost:5000.
Public URL
Before deploying your app in production, you might want to test it locally. We recommend using ngrok to generate a public URL that you'll be able to submit to Aircall.
Once ngrok is installed, you can easily get your app behind a custom public uri:
ngrok http 5000 --subdomain=my-weather-app-custom-urlWe'll use this Public URL to implement the OAuth logic later.
Web server
App entry point
The src/server.js file is the main entry point of the app. That's where we'll define the NodeJS web server. In this app, we use Express as a web framework.
/**
 *  Main file, setup the app server
 *  Entry point of the Weather app
 */
const express = require('express'),
  bodyParser = require('body-parser'),
  Logger = require('./modules/logger'),
  path = require('path'),
  router = require('./routes');

const app = express();
app.use(bodyParser.urlencoded({ extended: false }));
app.use(bodyParser.json());

// Define public assets folder
app.use(express.static(path.join(__dirname, 'public')));

const PORT = process.env.PORT || 5000;

app.listen(PORT, () => {
  Logger.info('[server] server started');
  Logger.info('[server] visit http://localhost:' + PORT);
});

// Init routes module
router.init(app);
We need bodyParser middleware to handle req.body properties in POST requests.
Using the express.static middleware line 18 allows us to serve HTML and CSS files, located in the public/ folder. More information in express' documentation.
Define public endpoints
The src/routes.js file is where all public endpoints are defined.
/**
 *  Main router file
 *  Declare each endpoint and redirect requests to the right controller
 */
const mainCtrl = require('./controllers/main_controller'),
  oauthCtrl = require('./controllers/oauth_controller'),
  webhooksCtrl = require('./controllers/webhooks_controller'),
  Logger = require('./modules/logger');
const _init = (app) => {
  if (!app) {
    throw '[Router] app is not defined';
  }
  // Log each request
  app.use(logRequest);
  /**
   *  [GET] /
   *  Render the main page
   */
  app.get('/', mainCtrl.index);
  /**
   *  [GET] /health
   *  Healthcheck endpoint
   */
  app.get('/health', mainCtrl.health);
  /**
   *  [GET] /oauth/install
   *  Install page, redirects to Aircall authorize URL
   */
  app.get('/oauth/install', oauthCtrl.install);
  /**
   *  [GET] /oauth/callback
   *  Called by Aircall once the admin has authorized the application scope
   */
  app.get('/oauth/callback', oauthCtrl.callback);
  /**
   *  [GET] /oauth/success
   *  Success page, redirect to Aircall' success
   */
  app.get('/oauth/success', oauthCtrl.success);
  /**
   *  [POST] /webhooks
   *  Fetch weather information and post an Insight Card
   *  Called by Aircall each time a webhook event is posted
   */
  app.post('/webhooks', webhooksCtrl.index);
  /**
   *  [GET/POST/PUT] Handle 404
   */
  app.get('*', render404);
  app.post('*', render404);
  app.put('*', render404);
};
/**
 *  Render a HTTP 404 code with error message
 */
const render404 = (req, res) => {
  Logger.warn(`[routes][${req.method}][${req.url}] - 404 not found`);
  res.status(404).json({
    error: 'route not found',
  });
};
/**
 *  Log request's info
 */
const logRequest = (req, res, next) => {
  // Remove sensitive information from the URL before logging it
  const cleanedURL = !!req.url && req.url.split('?')[0];
  // Avoid logging each `[GET] /health` requests
  if (cleanedURL !== '/health') {
    Logger.info(`[Router][${req.method}]` + cleanedURL, {
      http_method: req.method,
      url: cleanedURL,
    });
  }
  next();
};
module.exports = {
  init: _init,
};
[GET] /renders a basic JSON file. Via Main Controller.[GET] /healthrenders a blank page, with a 200 HTTP Code. Via Main Controller.[GET] /oauth/installredirects to Aircall's authorize URL (see the OAuth section below). Via OAuth Controller.[GET] /oauth/callbackis called by Aircall once the admin has authorized the application scope (see the OAuth section below). Via OAuth Controller.[GET] /oauth/successredirects to Aircall' success page. Via OAuth Controller.[POST] /webhookswill be called by Aircall, everytime a new Webhook event is emmited. Via Webhook Controller.[GET|POST|PUT] *takes any other request to a 404 page.
We'll see in the following chapters how those endpoints are implemented.
OAuth
Implementing OAuth with Aircall has been documented in our API References and in the following tutorial:
Get started with Aircall OAuth
Building an app for Aircall users? Learn how the Aircall OAuth flow works.
Here's the ultimate flow we want to implement:
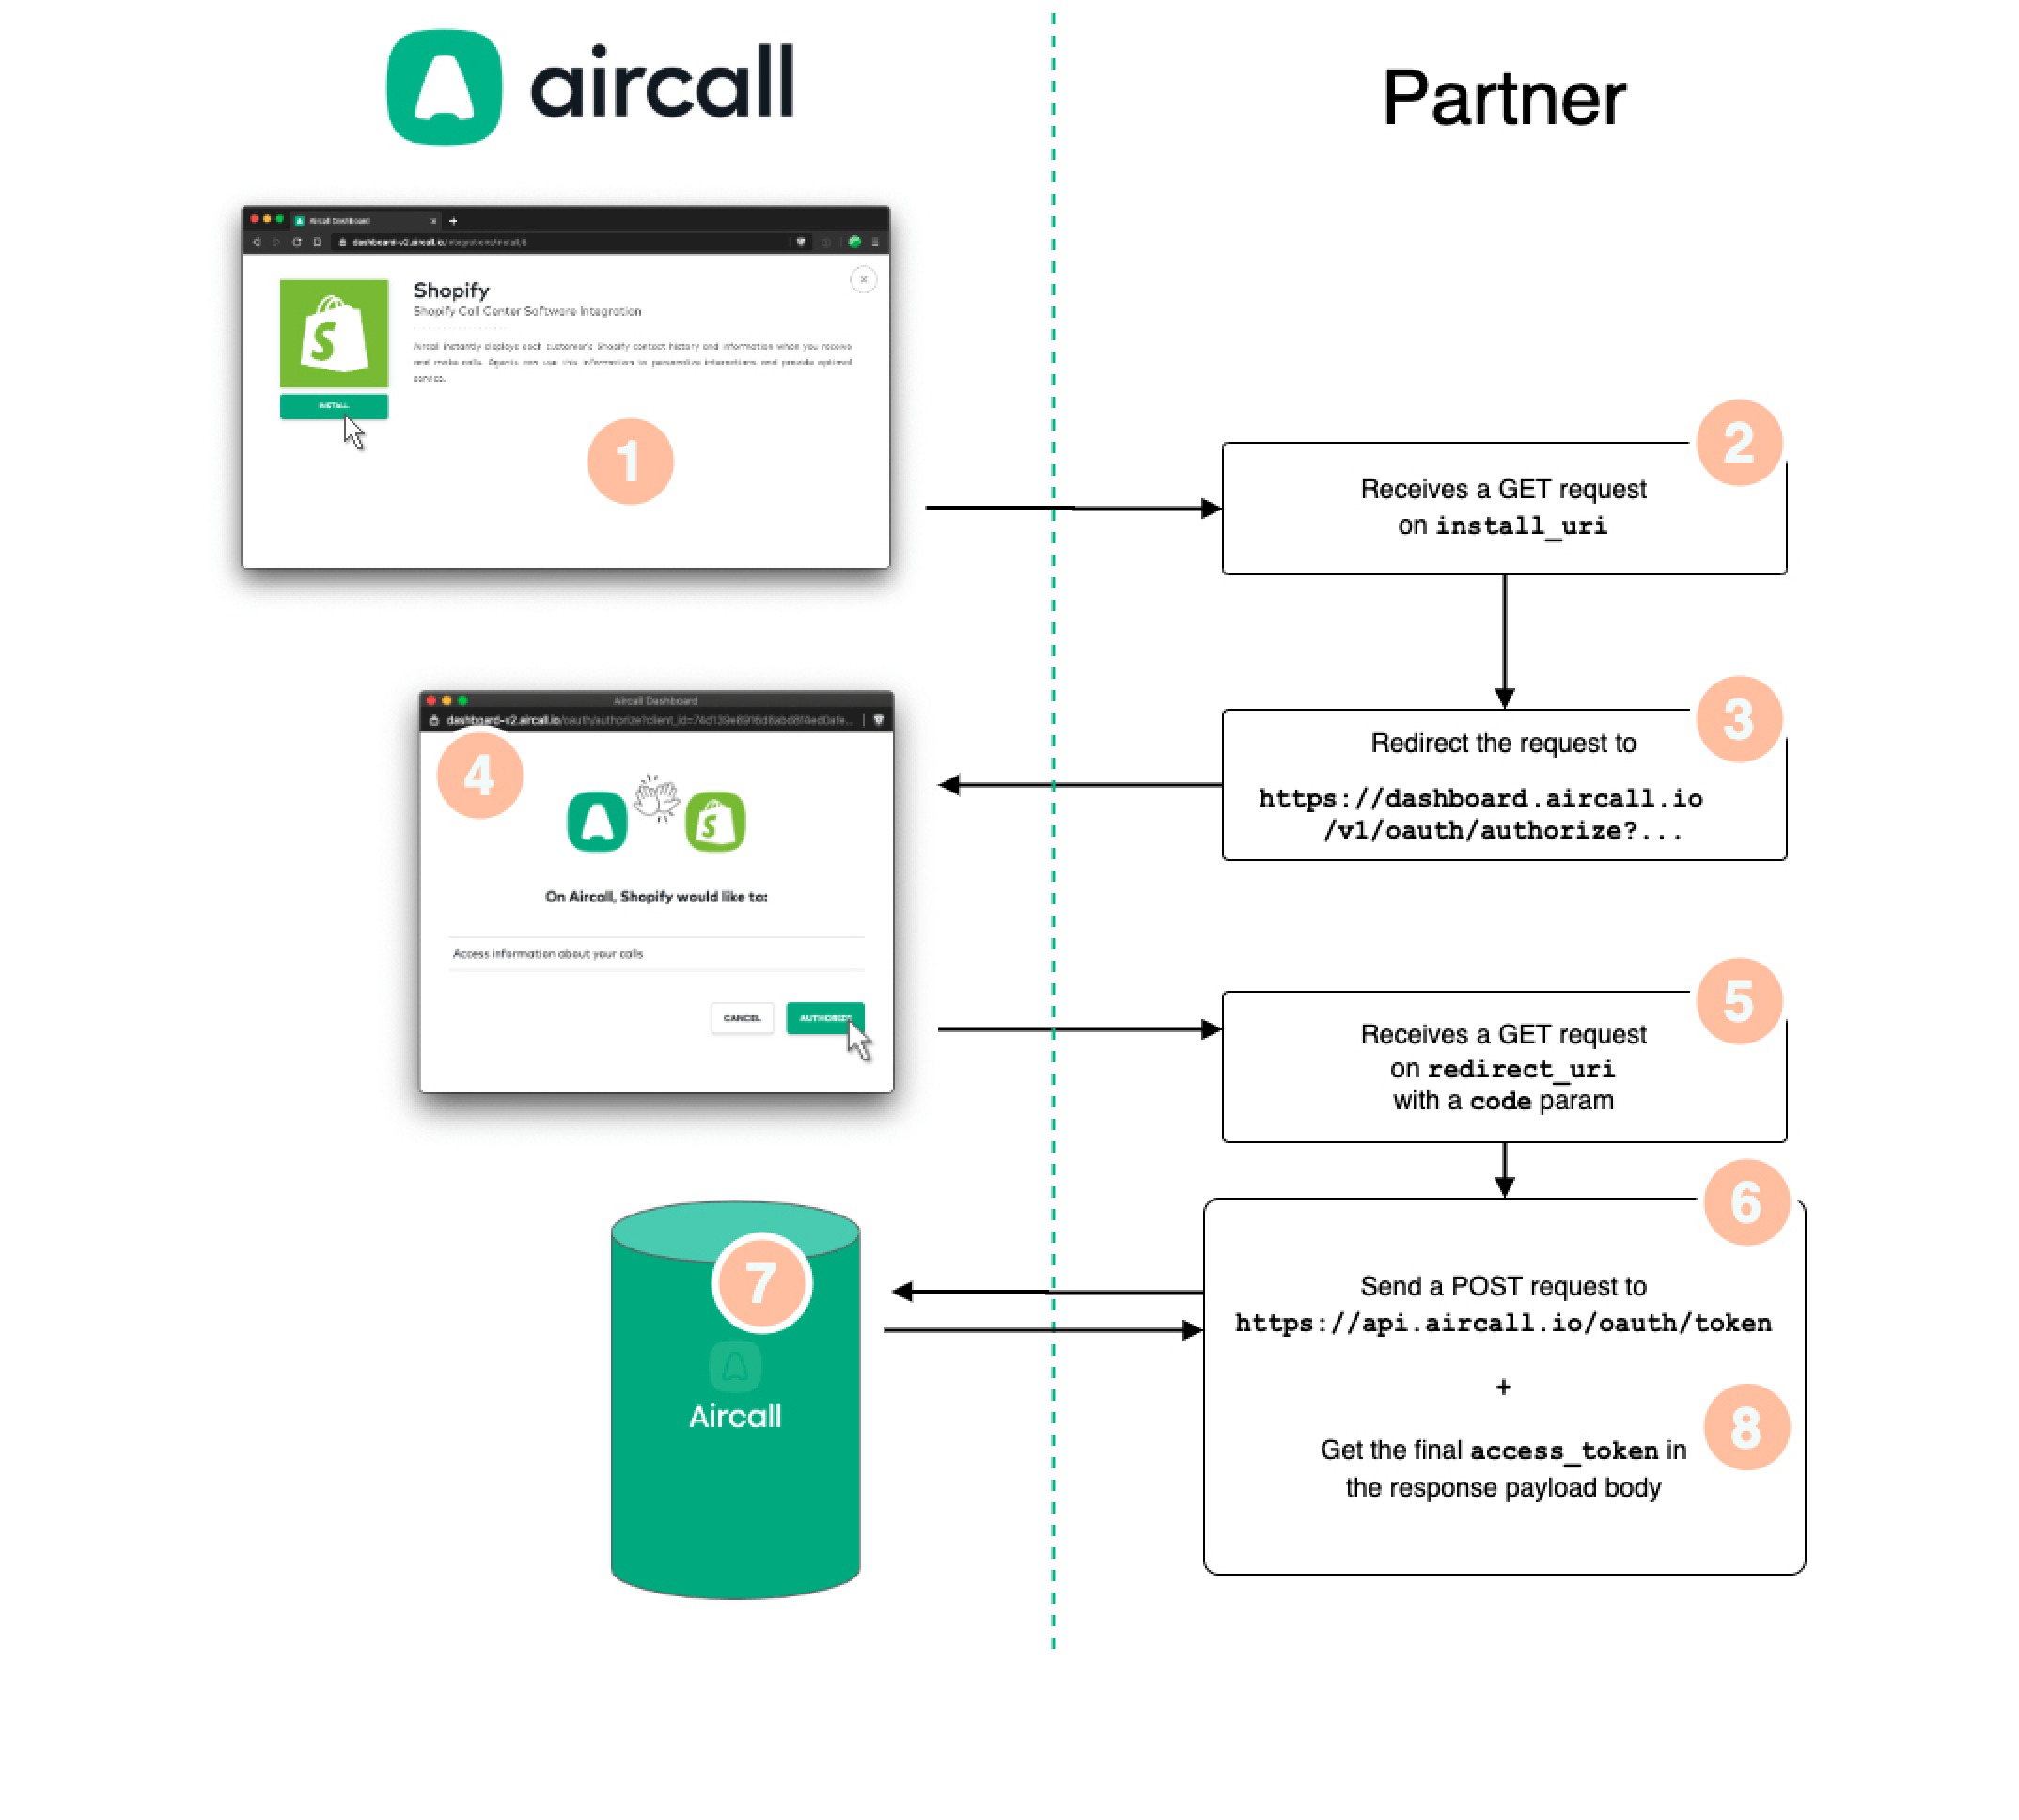
And it will look like this in Aircall's Dashboard:
The install_uri endpoint
install_uri endpointIn this section, we are going to implement steps 2 and 3 of the diagram above.
As seen in the public endpoint section above, the install_uri is defined in the src/routes.js file.
/**
   *  [GET] /oauth/install
   *  Install page, redirects to Aircall authorize URL
   */
  app.get('/oauth/install', oauthCtrl.install);
Thanks to express, we now have the following endpoint available publicly:
This endpoint uses the install method, defined and exported from the OAuth Controller line 18.
/**
 *  [GET] /oauth/install
 *  Redirect request to Aircall's consent page
 *  Second step of Aircall OAuth flow: https://developers.aircall.io/api-references/#oauth-flow
 */
const _install = (req, res) => {
  const weatherRedirectUri = `${Env.fetch('WEATHER_URL')}/oauth/callback`;
  const oauthUrl = Env.fetch('AIRCALL_OAUTH_AUTHORIZE_URL');
  const oauthId = Env.fetch('AIRCALL_OAUTH_ID');
  // Define Aircall's consent page url
  const url = `${oauthUrl}?client_id=${oauthId}&redirect_uri=${weatherRedirectUri}&response_type=code&scope=public_api`;
  res.redirect(url);
};
Now that we have defined our GET endpoint (step 2), we need to redirect any incoming requests to Aircall's consent page (step 3).
The _install method defines the full Aircall URL before redirecting the request to it.
Once interpolated, the URL will look like the following:
https://dashboard.aircall.io/oauth/authorize?client_id=YOUR_OAUTH_ID&redirect_uri=YOUR_PUBLIC_URL/oauth/callback&response_type=code&scope=public_apiThe redirect_uri endpoint
redirect_uri endpointIn this section, we'll implement step 5 of the diagram above.
Like the install_uri, the redirect_uri is defined in src/routes.js:
/**
 *  [GET] /oauth/callback
 *  Called by Aircall once the admin has authorized the application scope
 */
app.get('/oauth/callback', oauthCtrl.callback);
The following endpoint is now available publicly:
This endpoint uses the callback method, defined in the OAuth Controller:
/**
 *  [GET] /oauth/callback
 *  Requested by Aircall once the user has authorized the application
 *  Aircall must send a `code` query param
 */
const _callback = async (req, res) => {
  const errorPath = path.join(__dirname, '..', 'public', 'error.html');
  if (!req.query || !!req.query.error || !req.query.code) {
    Logger.error('[OauthCtrl][_callback] Missing or invalid params');
    res.sendFile(errorPath);
    return;
  }

  try {
    // Create and save a Company from the `code` sent by Aircall
    await Company.createFromOauth(req.query.code);
    const filePath = path.join(__dirname, '..', 'public', 'install.html');
    res.sendFile(filePath);
  } catch (e) {
    Logger.error(e.message);
    res.sendFile(errorPath);
  }
};
Aircall calls this endpoint with a GET request and a code in the URL query string. The Company.createFromOauth method then exchanges that temporary code for a Public API access_token. We'll cover how that works next.
Exchange the OAuth authorization code
In this section, we'll implement steps 6 and 8 of the diagram above.
The goal is to exchange the OAuth authorization code Aircall sent us for a Public API access_token we can use to make requests on behalf of the user.
Open src/models/company.js.
The createFromOauth method is an async function that does three things:
CompanyClass.exchangeOauthCode(oauthCode)— exchange the OAuth codeCompanyClass.createAircallWebhook(accessToken)— automatically create a webhook used to send Insight Cardsnew CompanyClass()— store the company info in DynamoDB
static async createFromOauth(oauthCode) {
  // 1. Create Aircall accessToken
  let accessToken = await CompanyClass.exchangeOauthCode(oauthCode);

  // 2. Create Aircall Webhook
  let webhookToken = await CompanyClass.createAircallWebhook(accessToken);

  // 3. Save Company object
  let company = new CompanyClass(accessToken, webhookToken);
  await company.save();

  return company;
}
1. exchangeOauthCode(oauthCode)
exchangeOauthCode(oauthCode)To convert an OAuth authorization code into an access_token, we use the following endpoint:
The request body needs:
code— the OAuth authorization coderedirect_uri— the/oauth/callbackURL built earlierclient_id— given by Aircallclient_secret— given by Aircallgrant_type— should always beauthorization_code
static async exchangeOauthCode(oauthCode) {
  if (!oauthCode) {
    throw new Error('[Company][exchangeOauthCode] oauthCode is undefined');
  }

  const body = {
    code: oauthCode,
    redirect_uri: `${Env.fetch('WEATHER_URL')}/oauth/callback`,
    client_id: Env.fetch('AIRCALL_OAUTH_ID'),
    client_secret: Env.fetch('AIRCALL_OAUTH_SECRET'),
    grant_type: 'authorization_code',
  };

  let payload = await Requester.POST('/v1/oauth/token', null, body);
  return payload.access_token;
}
Aircall returns the access_token in the response. We can use it to make API calls on behalf of the user.
2. createAircallWebhook(accessToken)
createAircallWebhook(accessToken)With an access_token in hand, we can make our first Public API request. The createAircallWebhook method creates a webhook that listens for call.created events:
Headers:
Authorization: Bearer ${accessToken}
Body:
{
  custom_name: 'Aircall Weather',
  url: 'https://my-weather-app-custom-url.ngrok.io/webhooks',
  events: ['call.created'],
}
Body params:
custom_name— optional, but helps identify this webhook laterurl— the URL Aircall will send events to. We'll define this endpoint in the next sectionevents— we only need call.created for this app
Once Aircall returns a response, we extract the webhook's unique token. We'll use it later to identify which Aircall account a webhook event is coming from.
3. new CompanyClass()
new CompanyClass()We now have both the Public API accessToken and the webhook token:
- The
accessTokenwill be used to send Insight Card API requests - The webhook token will be used to identify which Aircall account a webhook event is from
A new CompanyClass instance is created with both values, and the save() method stores them in DynamoDB.
async save() {
  let params = {
    TableName: DB_TABLE_NAME,
    Item: {
      CreatedAt: this.createdAt,
      ApiToken: this.apiToken,
      WebhookToken: this.webhookToken,
    },
  };

  await dynamoClient.put(params).promise();
}
Webhooks
The OAuth flow is now handled, and a webhook is created at the end of it listening for call.created events. Each time an inbound or outbound call starts on the user's Aircall account, Aircall sends a POST request to our server at /webhooks.
This endpoint is declared in src/routes.js:
/**
 *  [POST] /webhooks
 *  Called by Aircall every time a new webhook event is emitted
 */
app.post('/webhooks', webhooksCtrl.index);
Webhook controller
The index method handles any incoming POST request to /webhooks:
const WEBHOOK_EVENTS_HANDLED = ['call.created'];

const _index = (req, res) => {
  // Set HTTP 202 to avoid Aircall deactivating the webhook
  res.status(202);

  if (!req.body || !req.body.event) {
    res.json({ error: 'Body or event fields not defined' });
    return;
  }

  if (WEBHOOK_EVENTS_HANDLED.includes(req.body.event)) {
    if (!!req.body.data && !!req.body.data.id) {
      // Asynchronously trigger the flow
      startFlow(req.body);
      res.json({
        message: `Processing request for callId ${req.body.data.id}...`,
      });
    } else {
      res.json({ error: 'data or data.id not defined' });
    }
  } else {
    res.json({ error: `'${req.body.event}' event not handled` });
  }
};
We respond with 202 Accepted to prevent Aircall from automatically deactivating the webhook if processing takes too long. Read more in our webhooks overview.
Once we've confirmed the incoming event is one we handle (call.created), startFlow is called and a JSON response is sent.
startFlow is where the work happens. It does four things:
- Authenticate the request by looking up the company from the webhook token
- Extract location info from the caller's phone number
- Fetch weather info from OpenWeatherMap
- Build and send an Insight Card
const startFlow = async (webhookPayload) => {
  const callData = webhookPayload && webhookPayload.data;
  if (!callData) return;

  try {
    // 1. Authenticate request
    let companyData = await Company.getFromWebhookToken(webhookPayload.token);
    if (!companyData) return;

    // 2. Extract location from caller number
    let region = new Region(callData.raw_digits);
    let location = region.get();
    if (!location) return;

    // 3. Get weather
    let weatherData = await OpenWeather.getCityWeather(
      location.city,
      location.country
    );
    if (!weatherData) return;

    // 4. Build & send Insight Card
    let card = new InsightCard(location, weatherData);
    card.send(callData.id, companyData.ApiToken);
  } catch (e) {
    Logger.error(e.message);
  }
};
The Region model maps the caller's raw_digits to a city and country based on the country-code prefix. The mapping is built from the ITU country code database — see the src/models/region/ directory in the codebase.
Once we have the location and weather data, we build and send the Insight Card.
Insight Card
Read more about Insight Cards in our API reference or the Display contextual data to agents during calls guide.
Sending an Insight Card means making the following request:
Body:
{
  "contents": [
    {
      "type": "title",
      "text": "Weather"
    },
    {
      "type": "shortText",
      "label": "City",
      "text": "New York City",
      "link": "https://en.wikipedia.org/w/index.php?search=New York City"
    },
    {
      "type": "shortText",
      "label": "Temperature",
      "text": "80℉"
    },
    {
      "type": "shortText",
      "label": "Clouds",
      "text": "⛅️"
    }
  ]
}
Building the card
The InsightCard model assembles the contents array from the location and weather data:
constructor(locationData, weatherData) {
  this.contents = [];

  // City
  if (!!locationData && locationData.city) {
    this.contents.push({
      type: 'shortText',
      label: 'City',
      text: locationData.city,
      link: `https://en.wikipedia.org/w/index.php?search=${locationData.city}`,
    });
  }

  // Weather Data
  if (!!weatherData) {
    if (!!weatherData.temps) {
      this.contents.push({
        type: 'shortText',
        label: 'Temperature',
        text: weatherData.temps,
      });
    }
    if (!!weatherData.description) {
      this.contents.push({
        type: 'shortText',
        label: weatherData.description || 'Description',
        text: weatherData.emoji,
      });
    }
  }

  // Add the title only when there's content to show
  if (this.contents.length > 0) {
    this.contents.push({
      type: 'title',
      text: 'Weather',
    });
  }
}
Each piece of data is added as a shortText content block. The title block is only added when there's something to display.
Sending the card
Once the card is built, we send it to Aircall using the apiToken we stored during the OAuth flow:
send(callId, apiToken) {
  if (!this.contents.length) return;

  const path = `/v1/calls/${callId}/insight_cards`;
  const headers = { Authorization: `Bearer ${apiToken}` };
  Requester.POST(path, headers, { contents: this.contents });
}
Conclusion
In this guide, we walked through two flows of the Aircall Public API:
- OAuth, so users can install the Weather app on their account
- Webhooks, so our server reacts to call events in real time
The result is a working Insight Card that surfaces the caller's location, temperature, and weather on every call — automatically.
We didn't cover the HTML files, Docker setup, tests, DynamoDB schema, or the phone number to region matching. Be curious and navigate the codebase — it's all open source.
Updated 3 months ago