

OAuth implementation guide
Getting Started
This guide helps implementing the Aircall OAuth flow. Before yous tart make sure you have:
- You must have an Aircall account. Sign up as a customer here or if you qualify to be a tech partner you can then sign up for a developer account here.
- Familiarity with OAuth — new to it? Check the Authentication overview.
- OAuth credentials — If you haven't received them yet, apply to the Tech Partner program.
- A web server with two public HTTPS endpoints ready:
- one for your
install_uriand one for yourredirect_uri. - A local server works too, but it needs to be exposed via a tunneling tool like ngrok.
- one for your
OAuth flow overview
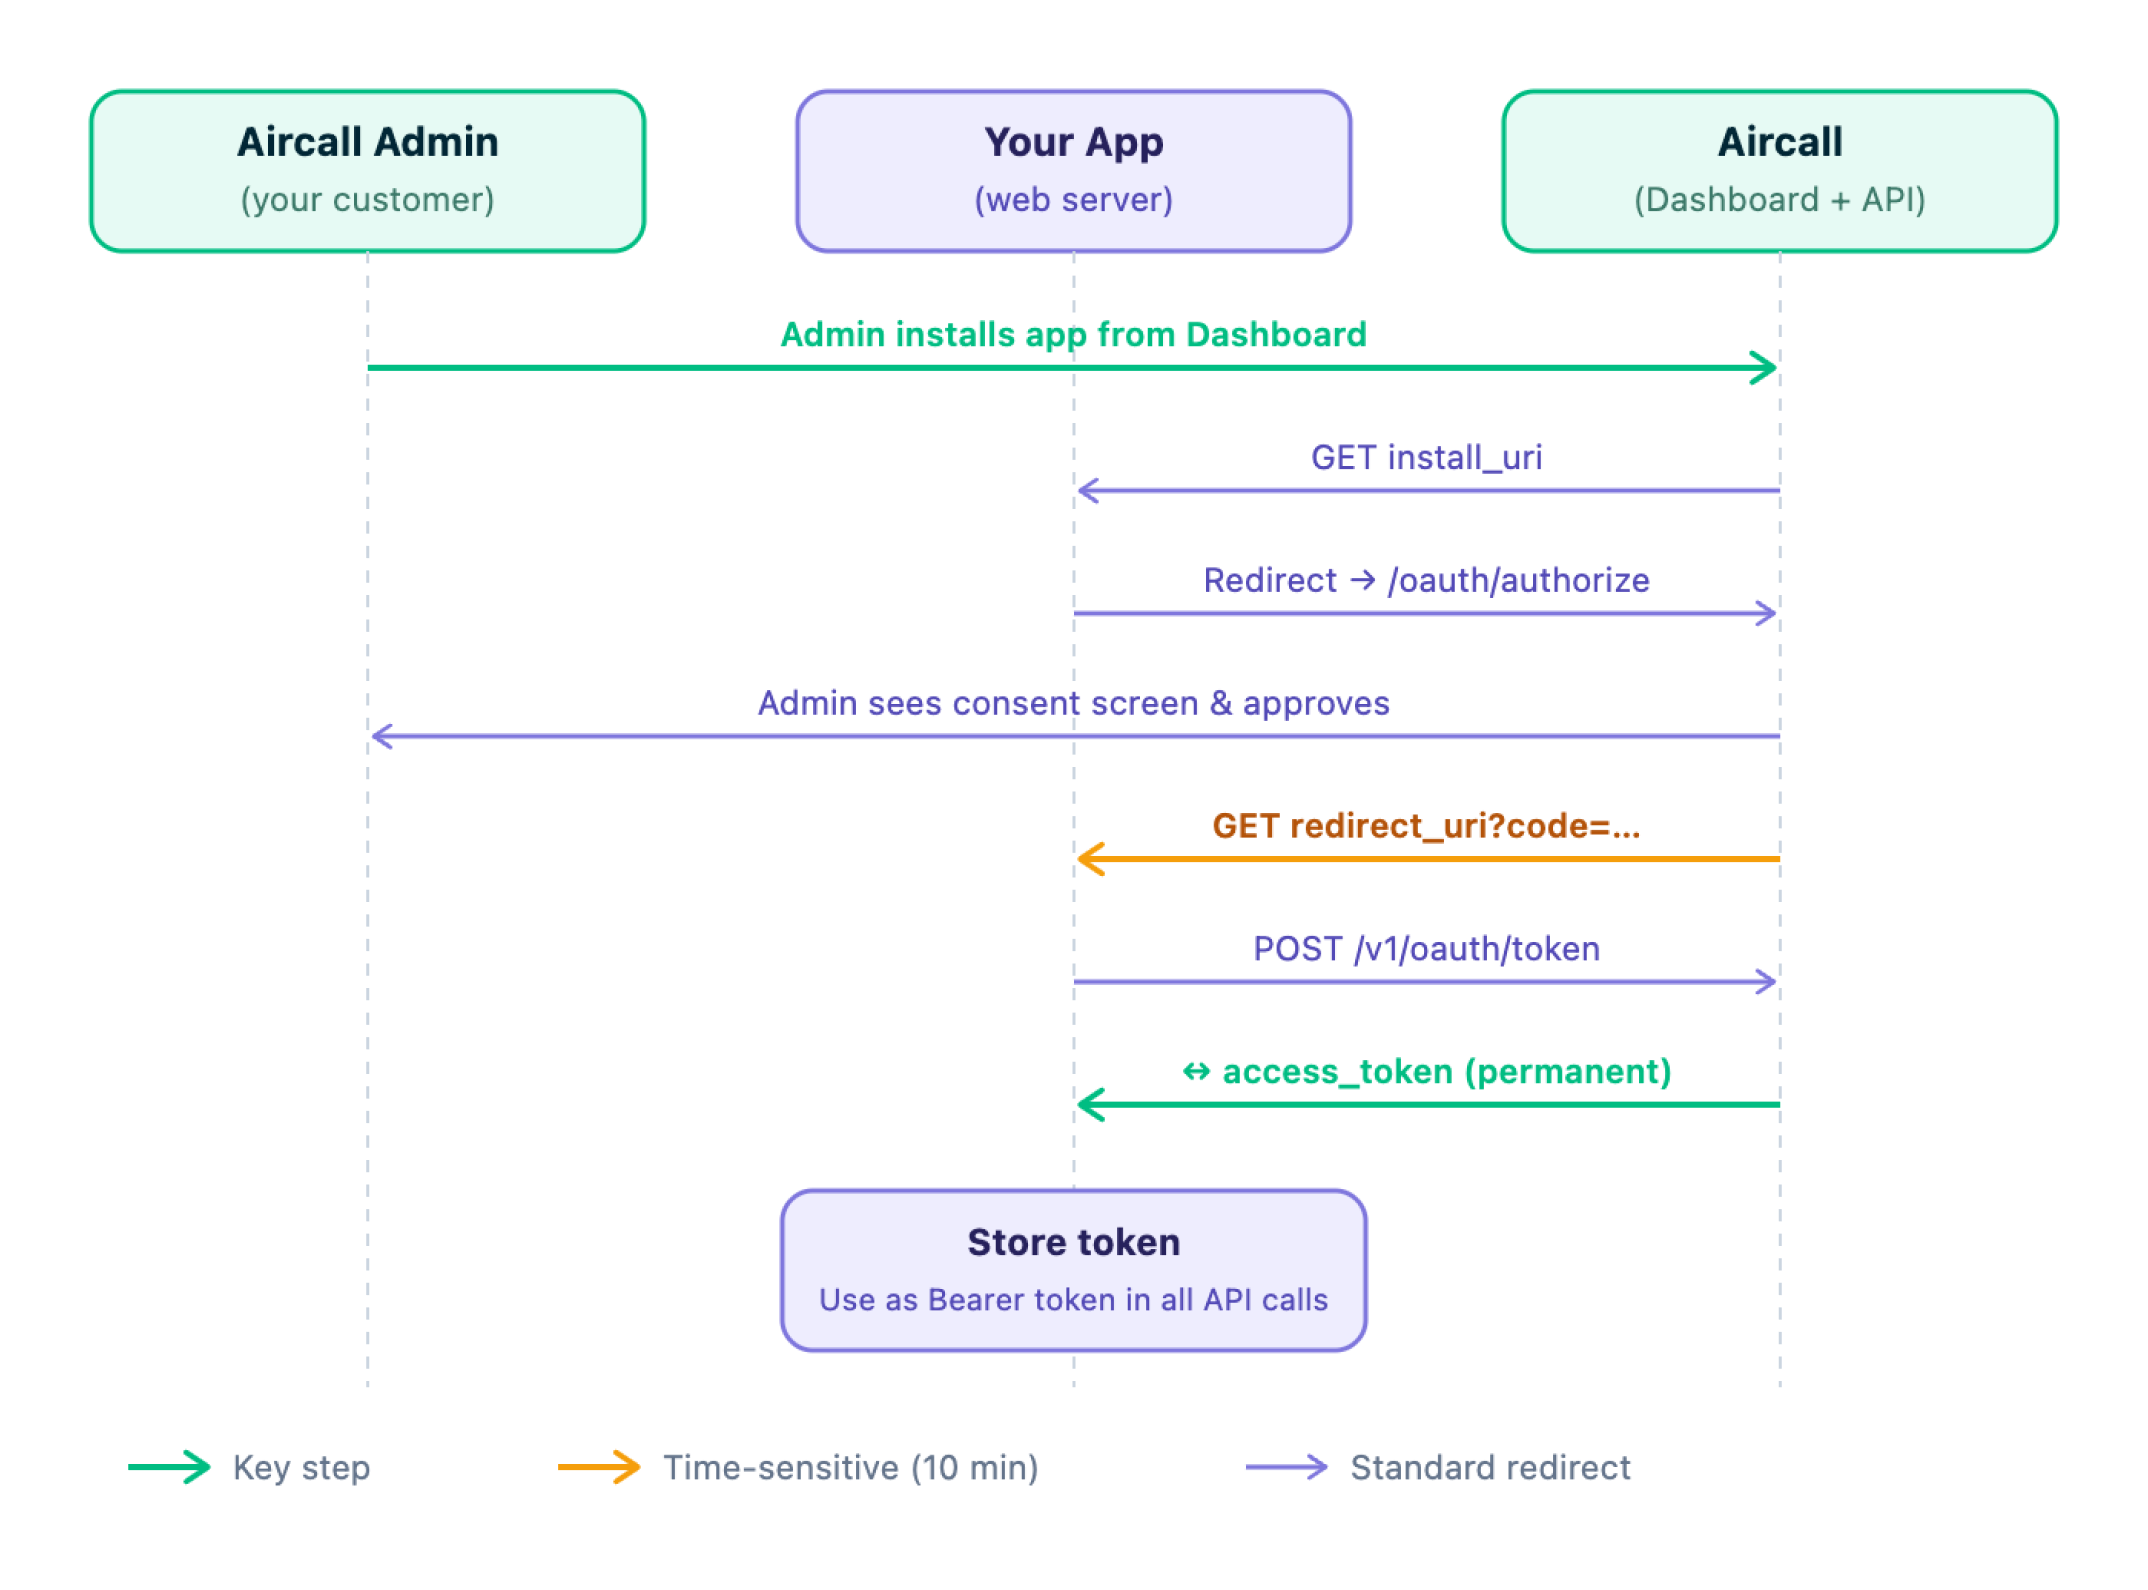
Before diving into the implementation, it's worth understanding what's happening at each stage. The OAuth flow involves three parties: your app, the Aircall Dashboard, and the Aircall API. The goal is to obtain a permanent access_token that your app can use to make API calls on behalf of an Aircall customer.
Step-by-step implementation
1. Set up a web server
Your server needs to handle two incoming requests from Aircall. Start with a basic Express setup:
// Server Setup
const express = require('express');
const bodyParser = require('body-parser');
const app = express();

// Import routes (made in the next step)
const aircallRoutes = require('./routes/aircall');

// Middelware
app.use(bodyParser.urlencoded({ extended: false }));
app.use(bodyParser.json());

// Mount all Aircall OAuth routes under /integrations/aircall
app.use('/integrations/aircall', aircallRoutes);

// Run
app.listen(5000, () => console.log('Server running on port 5000'));
2. Implement the install_uri endpoint
install_uri endpointWhen an Admin installs your app from the Aircall Dashboard, Aircall makes a GET request to your install_uri. This is your opportunity to show a settings page or onboarding instructions before redirecting the Admin to Aircall's authorization screen.
In your routes/aircall.js file, define the /oauth/install route. At minimum it must redirect to https://dashboard.aircall.io/oauth/authorize with the required query parameters:
// setup router...
const express = require('express');
const router = express.Router();

// Install route
// https://your.server.com/integrations/aircall/oauth/install
router.get('/oauth/install', (req, res) => {

   const params = new URLSearchParams({
      client_id:     'YOUR_CLIENT_ID',
      redirect_uri:  'https://your.server.com/integrations/aircall/oauth/callback',
      response_type: 'code',
      scope:         'public_api',
      state:         generateSecureState()
   });

   res.redirect(`https://dashboard.aircall.io/oauth/authorize?${params}`);
});

// Export...
module.exports = router;The
stateparameter is optional but strongly recommended. Generate a random value, store it in your session, and verify it matches when Aircall sends the Admin back to yourredirect_uri. This prevents CSRF attacks.
3. Admin approves your App
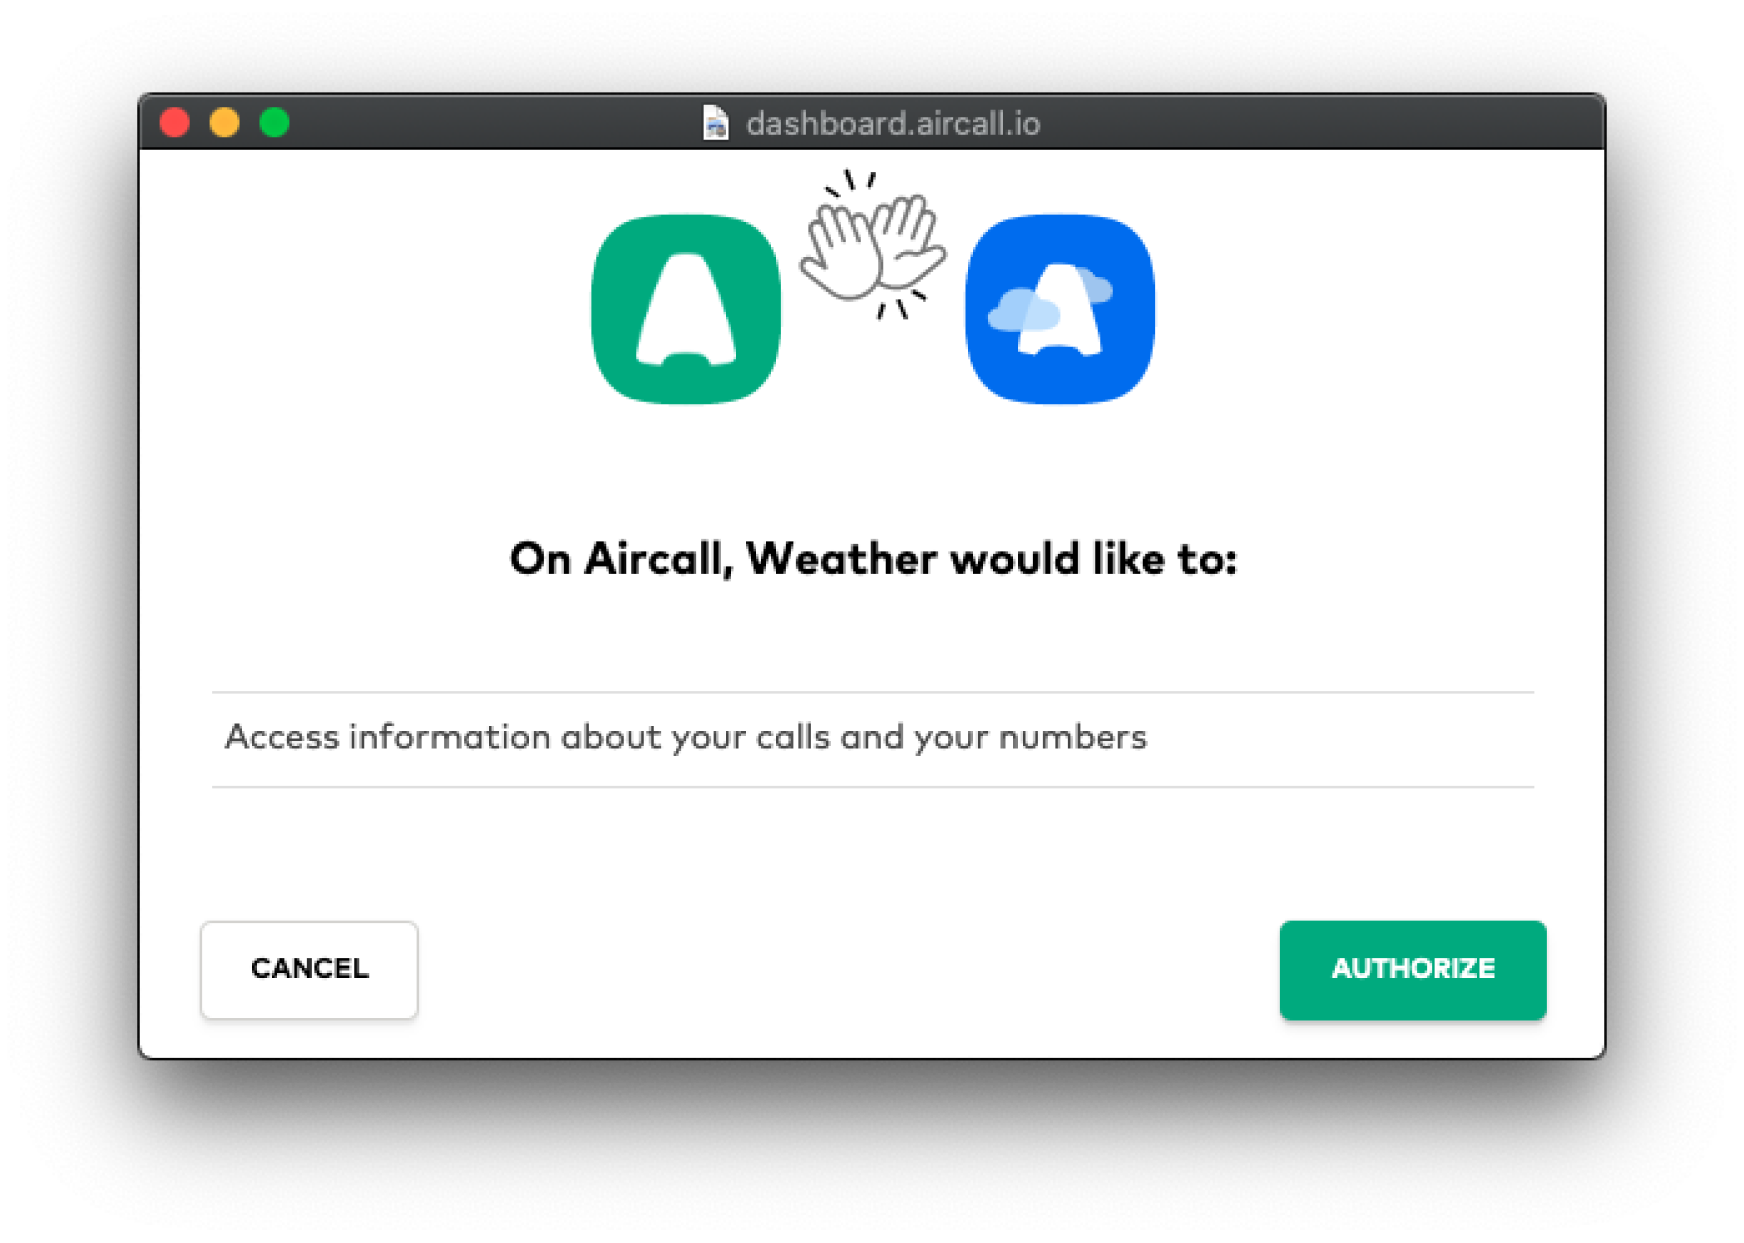
Aircall displays a consent screen to the Admin showing what your app is requesting access to. Only Admin users can approve — if a non-admin clicks the install link, they'll be redirected away.
There's nothing to implement here, but it's worth communicating this to your customers: make sure the person installing your integration is an Aircall Admin.
4. Implement the redirect_uri endpoint
redirect_uri endpointAfter the Admin approves, Aircall redirects them to your redirect_uri with a short-lived code in the query string. This code expires in 10 minutes — exchange it for an access_token immediately.
// setup router...
const express = require('express');
const router = express.Router();

// Import assets
const { startInstall } = require('../integrations/aircall/setupController);
const {
   retrieveAccessToken,
   completeSetup,
   verifyState
} = require('../integrations/aircall/setupService);


// Install route (👇 replaced previous code with a controller method)
router.get('/oauth/install', startInstall);

// Redirect route
// https://your.server.com/integrations/aircall/oauth/callback
router.get('/oauth/callback', async(req, res) => {
   const { code, state } = req.query;

   if (!verifyState(state)) return res.status(403).send('Invalid state');

   // 👋 Exchange code for access_token. This function is implemented in the next step.
   const accessToken = await retrieveAccessToken(code);


   // More about this in step 6
   await completeSetup(req.user, accessToken);

   // Redirect to our success URL or you can also redirect to your own URL
   res.redirect('https://dashboard.aircall.io/oauth/success');
});

// Export...
module.exports = router;The code is valid for 10 minutes only. If the exchange fails or times out, the Admin will need to go through the install flow again.
5. Exchange the code for an access_token
access_tokenSend a POST request to the Aircall API with your credentials and the authorization code. You'll receive a permanent access_token in response — this token does not expire.
Use the built-in fetch API to exchange the code:
const retrieveAccessToken = async (code) => {
   try {
      const response = await fetch('https://api.aircall.io/v1/oauth/token', {
         method: 'POST',
         headers: { 'Content-Type': 'application/json' },
         body: JSON.stringify({
            code,
            redirect_uri:  'https://your.server.com/integrations/aircall/oauth/callback',
            client_id:     'YOUR_CLIENT_ID',
            client_secret: 'YOUR_CLIENT_SECRET',
            grant_type:    'authorization_code'
         })
      });

      const data = await response.json();

      if (!response.ok) {
         throw new Error(data.message || 'Failed to retrieve access token');
      }

      return data.access_token;
   } catch (error) {
      // The code may have expired (10 min limit) or already been used.
      // Log the error and handle it gracefully in your app.
      console.error('Failed to retrieve access token:', error.message);
      throw error;
   }
};
6. Store the access_token
Implement completeSetup in your setupService to associate the token with the user and account in your database. Aircall automatically calls completeSetup when the OAuth flow completes.
const db = require(‘db’); // 👈 Replace this with your DB library

// Verify state helper
const verifyState = (state) => {...}

// Create webhooks helper (See our webhooks tutorials)
const createWebhooks = (accessToken) => {...}

// Retrieve access token
const retrieveAccessToken = async (code) => {...}

// Complete setup
const completeSetup = async (user, accessToken) => {

   // Create webhooks so you are notified of Aircall events
   const aircallWebhooks = await createWebhooks(accessToken);

   // Store integration related data in DB
   await db.integrations.save({
      provider:     'aircall',
      access_token: accessToken,
      user_id:      user.id,
      account_id:   user.accountId,
      status:       'active',
      scope:        'public_api',
      webhooksData:  aircallWebhooks,
      installed_at: new Date(),
   });
};

// Exports
module.exports = { retrieveAccessToken, completeSetup, verifyState };The
access_tokenis permanent and scoped to a single Aircall company. If a customer uninstalls and reinstalls your app, Aircall issues a new token. Store tokens in a way that supports updates (for example, use an upsert instead of an insert).
Troubleshooting
| Issue | What’s happening | How to fix |
|---|---|---|
| Authorization screen not showing | The user trying to install is not an Aircall Admin | Make sure you communicate that only Admins can complete the install |
| Code exchange fails with 400 | The authorization code has expired (10 min limit) or was already used | Exchange the code immediately after receiving it; each code can only be used once |
| Redirect not working in Aircall | Your install_uri or redirect_uri uses HTTP instead of HTTPS | Both URIs must use HTTPS — update your server and re-register the URIs with Aircall |
| You forgot to add the scope to the URL params | Add the public_api scope | |
| The redirect URL is not registered with your App in Aircall. | You’ll see an error in the network panel during the OAuth process. If so, contact ecosystem team to update your redirect URIs | |
| Receiving unexpected state value | Possible CSRF attack, or state wasn't stored correctly in the session | Verify state is stored server-side before step 2 and compared in step 4 |
Updated 3 months ago
What’s Next
Now that your OAuth flow is set up, you're ready to start making API calls on behalf of your customers. Check out the API reference for a full list of available endpoints, or explore the Webhooks guide to start receiving real-time events from Aircall.