-
ExploreCategories
Curate filtered lists in HubSpot for efficient and organised dialling sessions using the Aircall Browser Extension
In this guide you will learn 🎓
- How using HubSpot lists and the Aircall Browser Extension can boost efficiency and accuracy in regards to contacting leads or existing clients
- Active Lists vs Dynamic Lists
- How to Set Up the Lists and Do a Dialling Session
- Scenario One: New Leads to be Contacted
- Scenario Two: Following Up Leads using Tags
- Using the Aircall Browser Extension and Power Dialer
Please note- lists are a HubSpot feature. The amount of lists you can create depends on the level of your HubSpot plan. Please reach out to your HubSpot account manager to discuss further
How does using HubSpot Lists and Aircall boost efficiency and accuracy when contacting leads?
Lead outreach is a fundamental part of the Sales cycle and efficiency is a key component when it comes to conversion. That initial touchpoint is a critical stage, so therefore it is essential that your Sales team are organised and methodical when it comes to your first phone call with a lead. As your team scales, an Outbound sales manager needs repeatable and centralised processes in order to ramp up Sales agents faster and really assess performance. This is where Aircall and Hubspot are here to help you.
HubSpot lists allow you to create lists of contacts depending on their property values. It enables you to segment your contacts or companies based on common features, using nothing more than simple filters. Aircall empowers your agents to seamlessly and diligently work through these lists through the Click-to-Dial and the Power Dialer features encompassed within the Aircall Browser Extension.
Whether you are simply looking for organisation, or speed is your main sphere of interest, Aircall and Hubspot easily coordinate with one another to ensure that all your leads are contacted, and in a systematic fashion.
Active Lists vs Static Lists: What’s the Difference?
HubSpot offers two different types of lists: Active and Static.
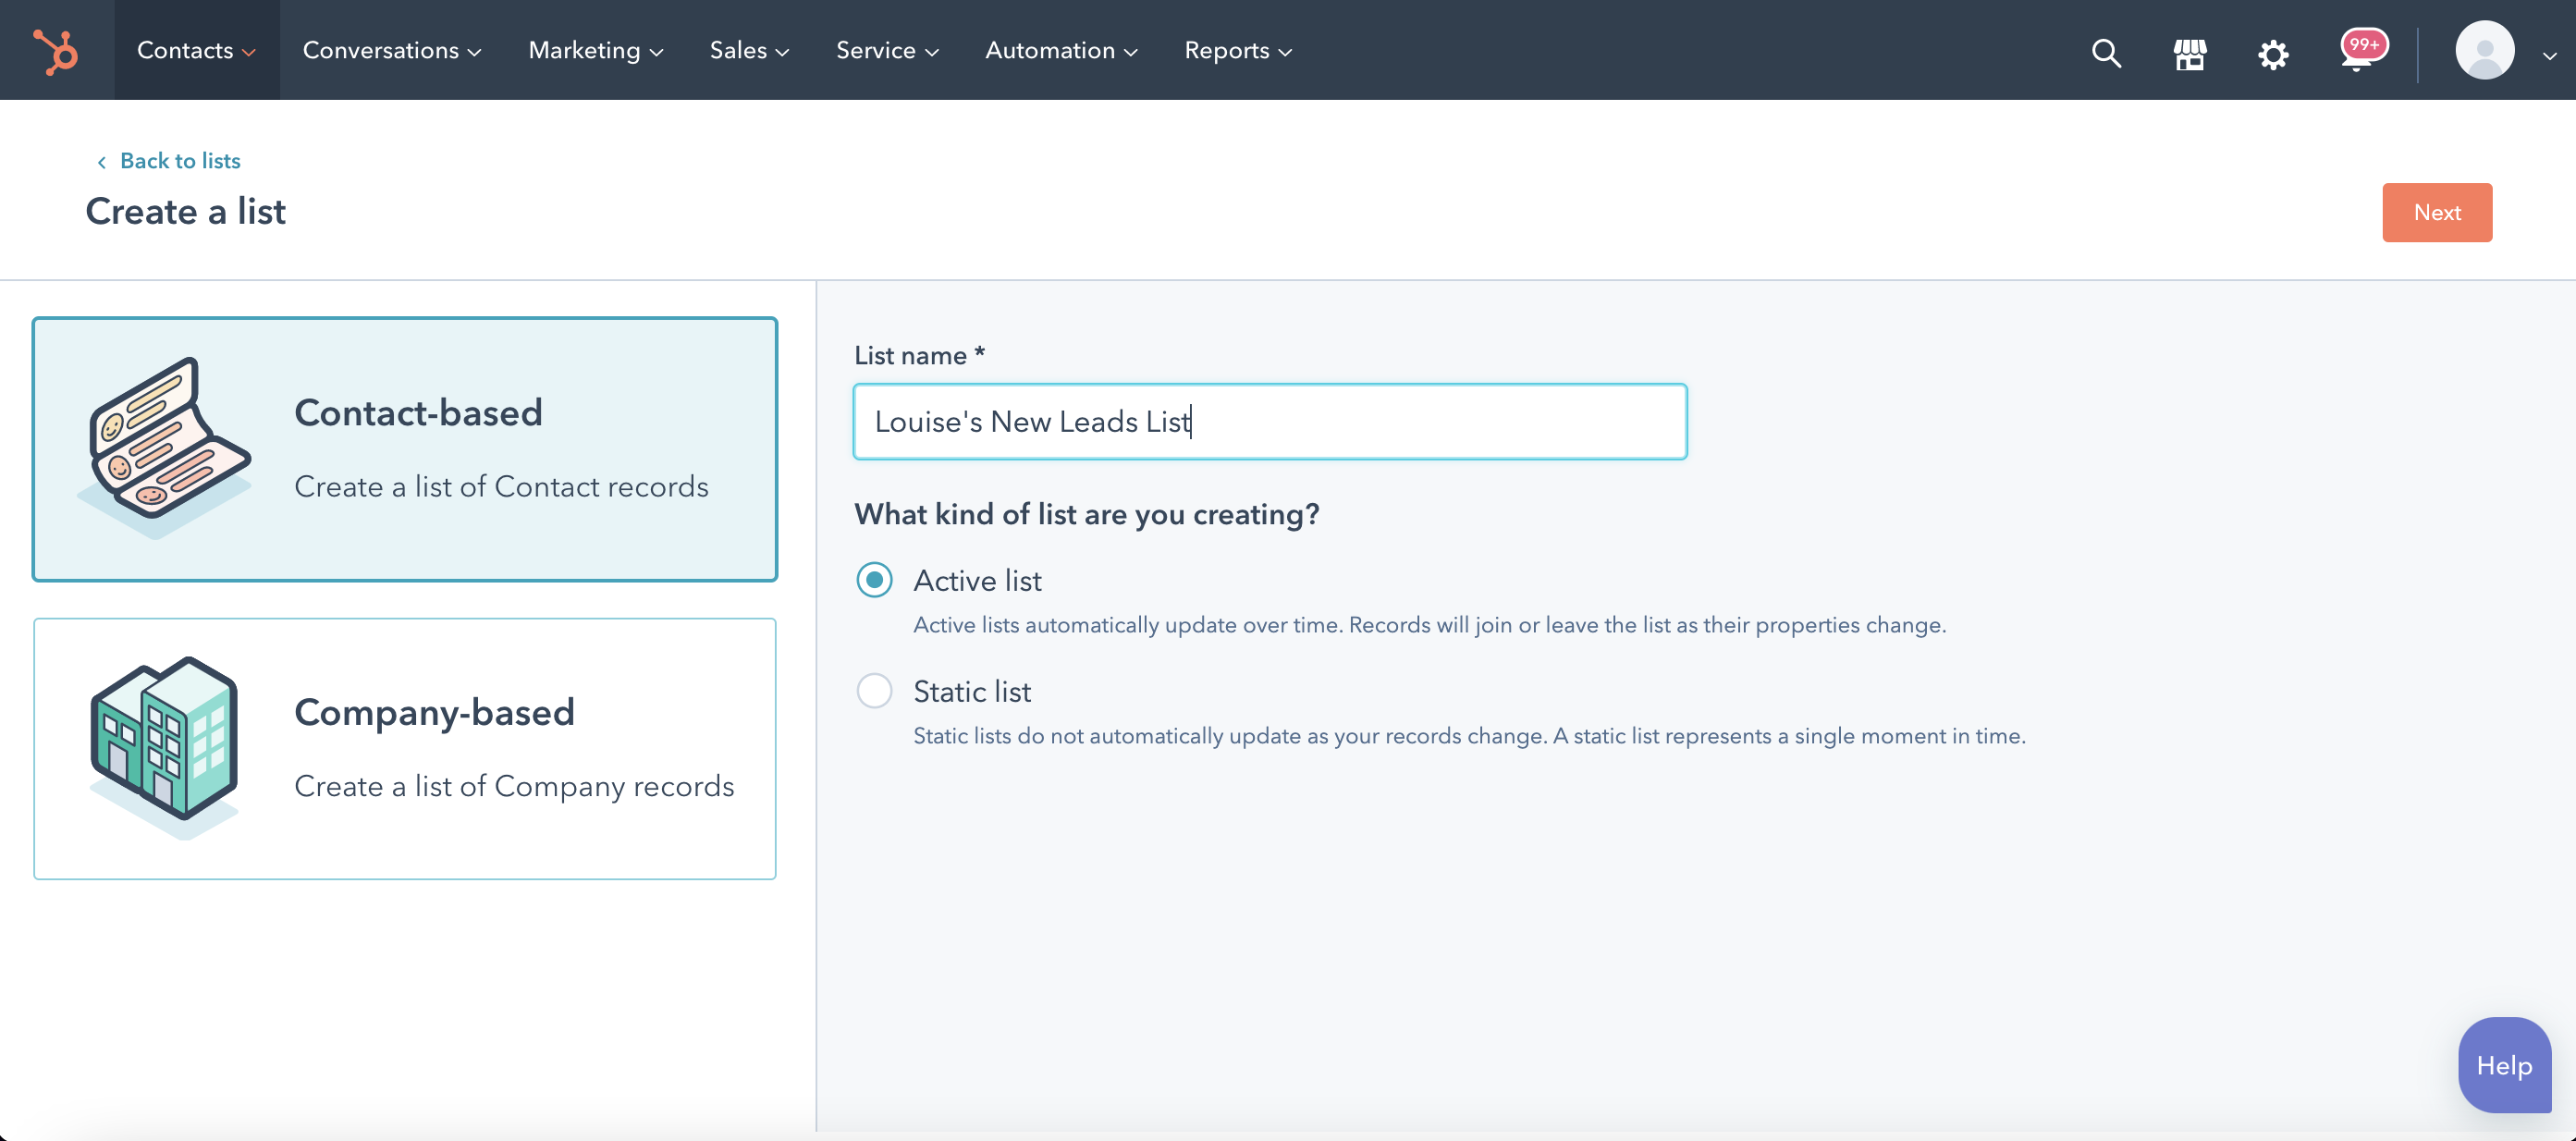
Active lists automatically update their members based on the criteria set in the filters. Contacts or Companies will automatically join the list when they meet the criteria, and automatically leave the list when they no longer do. It allows you to have an automatic rolling list of contacts created from new lead generation, without having to reset filters, manually funnel in contacts or refresh browsers. It is for this reason we choose to use Active lists.
Static lists do not automatically update, and only include records who met the criteria at the time of saving the list. New contacts will not be automatically added, even if they met the criteria.
How to Create Lists in HubSpot for Power Dialer Sessions 🔨
Scenario One: New Leads to be Contacted
This section requires some familiarity with creating lists in HubSpot. If you are new to this aspect of HubSpot, please reference HubSpot's Guide to Creating Lists
For this instance, we are going to use the scenario of freshly generated leads that need to to be contacted on the phone for the first time by one of your Sales agents. The process outlined below will allow you to create an all encompassed space for your teams to start calling those fresh new leads, minimising window switching and maximising call volume.
Create a new list from the Contacts section. We are going to create a Contact Based Active List
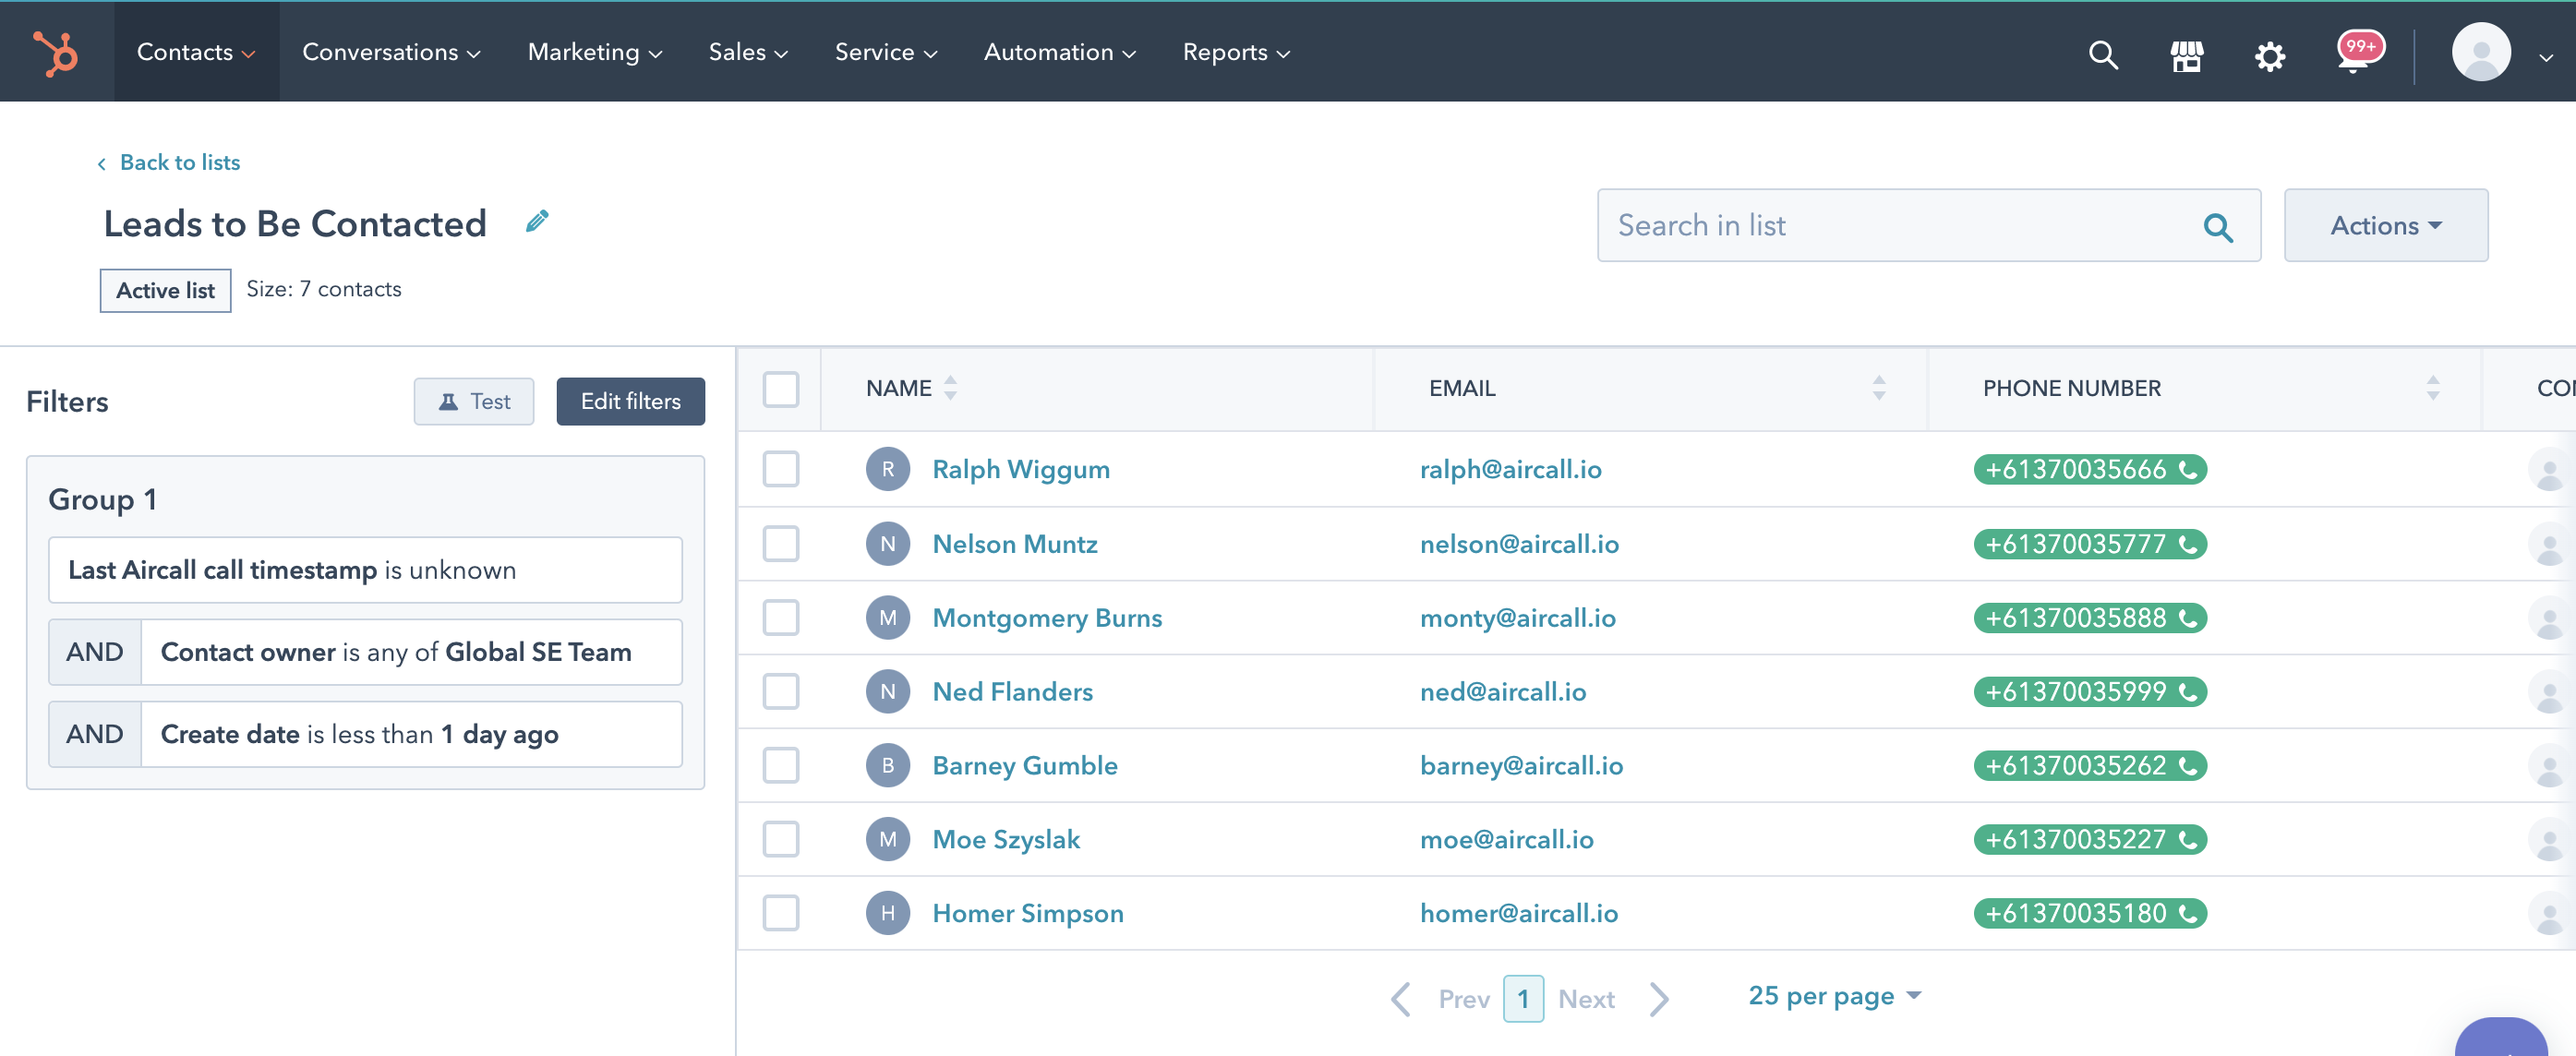
To create the list, we are going to filter using 3 Contact Properties:
Last Aircall call timestamp- this field is initially populated by Aircall upon the first call to a contact. It is then updated with every call. As these fresh leads are created, this field will remain empty/unknown which indicates no call has taken place to this contact. We will leverage this as a parameter to distinguish leads that require a first call.
Add Filter →
Contact Properties.
Contact Property →Last Aircall call timestamp
Last Aircall call timestamp →is unknownCreate Date- this field is native to HubSpot and automatically populates once the contact has been created. Depending on your use case, you may have pre-existing contacts in your HubSpot environment that have not been contacted via Aircall before and may not necessarily need to be. To exclude these from the freshly generated leads list, you can set the create date parameter to a timeframe related to your lead creation.
Add Filter →
Contact Properties.
Contact Property →Create Date
Create Date →is less than x days agoContact Owner- this field is native to HubSpot and displays the owner of the contact. By including this filter, it allows us to create personal lists for specific HubSpot users/Sales agents. By personalising the lists, it eliminates the possibility of ‘double-handling’ by agents if they were to work off of one communal list at the same time.
Add Filter →
Contact Properties.
Contact Property →Contact Owner
Contact Owner →Select HubSpot User
Once you have applied those filters, click on ‘Save List’ and give it a few moments to generate all contacts that meet the criteria. After initiating your dialling session, once your call is completed, the Last Aircall call timestamp field will populate (Known), which means the contact no longer meets the criteria to be on the list and will be automatically removed.
If you call a lead and they do not answer, or they wish to be called back at a later date, you cannot add them back to the list as the Last Aircall call timestamp field is now populated. You can however, create a secondary list which uses Aircall Tags to bring them back into a dialling session. We will go through this below.
Scenario Two: Following Up Leads using Tags
This section requires some familiarity with creating lists in HubSpot. If you are new to this aspect of HubSpot, please reference Hubspot's Guide to Creating Lists. It also requires familiarity with creating tags in the Aircall dashboard. Please see our guide to Creating Tags
If you have called through your lead lists and either received no answer, or a request for a call at a later date, you will need to do follow up calls. The simplest way to do this is to use the Aircall Tags, and utilise these in a Hubspot list.
To begin, you will have to create the tag ‘Follow Up’ on the Aircall dashboard. You will subsequently need to create at least one other tag that is to be added once the follow up call has been executed. These are generally outcomes of phone calls e.g ‘Interested’, ‘Demo Booked’ , ‘Do Not Contact Again’. This will replace the Follow Up tag, and therefore remove the contact from the list of follow up calls as it no longer meets the criteria.
When using the tag option, to avoid the lead remaining in the list after the follow up call and potentially being contacted again, it is essential your agents add a new tag during the call to ensure the contact is removed. If you would like to standardise this, consider enabling the Aircall Mandatory Call Tagging Feature which is available on Professional and Custom Plans.
To create the HubSpot list, we are going to filter using 3 Contact Properties:
Last used Aircall tag- this a dynamic field that populates the most recently used tag in calls associated with the contact. After your first call with a fresh lead, if they need a follow up you will add the ‘Follow Up’ tag which will be populated in this field.
Add Filter →
Contact Properties.
Contact Property →Last used Aircall tagLast Aircall call timestamp- this field is initially populated by Aircall upon the first call to a contact. It is then updated with every call. If you wish to leave a specific time frame between your initial call and the follow up call, you can set the filter to reflect this.
Add Filter →
Contact Properties.
Contact Property →Last Aircall call timestamp
Last Aircall call timestamp →is more than x days agoContact Owner- this field is native to HubSpot and displays the owner of the contact. By including this filter, it allows us to create personal lists for specific HubSpot users/Sales agents. By personalising the lists, it eliminates the possibility of ‘double-handling’ by agents if they were to work off of one communal list at the same time.
Add Filter →
Contact Properties.
Contact Property →Contact Owner
Contact Owner →Select HubSpot User
You have now successfully created your lists with all your qualified leads! 🎉 For your initial dialling session, your list will consist of the leads who match the criteria at the time. But it will continuously update for as long as the list is active, as new contacts are created that meet the parameters.
Start your Dialling Session
Please note- the Aircall Browser Extension is accessible on all Aircall plans. The Power Dialer feature of the Aircall Browser Extension is only available on Professional or Custom plans. Please reach out to your Aircall account manager to discuss further, and see our guide How to Use the Aircall Power Dialer for more information
Now that you have created your list, you are ready to start dialling! In order to get started, you will first have to ensure you have installed the Aircall Browser Extension (compatible with Google Chrome or Microsoft Edge). You then have two options of how to proceed:
- Click-to-Dial Session:
Enable the ‘Highlight Phone Numbers’ option for an easy Click-to-Dial process. As you click on the highlighted number, your desktop application will automatically pop up to launch your call.
2. Power Dialer Session:
Enable the ‘Show Numbers Panel on Pages’ option. It will automatically scan the page for the numbers on the list, and once this has been completed click on ‘Power Dialer +’ to start your campaign in the Aircall app.
No matter what list scenario you have chosen, once your contacts do not meet the criteria set in the filters, they will automatically be removed from the list. No need to refresh the page, or break the dialling focus of your agents. Happy Calling!
Please note- there will be a slight delay in terms of removal as the data from Aircall is definitively logged into HubSpot. It will not be noticeable when working with bigger lists of 50+ contacts as the rep will be already working on the next contact
Food for Thought💡
- You can set up automations for assigning leads to your agents through simple workflows in HubSpot. This is especially useful if you need to import a Google Sheet or .CSV file of leads and would like to round robin the assignment based on internal criteria. Please see the HubSpot guide here on Setting up your Import Files and their guide on Assigning Ownership of Records.
- You can use the lists and the dialling process for any group of contacts regardless of the stage of the Sales cycle. You simply have to apply the filters to the relevant contact properties to populate the list.
- You can also track your agents lead contact time on these freshly generated leads by setting up simple workflows in Hubspot. Learn how to do this in our guide Tracking your agent’s Time to First Contact in HubSpot using Custom Properties & Workflows.
Need some extra help?
If you need an extra hand with implementing this workflow, or you would like to learn more about similar automations to enhance your operations, check out our Professional Services page to book time with our Technical Consultants.