-
ExploreCategories
Monitor your agent's average time to call newly generated leads in HubSpot using a series of simple Custom Properties and Workflows within HubSpot’s automation platform
In this guide you will learn 🎓
- How tracking Time to First Contact can elevate your reporting and performance revision
- How to set up the fields and workflows to track this
- Creating Your Custom Fields
- Setting Up the Workflows
- Aggregating the data into a Report & Dashboard
Please note- this customisation is enabled solely in HubSpot. Workflows are only accessible on Professional & Enterprise plans within HubSpot. Please reach out to your HubSpot account manager to discuss this further.
How does tracking the lead response time in HubSpot add value to your Outbound sales operations?
In a hyper-competitive marketplace, prompt lead outreach is crucial for sales conversion. Aircall empowers your users to efficiently and effectively contact these leads with features such as automatic call logging and our Click-to-Dial function, all without leaving your HubSpot CRM. The data generated by these Aircall calls is seamlessly leveraged in HubSpot, which is why we recommend taking advantage of these two powerful tools to elevate your reporting.
Tracking your lead response time in HubSpot using Aircall call data will allow you to monitor your agents average lead response time in regards to newly generated leads. Aircall easily aligns with HubSpot Custom Properties to create a simple workflow that can be autonomously controlled and tailored to your specific needs. You can create a bespoke dashboard with the information that is most important to you as opposed to pre-set dashboards and parameters.
Following the guidance in this article, you can pinpoint the lead response time down to the minute for each contact and easily convert it into an average lead response time for your agents. The results of the granular data captured by Aircall and this workflow will enable you to improve your lead response time and monitor the performance of your Sales team.
How to set up your Custom Fields & Workflows to calculate Time to First Contact 🔨
Step One: Creating your Custom Properties
This section requires some familiarity with creating and managing Custom Properties in HubSpot. If you are new to this aspect of HubSpot, please reference HubSpot’s guide to Creating and Editing Properties
The two key points that we need to establish the Time to First Contact are based off of two timestamps:
- The time when the lead was created
- The time of the first Outbound Aircall call since the creation of the lead
Our Time to First Contact result is the time difference between these two, and the numerical value that we want populated on the Contact Object. With that in mind, how do we retrieve these, and where do we store the end calculation?
It requires us to create 5 Custom Properties on the Contact Object to capture the timestamps. Below we will go through what each one is, why we use them and what parameters are used to create them.
Once you have created these, you can choose which ones you want to make visible on your view. If you prefer a less cluttered view, it is not relevant to display Outbound Contacted Date or Time to First Contact (Milliseconds)
- Create Date (the time the lead was created) -this field operates as the foundation of the calculation and the first point of setting it in motion. This is native to HubSpot, and therefore you just have to add this to your view.
Outbound Contacted (whether the lead has been contacted yet) -this field sits as ‘Unknown’ upon creation of the lead and functions as a way to block the re-enrolment of the contact once a call has taken place.
Group=
Aircall Properties. Field Type=Single-line TextOutbound Contacted Date (the time of the first Outbound Aircall call) -the lead has been contacted and therefore this field works as the clock stopper. We rely on the existing property
Last Aircall call timestamp, which is a dynamic field and will change with every Aircall call. In order to seal the value from the first Aircall call, we have to transfer it to a static property.Group=
Aircall Properties. Field Type=Calculation
Calculated Property Type=Time between
Start Date=Create Date. End Date=Last Aircall call timestampTime to First Contact (Milliseconds) (static field used to transfer the value from Outbound Contacted date) -this is where the copied calculated time is sealed and stored. HubSpot natively copies values in milliseconds, so we have to create a more readable time field.
Group=
Aircall Properties.Field Type=Number.Format=Formatted NumberTime to First Contact (Hours) or (Minutes) (the final calculated difference between the two timestamps) -A readable time field where the calculated time is stored and pulled into the reporting. Depending on your use case, you may want to have this in either Hours or Minutes.
Group=
Aircall Properties. Field Type=Calculation
Calculated Property Type=Custom Equation
Select propertyTime to First Contact (Milliseconds)/3,600,000(hours) or60,000(minutes)
You can name these Custom Properties anything you wish, however the above names are the most logical way to create and track these fields.
HubSpot natively stores the time & date of when the Contact was created (Create Date), however it does not natively store the time of the first Outbound Aircall call (Outbound Contacted Date). In order to populate this value, we have to set up an automation through workflows. In the same workflow, we also need to transfer the value from the dynamic field Outbound Contacted Date to the static field Time to First Contact (Milliseconds)
Step Two: Setting Up the Workflows
This section requires some familiarity with creating and managing Workflows in HubSpot. If you are new to this aspect of HubSpot, please reference HubSpot’s guide to Creating Workflows
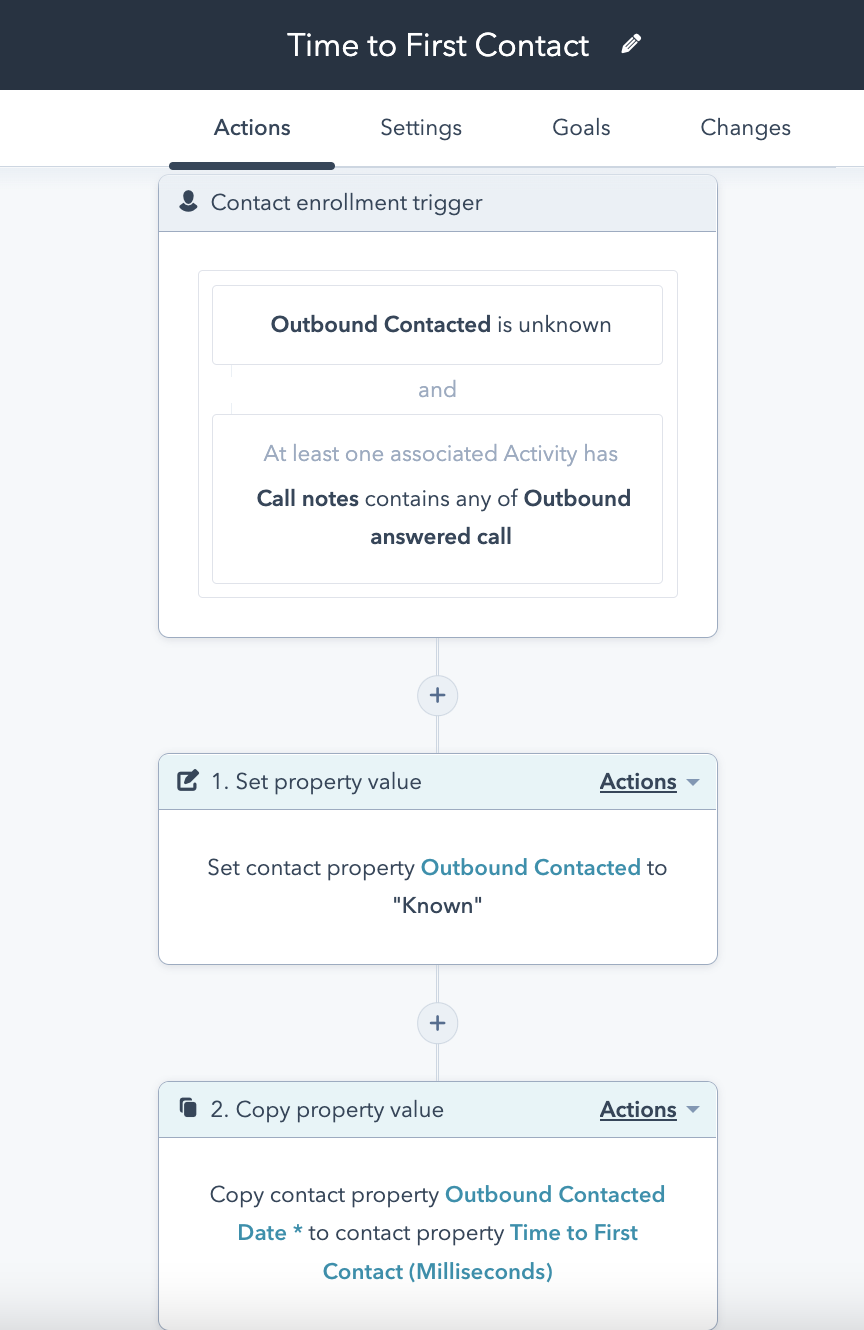
Select ‘Create a New Workflow→ Contact Based→ Blank’ The enrolment trigger for this workflow is going to be based on certain Contact Properties and Activity Properties.
Filter Type= Contact Properties-> Outbound Contacted= Is Unknown
AND
Filter Type= Activity Properties-> Call Notes= Contains any of Outbound Answered Call

Once this has been created, we need it to trigger an update of two different property values once the lead has been qualified and enrolled in the workflow. These properties are the custom ones we created, and therefore are stored on the Contact object.
- Set Property Value→ Target Object=
Contact→ Property to set:Outbound Contacted→ Outbound Contacted:Known
- Copy Property Value→ Property to Copy From=
Outbound Contacted Date→ Target Object=Contact→ Property to Copy To=Time to First Contact (Milliseconds)
Once you have completed the above steps, your workflow should look like this:
Before you turn the workflow on, be sure to click ‘Review & Publish’. Under the ‘Enrolment’ section, you have the option of applying this workflow to existing leads that have not been contacted yet, or to apply this workflow to any leads created from the point you turn it on. Your decision will be based on whether you already have leads that have not been contacted in your pipeline.
Turn the workflow on and run a test against a lead that has not yet been contacted. You should see the 5 fields we created at the start populated with the relevant information. The key field is the Time to First Contact (Hours) or (Minutes) which holds the concluding value.
Congratulations 🎉 You’ve created your Time to First Contact workflow!
Step Three: Aggregating the data into a Report & Dashboard
This section requires some familiarity with creating and managing dashboards in HubSpot. If you are new to this aspect of HubSpot, please reference HubSpot’s guide to Creating and Managing Dashboards
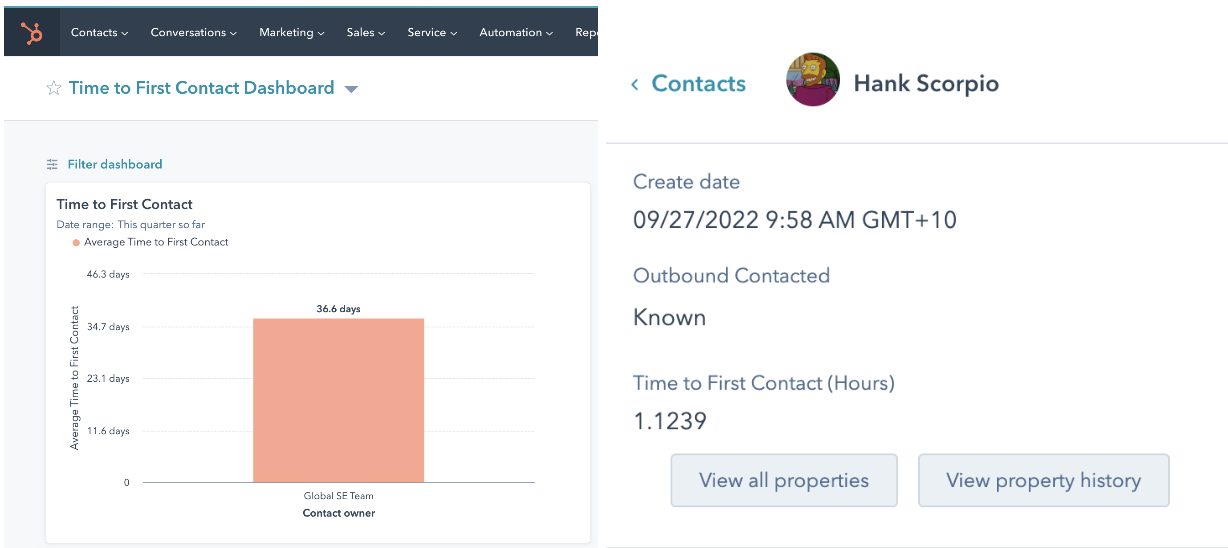
Now that you have the data stored on your contact object, you can leverage this Time to First Contact value into a customised report and dashboard.
In the below composition, our Time to First Contact is based on Hours as per the rules of the equation set in Step 1. Yours may be in minutes, depending on what you chose during your calculation.
Create a new report e.g ‘Time to First Contact’. You are going to create it from scratch on a Single Object→ Contacts. Select the below properties to add to your report:
- Time to First Contact (Hours)
- Contact Owner (this is based on the assumption that the Contact Owner will always be the agent who made the first Outbound call)
Proceed through to the visualisation page, where you will drag these two properties into the ‘Display’ panel. The Time to First Contact (Hours) property will be displayed under ‘measured by’ and you will have to open the drop down menu and select ‘Average’. You can choose how to visualise the graph format as you wish, as long as the two properties are there.
Click on Save, and select to add it to a new dashboard (generally speaking, the report and the dashboard will be named the same thing). You will then be able to see each agent’s average lead contact time!
Food for Thought💡
- You can use this workflow for any type of call. If your use case differs to the one outlined above, you can make adjustments at the trigger level by still using the ‘Call Notes= Contains any of’, but just including a different type of Aircall call e.g
Missed Call. - If you do not want to track the lead time for every single call, you can give your agents an element of autonomy of which calls are enrolled in the workflow by leveraging the Aircall tags. Tags are stored in the
Last Used Aircall Tagsproperty on the Contact level. Your agents add this tag during their call with the lead, which will then trigger the workflow just for qualified calls. - The reporting is based on the assumption that the Contact Owner is the user doing the first Outbound call to the lead. If this is not your use case, you can instead store the Caller information as opposed to the Contact Owner and use that property while creating your reports and dashboards.
Need some extra help?
If you need an extra hand with implementing this workflow, or you would like to learn more about similar automations to enhance your operations, check out our Professional Services page to book time with our Technical Consultants.