-
ExploreCategories
If you are building an integration with Aircall that accesses Aircall's customers data, then you will need to set up OAuth and understand how that can be done with Aircall.
This tutorial will guide you through the Aircall OAuth flow, and show you how it works in few steps. All the technical details are described in the API References, in the OAuth - Technology Partner section.
If you want to see a practical example of how to implement the Aircall OAuth flow, check out our Ruby example app on GitHub!
OAuth flow description
The goal of the OAuth flow is to get an access_token that will be used to authenticate each request you will do to Aircall Public API. Admins will consent your app to access their Aircall data.
The flow is started when Admins install an app from the Aircall Dashboard. That's when Aircall redirects the Admin to your
install_uri.
This step is often used to display a Settings page, instructions on how to use the app, any useful information for the Admin. Even it doesn't do anything specific, it must forward the user to[POST] https://dashboard.aircall.io/oauth/authorize.Once redirected to Aircall, Admins will authorize your app to access their Aircall data. That's when Aircall redirects the Admin to your
redirect_uri.
Use this step to get the OAuth authorizationcode.Once redirected to your
redirect_uri, you will need to exchange the OAuth authorizationcodefor anaccess_token.
Steps
- Get your OAuth credentials
- Setup a Web server
- Implement the Install URI endpoint
- Implement the Redirect URI endpoint
- Retrieve a permanent
access_token - Store the
access_token - BONUS: automatically create a Webhook
1 - Get your OAuth credentials
A client_id and a client_secret are needed to use the OAuth flow. Please contact us on marketplace@aircall.io.
To create your OAuth application on Aircall, you will need to provide both an install_uri and a redirect_uri. Make sure you have them ready!
2 - Setup a Web server
Aircall will send Authentication requests to your server. Open your code editor and make sure to have a web server ready.
javascript/**
 *  server.js
 *  Configure your app server with express
 */

const express = require('express'),
      bodyParser = require('body-parser');

const app = express();

// body-parser will be useful later
// to extract POST params Aircall will send
app.use(bodyParser.urlencoded({ extended: false }));
app.use(bodyParser.json());

const PORT = 5000;
app.listen(PORT, () => {
  console.info('[server] server started');
  console.info('[server] visit http://localhost:' + PORT);
});
Save this file and start your web server:
node server.js
Now that we have a web server up and running, we can start implementing the two endpoints dedicated to Aircall OAuth flow.
3 - Implement the Install URI endpoint
The first endpoint we will implement is the install_uri one and will look like this: https://your.server.com/aircall/oauth/install.
As seen in the OAuth flow description section, Aircall will fetch the install_uri endpoint when an Admin starts the OAuth flow.
javascript/**
 *  server.js
 */

...

/**
 *  Endpoint requested by Aircall as the first step of the Install flow
 */
app.get('/aircall/oauth/install', (req, res) => {
  // Aircall endpoint that we need to redirect this request to:
  const aircallUrl = 'https://dashboard.aircall.io/oauth/authorize';

  // client_id given by Aircall when you registered your app:
  const clientId = 'YOUR_CLIENT_ID';

  // Callback endpoint given to Aircall when registering your app (see next step)
  const callbackUri = 'https://your.server.com/aircall/oauth/callback';

  // The final url composed of:
  // - clientId
  // - callbackUri
  // - response_type=code
  // - scope=public_api
  const finalUrl = aircallUrl
                   + '?client_id=' + clientId
                   + '&redirect_uri=' + callbackUri
                   + '&response_type=code'
                   + '&scope=public_api';

  // Redirect immediately this request to the finalUrl
  res.redirect(finalUrl);
});
The install_uri endpoint will have to redirect your user to the following URL:
https://dashboard.aircall.io/oauth/authorize?client_id=XXXX&redirect_uri=XXXX&response_type=code&scope=public_api
The required parameters are :
client_id: provided by Aircall.redirect_uri: will be implemented in step 4.response_type: must becode.scope: must bepublic_api.
Optionally, a state can also be added:
state: A string value created by your app to maintain state between the request and callback. This parameter should be used for preventing Cross-site Request Forgery and will be passed back to you, unchanged, in yourredirect_uri.
Check the OAuth terminology section of our Developer API References documentation to better understand how the Aircall
/oauth/authorize query params should be built!
In the code example above, we configured our /aircall/oauth/install endpoint to immediately redirect the Admin to the Aircall Dashboard. This step can also be used to display a Settings page, instructions on how to use the app or any useful information for the Admin!
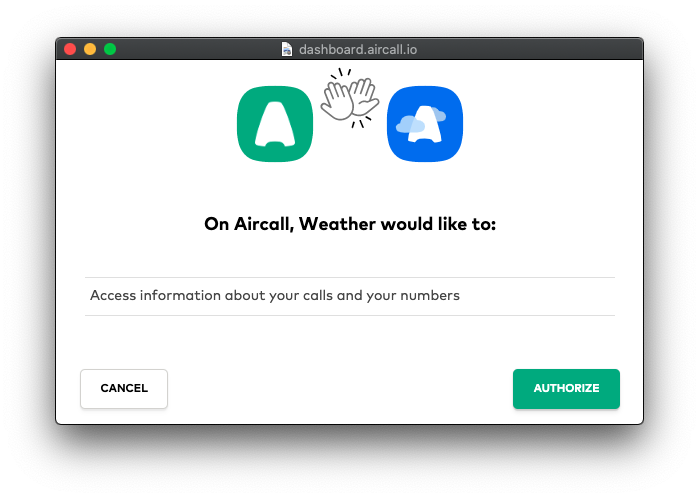
Calling https://dashboard.aircall.io/oauth/authorize will display the approval popup:
Install URIs must use HTTPS as they will communicate over SSL connection.
4 - Implement the Redirect URI endpoint
Once the Admin clicks on the green Authorize button on the previous popup, they will be forwarded to your redirect_uri endpoint.
The URL will look like this: https://your.server.com/aircall/oauth/callback
Aircall will provide an OAuth code in the query param that will expire 10min after being generated. This OAuth code needs to be exchanged for a permanent access_token via the Public API (see following step).
After that step is done, the OAuth flow is completed!
javascript/**
 *  server.js
 */

...

/**
 *  Endpoint requested by Aircall after Admin authorizes your app,
 *  with the OAuth code needed to get the final `access_token`
 */
app.get('/aircall/oauth/callback', (req, res) => {
  const oauthCode = req.query.code;

  // will be implemented at next step!
  retrieveAccessToken(oauthCode);

  // At this point, the flow is over.
  // You can either display your own success screen or Aircall's one:
  const successUrl = 'https://dashboard.aircall.io/oauth/success';
  res.redirect(successUrl);
});
Redirect URIs must use HTTPS as they will communicate over SSL connection.
5 - Retrieve a permanent access_token
Now that the flow is over, we need to exchange the OAuth code for a permanent access_token. This access_token will then be used as a Bearer token in each Public API request you'll make.
Retrieving this access_token can be done by sending a HTTP POST request to https://api.aircall.io/v1/oauth/token with the following body params:
code: the OAuthcodesent by Aircall in step 4.redirect_uri: the URL defined in step 4.client_id: given by Aircall's team when you registered your app.client_secret: given by Aircall's team when you registered your app.grant_type: must beauthorization_code.
javascript/**
 *  server.js
 */

...

// We'll need the https module to send HTTP requests
const https = require('https')

// Takes an oauthCode given by Aircall,
// exchanges it for a permanent access_token,
// and associates it to the current user
const retrieveAccessToken = (oauthCode) => {
  // Define the HTTP options:
  let options = {
    host: 'api.aircall.io',
    path: '/v1/oauth/token',
    method: 'POST',
    headers: { 'Content-Type': 'application/json' }
  };

  // Define the request's body:
  const body = {
    'code': oauthCode,
    'redirect_uri': 'https://your.server.com/aircall/oauth/callback',
    'client_id': 'YOUR_CLIENT_ID',
    'client_secret': 'YOUR_CLIENT_SECRET',
    'grant_type': 'authorization_code'
  };

  // Define the POST request:
  const req = https.request(
    options,
    res => {
      let payload = '';
      res.on('data', data => { payload += data });
      res.on('end', () => {
        // the accessToken we need is in this payload response!
        const accessToken = payload.access_token;

        // will be implemented in next step!
        storeAccessToken(accessToken);
      });
    }
  );

  // Attach the body to the request and execute it
  req.write(JSON.stringify(body));
  req.end();
}
6 - Store the access_token
Once the access_token is retrieved via the https://api.aircall.io/v1/oauth/token URL, we need to store it on our server and associate it to the current user.
javascript/**
 *  server.js
 */

// Match the Public API accessToken to one of your user
// Here you should have access to the user logged in with the current session.
// Save the accessToken in your own database!
const storeAccessToken = (accessToken) => {
  // In this example, we'll use mongoose' syntax.
  // Please adapt this function to your own database:
  curentUser.aircallAccessToken = accessToken;
  currentUser.save();
}
After this step, you can start sending requests to Aircall Public API as the user and access all their data! Please check our API References documentation to see an exhaustive list of endpoints.
7 - BONUS: automatically create a Webhook
Using Aircall Public API gives you lots of flexibility and will allow you to fetch, create or update data whenever you want. You can also listen to Aircall's Webhook events to receive real-time information about Aircall customers.
Only call happening on Aircall numbers associated with the integration will be emitted. Please check the following article on the Knowledge Base for more information.
A list of all available Webhook events is available on our API References page.
To start receiving Webhook events on your server, you will need to create a Webhook reference on your customer's Aircall account and to build a dedicated endpoint to register in Aircall.
Here we're going to explain how to register a Webhook inside Aircall, using the [POST] https://api.aircall.io/v1/webhooks endpoint.
In the response payload body, Aircall returns the newly created Webhook with a unique token. As this token will be sent in each Webhook event payload, it must be used to associate a Webhook event to your Users.
javascript/**
 *  create-webhook.js
 */

const https = require('https')

// Takes a User accessToken
// and creates a Webhook in your User's Aircall account
const createWebhook = (accessToken) => {
  // Define the HTTP options:
  let options = {
    host: 'api.aircall.io',
    path: '/v1/webhooks',
    method: 'POST',
    headers: {
      'Content-Type': 'application/json',
      'Authorization': 'Bearer ' + accessToken
    }
  };

  // Define the Webhook's body:
  const body = {
    'custom_name': 'YOUR_APP_NAME',
    'url': 'https://your.server.com/aircall/webhook'
  };

  // Define the POST request:
  const req = https.request(
    options,
    res => {
      let payload = '';
      res.on('data', data => { payload += data });
      res.on('end', () => {
        // Here the Webhook has been created
        // The unique token can be extracted from the payload:
        const webhookToken = payload.webhook.token;

        // TODO: store this webhookToken on your User model
      });
    }
  );

  // Attach the body to the request and execute it
  req.write(JSON.stringify(body));
  req.end();
}
More information on this Webhook endpoint in our API References documentation.