-
ExploreCategories
Ensure consistently accurate logging of Aircall calls by tidying your phone number database on a regular, scheduled basis
In this guide you will learn 🎓
- Why it is important to have correctly formatted numbers in HubSpot when using Aircall
- How to Set Up your HubSpot Workflows and Schedules
- Step One: Data Management- Checking your phone field usage using HubSpot Reporting
- Step Two: Creating your HubSpot Workflow
Please note- this process is enabled using HubSpot OperationsHub and Workflows. These are only accessible on Professional & Enterprise plans within HubSpot. Please reach out to your HubSpot account manager to discuss this further.
Why is it important to have correctly formatted numbers in HubSpot when using Aircall?
E.164 number format is an internationally recognised standard phone number format that helps ensure calls always reach the correct destination. At Aircall, when it comes to call logging in HubSpot, we follow suit!
When your phone numbers are saved in the E.164 format, our systems can always detect the correct phone number in HubSpot. This allows Aircall calls to correctly map the call log against the correct contact or company. This in turn means that you get the accurate information on the insight cards, and you will not end up with duplicate records for contacts.
When you have leads coming into HubSpot from multiple different platforms, whether it is automatic or manually, it is easy to end up with inconsistency across number formatting. Using HubSpot Operations Hub, this powerful tool allows you to easily clean your data and to also automate the process. This will improve your experience with the Aircall x HubSpot integration, as it will mean a seamless running of your daily operations when using both platforms.
How to Set Up your HubSpot Workflows 🔨
Step One: Data Management- Checking your phone field usage using HubSpot Reporting
Before we begin building the workflow, it is important that we do an assessment on what phone field is the dominantly used one. This is because we need to know what field to trigger the automations off of. While it is likely going to be the standard Phone number or Mobile number field for most use cases, for those using custom properties to store contact numbers it is recommended to do this check.
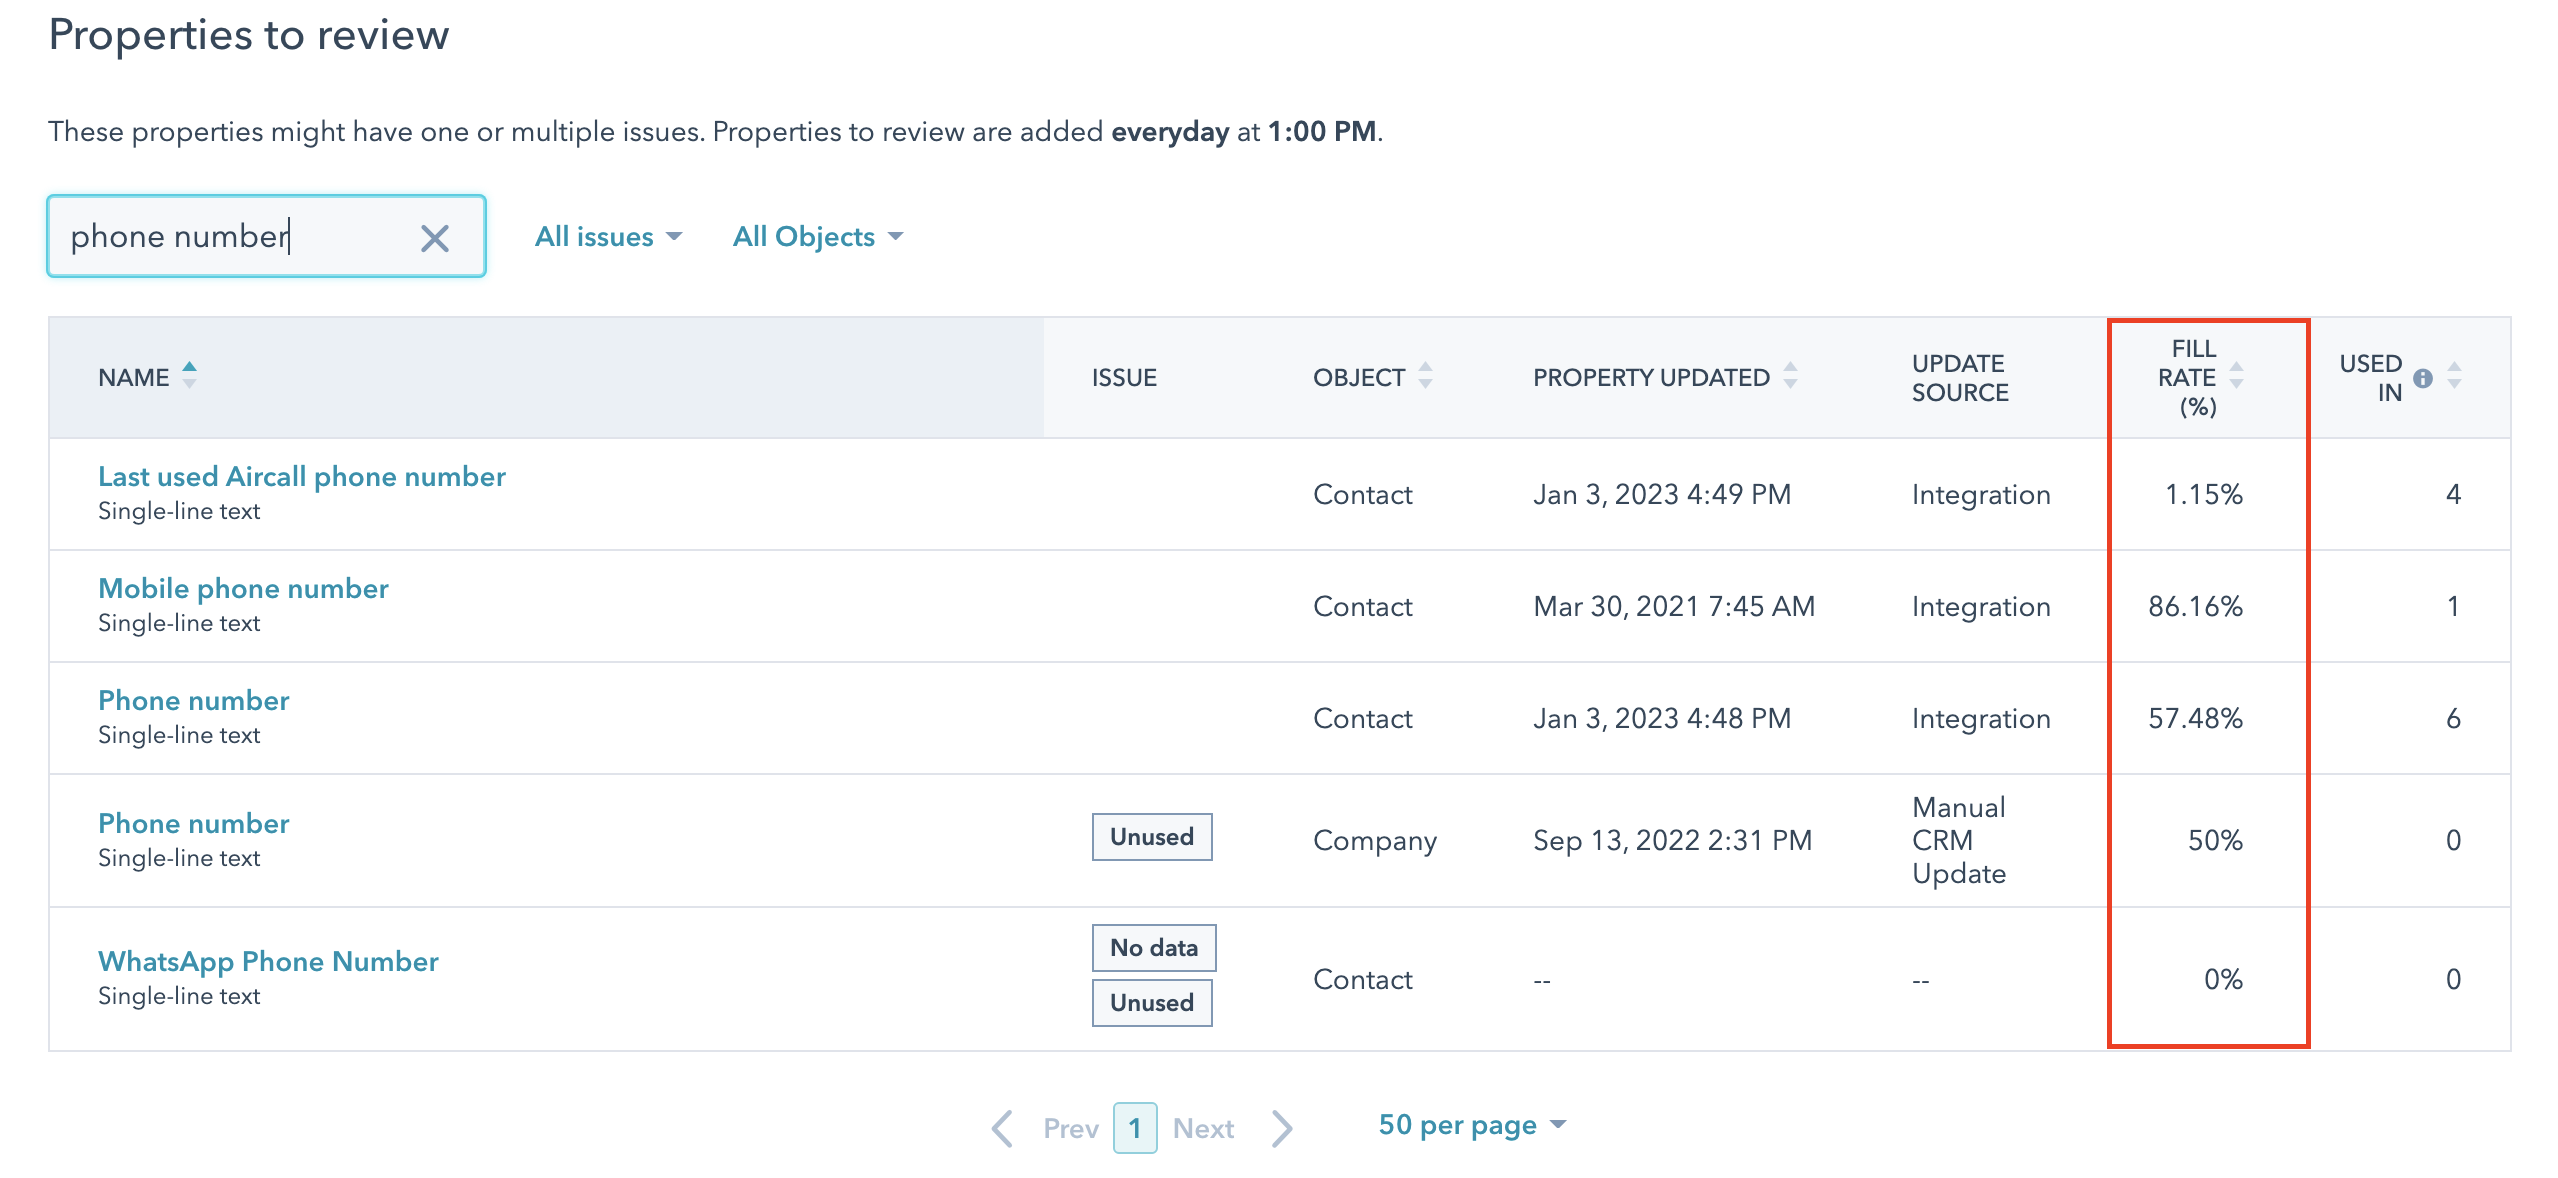
Navigate to the Reports drop down menu in your HubSpot environment. Select Data Management → Data Quality. Under the Data Quality drop down menu, select Property Insights. Scroll down to Properties to review and enter Phone number in the search bar to bring up relevant phone fields.
If you are using custom fields to store contact numbers, you may need to enter additional key words in your search bar depending on what you have named them.
Once you have brought up the overview of your phone numbers, there is a column to the right called Fill Rate ( % ). Here you will a see a breakdown of what phone fields are being predominantly used to store your contact numbers.
Now that you have established which field is your predominant field, we will take this field and use it as the trigger for our workflow automations in the next step. Please note, since the point of this workflow is to ensure accurate logging, Aircall only logs against numbers stored in the Phone number or Mobile number field and not custom fields. When it comes to copying the string value later in this guide, you will have to ensure it is copying into the Phone number or Mobile number field native to HubSpot.
You may have multiple fields with high usage and want to update all of them. You can apply this automation to as many phone fields as you like, however you will have to do separate workflows for each one you wish to format.
Step Two: Creating your Data Formatting Workflow
This section requires some familiarity with creating and managing Workflows in HubSpot. If you are new to this aspect of HubSpot, please reference HubSpot’s guide to Creating Workflows
We will now take the dominant phone field and build our workflow around it. The workflow we are going to build has a number of actions to it, which we will go through thoroughly in the next steps. The two most important actions are:
Schedule Trigger: this action is the core of the automation. It is here that we set the frequency and the time rules for when we want this formatting update to take place.
Format Data: this action is the engine of the workflow, and where we set all the rules of formatting the phone number.
Navigate to the Workflows section of your HubSpot environment. Select Create a New Workflow→ Contact Based→ Schedule
It will now prompt you to set the aforementioned Schedule Trigger, where you determine how frequently and when you would like this formatting to automatically update.
We recommend scheduling it outside of business hours to avoid any possible interference with your daily operations
This will automatically add the Schedule Trigger to the workflow, so now we have to set the Enrollment Trigger. The Enrollment Trigger for this workflow is going to be based on a singular contact property, the phone field you determined to be your dominant one back in step one.
Filter type= Contact Properties → Phone number*= Known (*enter your targeted phone field)
Now that we have set up the Enrollment Trigger and the Schedule Trigger, we get into the formatting data action. In this next section, we are going to be creating a Custom Formula to remove any unwanted spaces and characters from our phone number.
For this next step, we will be going through a manual, step-by-step version of creating the formula to ensure accuracy for people who are not familiar with custom formula. It is possible to type the whole formula which may be the preferred method for people experienced in custom formula. You can see the typed method in the GIF below
Select Format Data as the next action in your workflow. Toggle on Custom Mode. We highly recommend making sure Formula Guidance is turned on which will provide you with visual assistance and error warnings when building formulas. We are going to use two functions to remove any spaces or special characters from our phone number stored in the property:
trim- trim leading and trailing whitespace
cut- cut a character or several characters
The standard characters we would likely find in a phone number are -, (, )and spaces ( ). If for some reason you have different ones or additional ones, you will have to add these to your formula. The key thing to remember when using custom formula is that each character requires a corresponding function, and vice versa. For example, if you have 5 characters you would like to remove, you will need to add the ‘cut' function 5 times. So let's start with adding our functions.
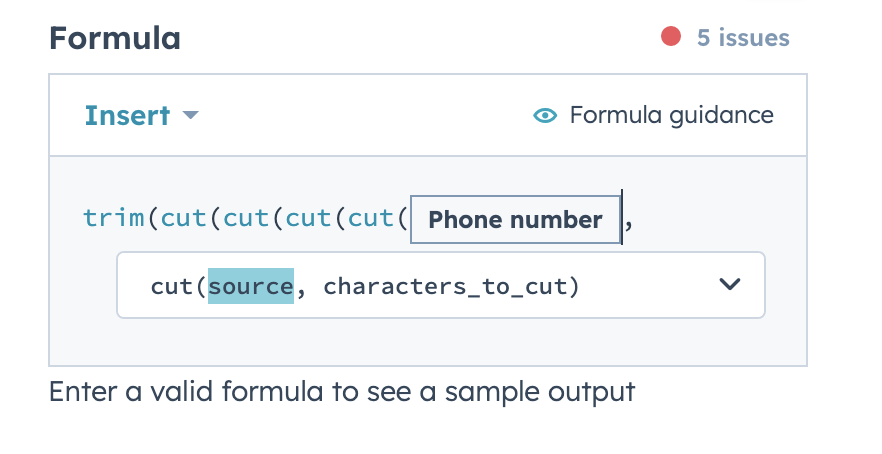
Click on Insert → Function and select trim. Working off the assumption that the only characters we need to remove are the 4 mentioned above, we need to add 4 cut functions. Click on Insert -> Function and select cut. Repeat this 3 more times. Once completed, your functions look like the image below. It is expected for the formula guide to indicate issues, as we have not completed the workflow.

Next, we have to add the source. In this case, it is the phone number property from the first step of the workflow. Click Insert -> HubSpot Property and select your phone field. Add a comma directly after it, which should leave your formula looking like this:
Now we add the characters. There are 3 simple rules to remember when entering the characters:
- Commas must be followed by spaces.
- Characters must be in quotation marks.
- You must close off each character with a bracket.
We have to type this section. Start entering your characters to remove following the above rules. Please see this as a reference:
, "-"), "("), ")"), " ")
Once you have finished entering your characters, we need to close off the formula so you will have to add an additional ) to the end. Your formula guider should be green ‘no issues’, and your formula should look like the image below. If it does, be sure to click on save and return to the workflow.
We now have to take the cut and trimmed value and put it back into the Phone number or Mobile number field. To do this, we are going to use the action Copy property value. When you select this action, it will say Property or value to copy from and offer you a drop down menu. One of the options on the drop down menu will say 1. Format data, which is reference to the Format Data action we created before. Click on 1. Format data and select the option [String] value. Continue down the prompts selecting the below:
Target Object= Contact
Property to copy [String] value to= Phone number or Mobile number
Now that we have removed all the spaces and characters from our number, to truly complete the E.164 format we will have to ensure that the + is at the front of the number. Some of your numbers may already have this and others may not, which is why we are going to use the If/Then branching action to separate them.
Select If/then branch. We then configure the 2 branching actions below:
Branch name= Has +
Filter type= Contact properties → Phone number= starts with any +
For the second branch, we are going to use the native HubSpot branch if none of the are criteria met, which means any phone number without a + in front of it will default to this branch.
- Branch name=
No +
For the Has + branch, this is where the workflow ends and no further action is taken. The characters and spaces have been removed, and it already has the + so it is in the E.164 format. However, we must configure the No + to have the + added to the front of the number. Under the No + branch, select Format Data and toggle on Custom Mode. We are revisiting the custom formula, but this time with a new function called Concat.
Click on Insert → Function and select Concat. Immediately after the bracket type +, . Click on Insert → HubSpot Property and select your previously used phone number field. Then close off the formula using ).
To finish off the workflow, we have to copy the [String] value again. Repeat the step above following the slight difference below:
Select Copy property value
Property or value to copy from → 4. Format Data → [String] value
Target Object= Contact
Property to copy [String] value to= Phone number or Mobile number
Congratulations!🎉 You have just created your number formatting workflow!
To test this, we recommend creating a fake contact with a fake number containing the likes of (, ), - and then manually enroll the contact.
A Point of Note
We are aiming to change the numbers into the E.164 format, however the default native behaviour of HubSpot is to automatically format the number to the local standard formatting. Each country has their own stylised version of number formatting, which we are hoping to override with the universally recognised E.164. Due to a limitation on HubSpot’s side, we cannot disable this automatic local formatting. Aesthetically, despite completing the workflow, the contact phone number is going to look like it hasn’t changed when viewing it in the property field (front end). However, if the contact has successfully enrolled and completed this workflow, in the backend it will be in the E.164 format which is the more important aspect. Aircall searches the endpoint calculated phone number when looking to log calls and pull contact data, so as long as this is in E.164 format then you will see the expected behaviour in terms of call logging consistency.
Food for Thought💡
- If you would like to check that the number is being formatted correctly on the backend, you can utilise the action ‘Send a webhook’ offered by OperationsHub at the bottom of your workflow. Using a POST method, you can send the request to your testing environment to check the format of the number. Learn more about Using Webhooks with HubSpot Workflows
- If the contact numbers do not have the country code in front of them, you can create a similar workflow to add the country code to the start like we did with the “+”. This only applies if your contact numbers are all in the same geographical zone e.g
+44. If you have contacts from multiple different countries, it is possible to automate this with workflows if you have a country code field on each contact.
Need some extra help?
If you need an extra hand with implementing this workflow, or you would like to learn more about similar automations to enhance your operations, check out our Professional Services page to book time with our Technical Consultants.