-
ExploreCategories
Automate inbound lead distribution to agents based on their Salesforce User settings and who answered the call
In this guide you will learn 🎓
- How Would an Insurance Firm Utilise the Automation of Inbound Lead Distribution?
- How to Automate Assignment of Inbound Leads to Specific Insurance Firms
- Step One: Creating the Custom Field on the User Object
- Step Two: Configuring the User Settings
- Step Three: Creating the Flow to Trigger the Automation
How Would an Insurance Firm Utilise the Automation of Inbound Lead Distribution?
Ora Insurance is a parent company that consists of 2 other insurance companies, Solicitude Insurance and AInsure, specialising in life insurance policies. Ora’s Sales team consist of 10 agents split into 3 teams who do both Inbound and Outbound for their designated company.
All 3 companies share the one Inbound line with all 10 agents attached. The first agent that answers is then awarded the lead that is assigned to them in Salesforce. In order to streamline the daily operations and ensure the lead is passed to the correct agent and company, Ora Insurance need the inbound leads to automatically be assigned to the agent who answered the phone. Ora insurance also needs a solution that is scalable for their expanding Sales team, and in the future if they create further companies under the parent company.
Let’s see how to set this up!
💡 We will be using the use case above as an example throughout the tutorial. In the sections where we are naming or labelling anything company specific, use your own company names and terminology as you wish.
How to Set Up Automatic Assignment of Inbound Leads to Specific Insurance Firms
Step One: Creating the Custom Fields on the User Object and the Lead Object
This section requires familiarity with creating custom fields in Salesforce. If you are new to this aspect of Salesforce, please see their guide on Creating Custom Fields
This workflow requires us to create two custom fields; one on the User object and one on the Lead object. The field for the User object is used to define which insurance branch the Salesforce agent works for, and is manually set by the Salesforce admin. The field on the Lead object is used to populate the insurance branch of the agent who answered the call. Let's begin with the User object.
In your Salesforce Org, navigate to Setup and click on the Object Manager tab (if it doesn’t automatically appear, use the quick find bar). From the Object Manager page, select the User object. This will open the details page, and on the left-hand sidebar you will click into Fields and Relationships. Select New and follow the below process for each prompted step:
- Step 1: Data Type=
Picklist - Step 2: Field Label=
Insurance Association- Values=
Enter values, with each value separated by a new line - Values=
Ora Insurance,Solicitude Insurance,AInsure Restrict picklist to the values defined in the value set- Field Name=
Insurance Association - Default Value= leave this space blank.
- Values=
- Step 3: Field Level Security. This section is at your discretion over who has edit or read only access rights to this specific field.
- Step 4: Page Layouts. This section is at your discretion about which page layouts this field should be visible on.
Click on Save. Your field should now be visible in the fields list. Now we will create the custom field for the Lead object. Navigate back to the Object Manager page, and this time select the Lead object. Select Fields and Relationships from the left-hand sidebar and select New. Follow the below process for each prompted step:
- Step 1: Data Type=
Text - Step 2: Field Label=
Insurance Branch- Field Name=
Insurance Branch - Default Value= leave this space blank.
- Field Name=
- Step 3: Field Level Security. This section is at your discretion over who has edit or read only access rights to this specific field.
- Step 4: Page Layouts. This section is at your discretion about which page layouts this field should be visible on.
Click on Save. Your field should now be visible in the fields list. We will now navigate to the User settings to go through how to find and set the custom field on the User object.
Step Two: Configuring the User Settings
Since our intention with this flow is to automatically assign calls to an Insurance firm based on the agent who answered the phone, it is important that we identify which firm each agent works for. So we have to manually set this in the custom User field we just created on the User profile.
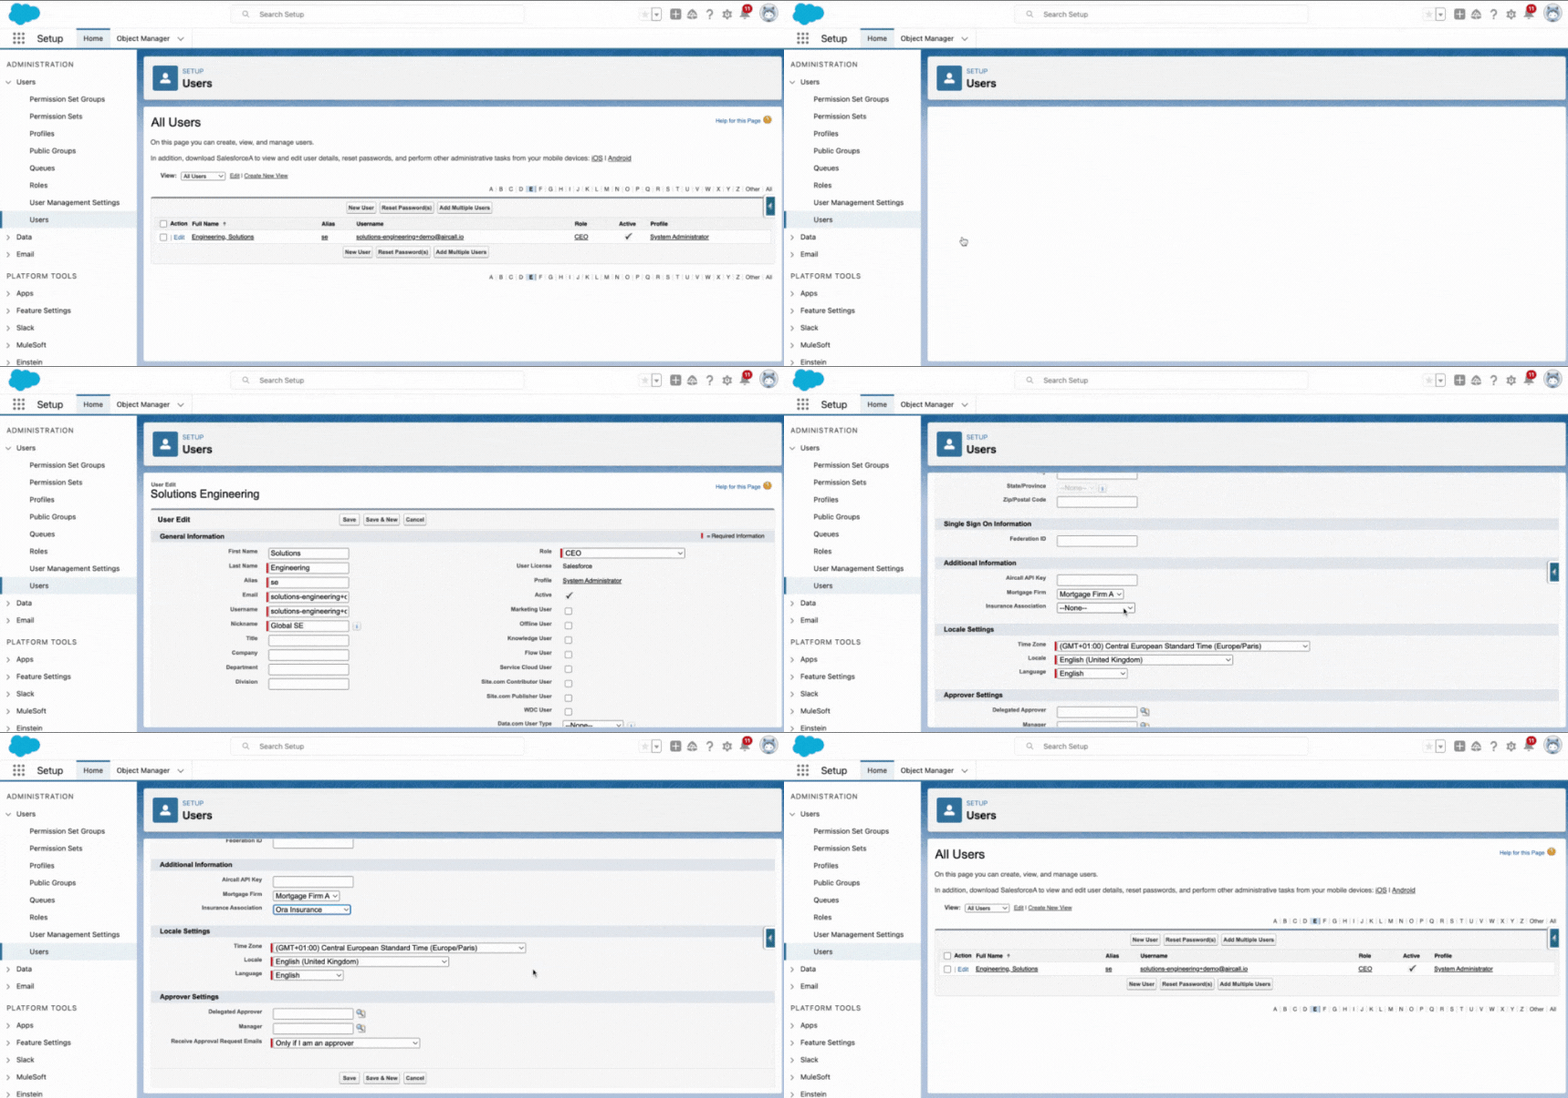
Go to Setup and make sure you are on the Setup Homepage. On the left-hand navigation menu under Administration, open up the User drop down menu and select Users. This will display a list of all Salesforce users, and click on Edit on the agents that need to have their Insurance firm identified. Find your custom field Insurance Association, and select from the picklist for each user their relevant Insurance branch. Click Save.
Should you add new users in the future after activating this workflow, a SFDC admin user can automatically add this information when setting up the new user’s profile.

Step Three: Creating the Flow to Trigger the Automation
This section requires sufficient familiarity with Salesforce Flows. If you are new to this aspect of Salesforce or have not used their Process Automations before, see their help section dedicated to all things Flows here
Select Setup → Process Automation → Flows and select New Flow. We are going to be creating a Record-Triggered Flow.
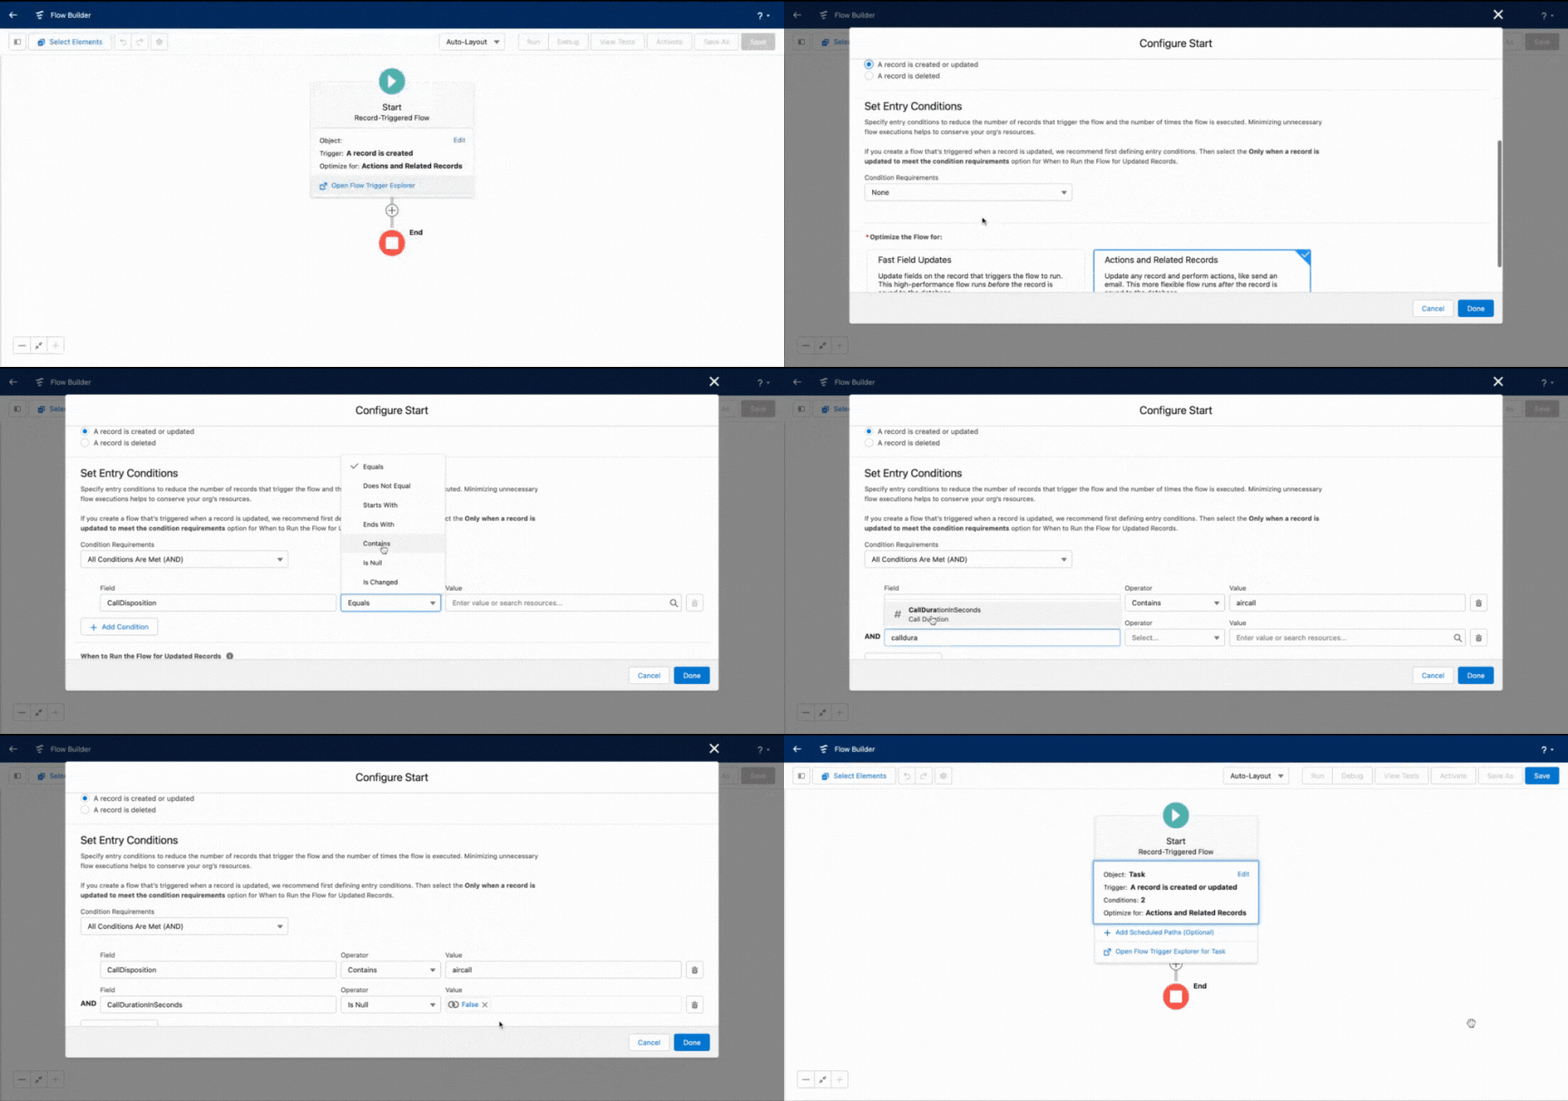
For the trigger, we are going to be leveraging data from the Task object. Firstly, we want to make sure this flow only affects Aircall call. The default behaviour of the integration is that all Aircall calls create a Task, so we use the CallDisposition field from the task to identify the Aircall relevance. We then will use the CallDurationInSeconds field from the Task. This is because this field is only updated once the call has been completed, which is when we want the lead to be assigned to the agent who answered the phone.
Click on the Start box and select the below parameters:
- Object=
Task - Configure Trigger=
A record is created or updated - Condition Requirements=
All Conditions Are Met (AND)- Field=
CallDisposition→ Operator=Contains→ Value=aircall - Field=
CallDurationInSeconds→ Operator=Is Null→ Value=False
- Field=
- When to Run the Flow for Updated Records=
Every time a record is updated and meets the condition requirements - Optimize the flow for:
Actions & Related Records
Press Done to return to the flow editing canvas.

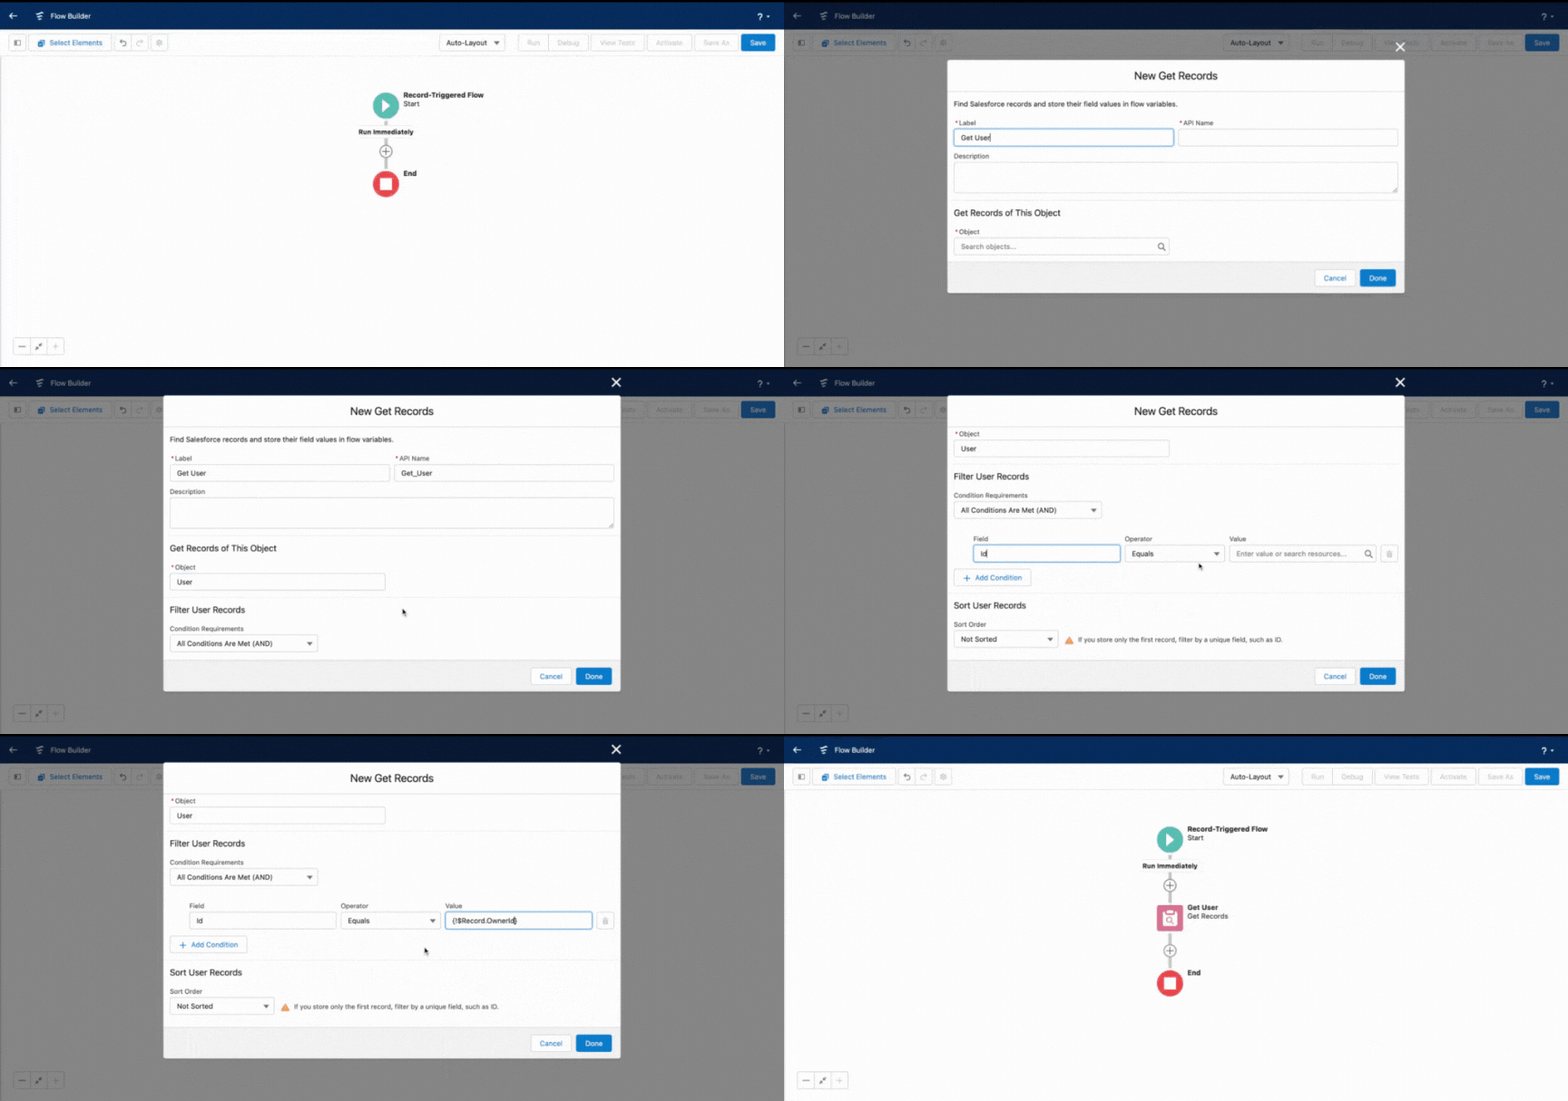
Now that we have set the flow trigger, we move on to setting our actions. The first step we are going to use is the Get Records action, which is used to fetch records in the Salesforce org. In this case, we are using it to get the User.
Click on the + button directly under the start box we just configured to bring up the Add Element menu. Search and select Get Records. Configure the below parameters:
- Label=
Get User - Object=
User - Filter Lead Records=
All Conditions Are Met (AND)- Field=
ID→ Operator=Equals→ Value={!$Record.OwnerId}
- Field=
- Sort Order=
Not Sorted - How Many Records to Store=
Only the first record - How to Store Record Data=
Automatically store all fields
Press Done to return to the flow editing canvas.

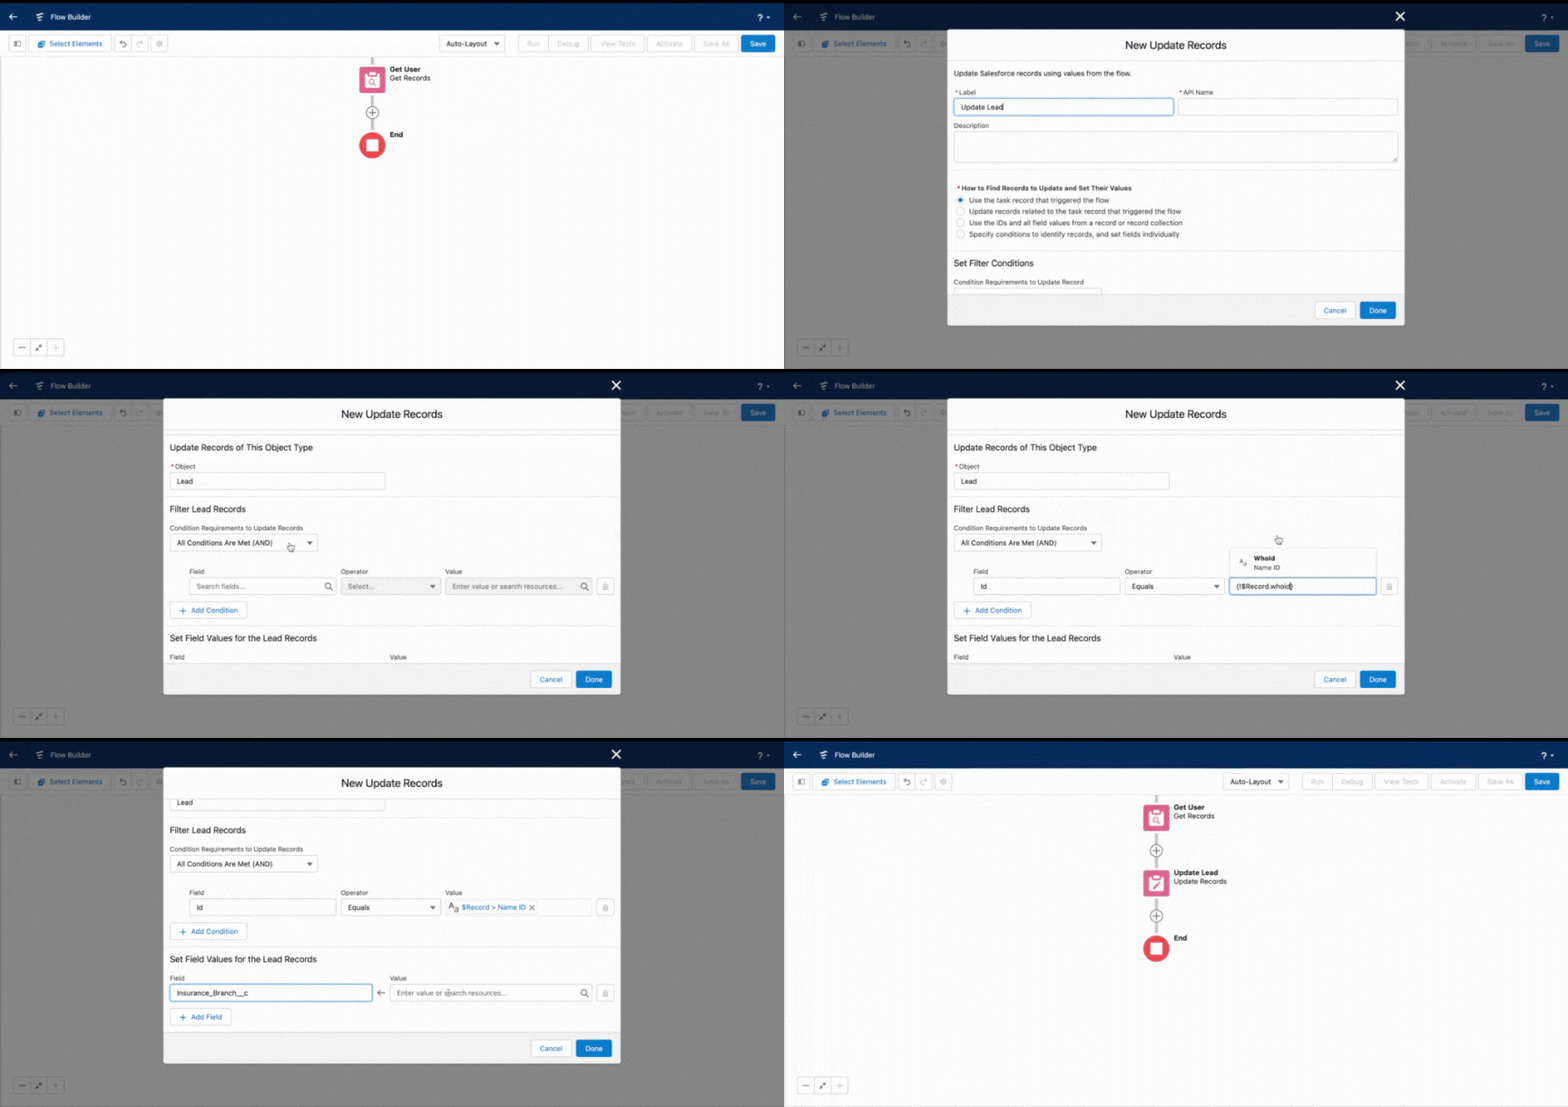
Our final action in the flow is going to be the Update Records action. This is where we take the leveraged data from the trigger and populate the Insurance Branch field against the lead we fetched in the Get Records action above.
Click on the + button directly under the Get Lead action we just configured to bring up the Add Element menu. Search and select Update Records. Configure the below parameters:
- Label=
Update Lead - How to Find Records to Update and Set Their Values=
Specify conditions to identify records, and set fields individually - Object=
Lead - Filter Lead Records=
All Conditions Are Met (AND)- Field=
ID→ Operator=Equals→ Value={!$Record.WhoId}
- Field=
- Set Field Values for the Lead Records=
- Field=
Insurance Branch←{!Get_User.Insurance_Association__c}
- Field=
Press Done to return to the flow editing canvas.

Click on Save in the top right hand corner of the screen and name your flow. Be sure to select Activate before exiting the page.
Congratulations 🎉 You just completed your Automatic Assignment for Inbound Leads workflow!
Food for Thought 💡
- Instead of enabling this for all inbound Aircall calls, you can limit it to certain Aircall numbers by adding to the
CallDispositionfield in the trigger settings. - As you are passing information from the
Taskobject and theUserobject, you could consider passing over other fields to store on theLead object, or to trigger further automations. - For inbound call routing, if you see you are overwhelmed and the number of missed calls on an inbound line is too high, you could consider switching to a form where you have more flexibility and control on agent availability. You can find more information about this process in our tutorial on Automatic Callback from a Landing Page
Need Some Extra Help?
If you need an extra hand with implementing this workflow, or you would like to learn more about similar automations to enhance your operations, check out our Professional Services page to book time with our Technical Consultants.