-
ExploreCategories
Keep your HubSpot ticket pipeline orderly and streamlined by using simple HubSpot workflows and the Aircall Tags feature

In this guide you will learn 🎓
- How autonomously controlling ticket creation can keep your HubSpot ticket pipeline prioritised and your ticket management efficient.
- How to set up the HubSpot Workflows and the Aircall Dashboard
- Step One: Configuring the Aircall Dashboard and Creating Tags
- Step Two: Setting Up the HubSpot Workflows
Please note- Hubspot Workflows are only accessible on Professional & Enterprise plans within HubSpot. Please reach out to your HubSpot account manager to discuss this further.
How does controlling ticket creation in HubSpot help keep your pipeline ordered and efficient?
When it comes to Customer Service, not all enquiries are able to be fully resolved on the spot. Whether it requires deeper investigation, escalation or the involvement of other teams, a ticket is the most logical way to document and track more complex requests until a resolution is reached. Tickets allow you to segment, prioritise and track requests, and also offer accessible information easily.
Aircall offers the power of conversation between people, where customers can be heard. This initial touch point through call allows your agents to listen, understand, assess and then action. Ideally, your agents will be able to resolve this issue on the phone which would mean it does not require a ticket to be created as a resolution has been reached. However, if your agent has triaged the issue and determined it needs further investigation, they will have autonomy to automatically create these in HubSpot by simply adding a single tag to the Aircall call. The two systems powerfully align for seamless escalation, and with the Aircall Call Recording and Notes feature, your agents can revisit their initial touchpoint easily within an accessible HubSpot ticket.
By giving your users autonomy to govern when a ticket is necessary, you will reduce the amount of tickets you have in your pipeline, reduce the workload for agents and eradicate time spent on unnecessary ticket management. This in turn will allow your users to focus on investigating and solving matters more efficiently, boosting SLA’s, and a higher degree of organisation within the pipeline.
How to set up your HubSpot Workflows and Aircall Dashboard to Control Ticket Creation 🔨
Step One: Configuring the Aircall Dashboard and Creating Tags
This section requires an active HubSpot integration on the Aircall Dashboard. If you have not installed it yet, please reference our guide Installing Your HubSpot Integration
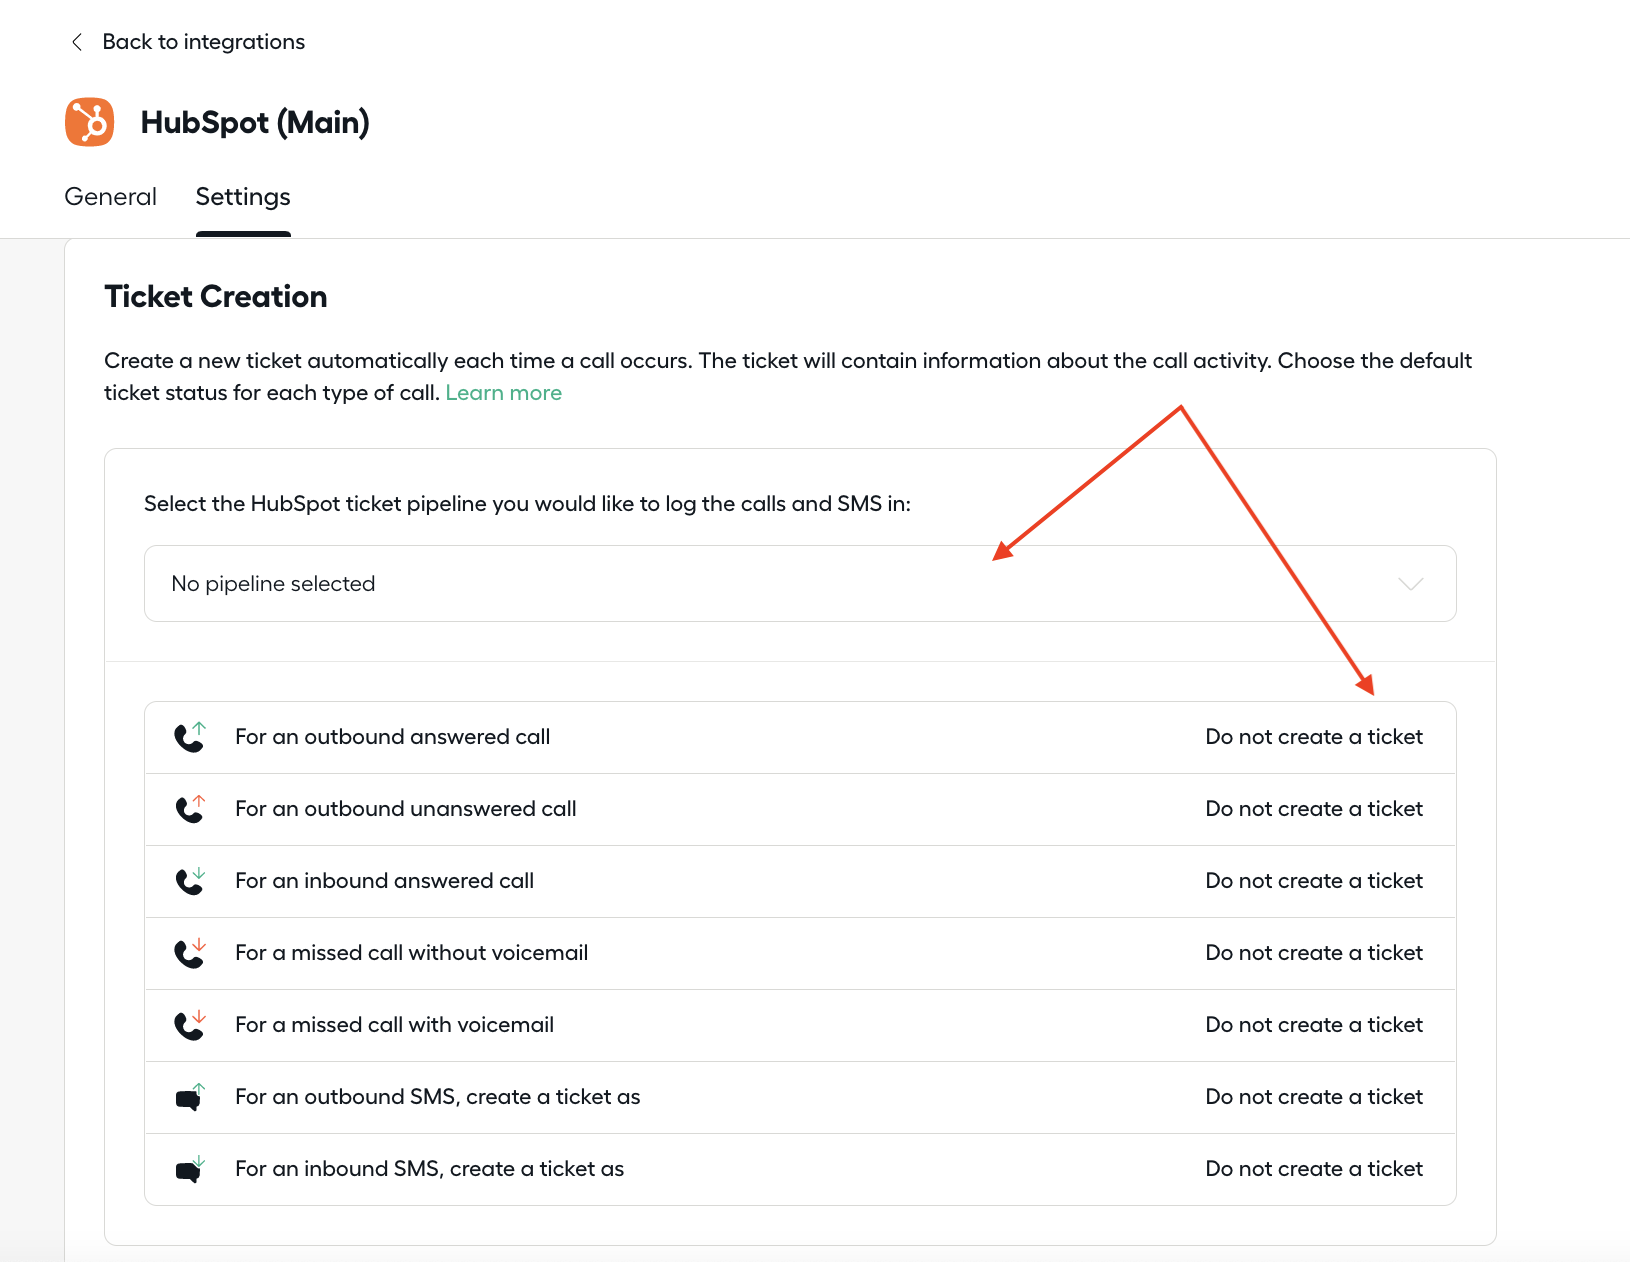
Once you have installed your HubSpot integration, Aircall syncs with your HubSpot pipelines. You are then able to control not only what pipeline your Aircall calls should log tickets into, but also what type of calls should trigger a determined type of ticket. For example, you may choose to direct your tickets into your Customer Support Pipeline, with inbound answered calls creating a New ticket, missed calls creating a Closed ticket, and then Do not create a ticket for all other types of calls.
While these settings may suit you to some degree, you may not require or want a ticket created for every phone interaction you have within the parameters that our native integration offers. But to allow yourself to still have the option to create a ticket automatically, you can use tags to trigger this into HubSpot.
With the set-up we are going to work through, the objective is to give the agents autonomy on when the ticket is created which means we do not want every call to trigger a ticket object creation. We are therefore going to configure it No Pipeline Selected, which defaults it to Do not create a ticket for all call types. We will control the pipeline from the HubSpot side in the next steps.
For this example, we are disabling ticket creation on all call types which means tickets will only log when the tag is added. You can still work with our native settings for certain call types and just use the tagging system for others. If you intend to do this, select your pipeline and customise the settings for what you want invariably logged, and select
Do not create ticket for the types you wish to autonomously control.
We will then need to create the appropriate Aircall tag which will be used to trigger the workflow in HubSpot. Navigate to the Tags section on the Aircall dashboard and create a new tag e.g Create HubSpot Ticket.
Step Two: Setting Up the HubSpot Workflows
This section requires some familiarity with creating and managing Workflows in HubSpot. If you are new to this aspect of HubSpot, please reference HubSpot’s guide to Creating Workflows
Select Create a New Workflow→ Contact Based→ Blank
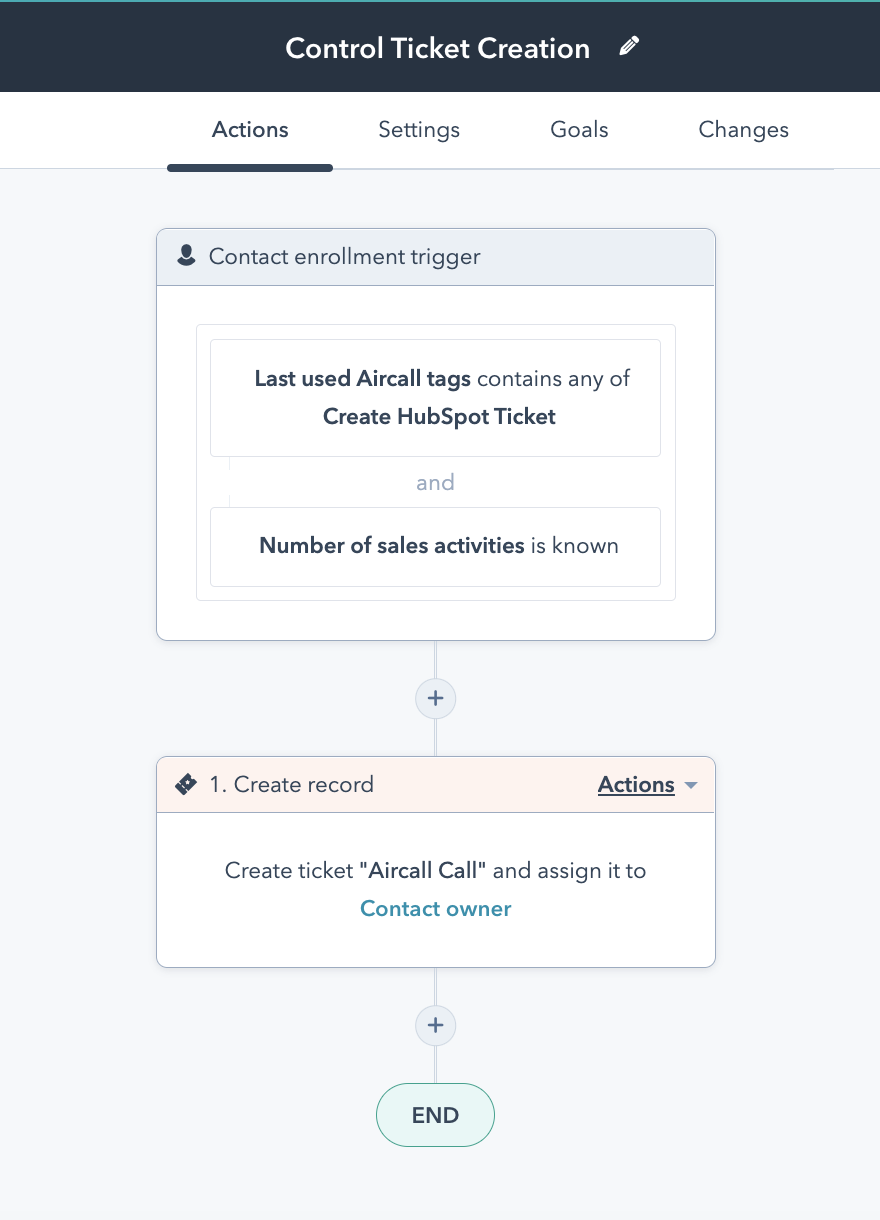
The enrolment trigger for this workflow is going to be based on two the contact properties:
Last used Aircall tags- this is a dynamic field that populates the most recently used tag in calls associated with the contact. The logic here is that when your agent has triaged the caller and assessed that ticket creation is necessary, they would add the tagCreate HubSpot Ticket, which in turn would populate the fieldLast used Aircall tagsand therefore enrolled in the workflow.Number of sales activities- this is also a dynamic field and is used here as a method to allow re-enrolment should the same contact call again in the future. This field automatically updates any time there is an activity logged on the contact. We use this field to allow the re-enrolment because it is a given that it will be populated automatically by the phone call.
Filter Type=Contact Properties→ Last used Aircall tags= Contains any of Create HubSpot Ticket
AND
Filter Type=Contact Properties→ Number of sales activities= Known
Once you have set those in the Trigger tab, be sure to click on the Re-enrolment tab and select the option that allows re-enrolment based on ‘Number of sales activities is known’.
Make sure to select ‘Contains any of’, as your agents may be adding multiple tags on the call.
Once this has been created, we need to trigger a Record Creation once the caller has been qualified and enrolled in the workflow.
Create Record → Type of record to create = Ticket.
HubSpot is then going to prompt you to fill in logic parameters. These include who the ticket should be assigned to, the pipeline it should be funnelled to and the name of the ticket. Fill these in with what you require for your use case.
Please note that there are no options native to HubSpot that allow the ticket to be automatically assigned to the user who answered the call. In order to achieve this, you would have to use custom code within HubSpot’s Operations Hub, or third party tools.
Depending on what you have filled in the fields when setting the logic parameters, and also on your internal processes, you will have options to select what objects you would like to associate the ticket to. Be sure select the relevant boxes before saving.
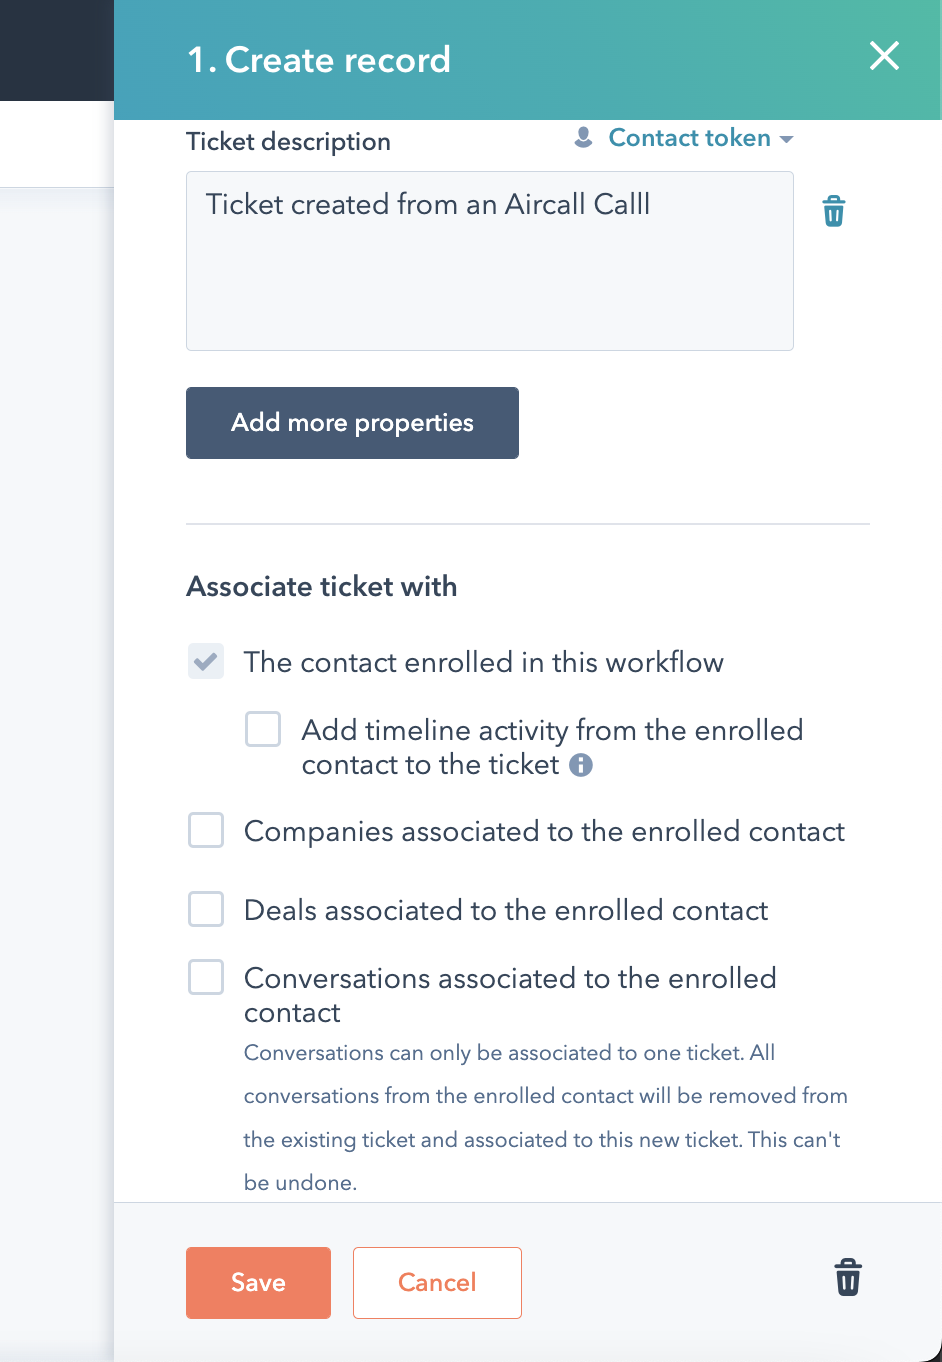
Once you have completed the above steps, your workflow should look like this:
Before you turn the workflow on, be sure to click ‘Review & Publish’. Under the ‘Enrolment’ section, you will have to apply this only to contacts that meet the criteria after you have turned the workflow on. Turn the workflow on and run a test.
Congratulations 🎉 You’ve created your Control Ticket Creation Workflow!
Food for Thought 💡
- You can add more properties to the ticket record creation if you would like more information logged into your tickets.
- If the association options for the ticket are not suitable, you can use custom code within HubSpot’s Operations Hub, or third party tools such as Insycle or Associ8 to customise this option. You can find more information in the HubSpot Community thread about Automating Record Associations in Workflows
- If you are using this feature as a way to escalate tickets to specific departments, using the above tools you can assign them to internal teams as opposed to individuals.
Need some extra help?
If you need an extra hand with implementing this workflow, or you would like to learn more about similar automations to enhance your operations, check out our Professional Services page to book time with our Technical Consultants.