-
ExploreCategories
Enable Aircall phone calls to automatically create a specific Salesforce Case based on the issue being reported by the caller
In this guide you will learn 🎓
- How would a Customer Service team Utilise Automatic Case Creation Based on IVR Options?
- How to Set Up Your Aircall Dashboard and Your Salesforce Flows to Automate Case Creation Based on IVR Options
- Step One: Setting Up Your Aircall IVR and Aircall Tags
- Step Two: Building the Flow and Configuring the Flow Trigger
- Step Three: Configuring the Decision Element and Outcomes
- Step Four: Creating the Case Record
- Step Five: Updating the Task Record
How Would a Customer Service Team Utilise Automatic Case Creation Based on IVR Options?
Sneaker Grails is an online footwear store specialising in limited edition sneakers.
They have a 3 option IVR to handle Customer Service requests. The first option directs the caller to their website. The other two options are Shipping, and Returns. Both of these options allow the caller to be connected to an agent who can look into their order. The majority of issues can be resolved directly on the original phone call, and do not require follow up. However, there are a few issues that will require follow up with the customer at a later time.
In regards to Shipping, the agent will check for any abnormalities in terms of dispatch, handling time or delivery. If there is a delay in dispatch, the agent has to check with the warehouse staff to see what the issue is. If there is an issue with delivery, the agent must check with the third party freight company.
Returns, regardless of the reason, can only be processed once the stock has been returned to the warehouse and inspected before any further action can be taken.
All these scenarios cannot be resolved on the spot, and require follow up with the customer. The Ops manager would like these requests to automatically create a Case that can be closed once the matter is resolved. They would like the specific issue as the subject of the Case, so that a single agent can be assigned to deal with all issues of that type each day. Their sub-issues are represented by tags:
- For Shipping: Awaiting Dispatch, Dispatched
- For Returns: Faulty, Exchange, Refund/Credit Note
Let’s see how they would set this up!
We will be using the use case above as an example throughout the tutorial. In the sections where we are naming or labelling anything company specific, use your own company names and terminology as you wish. You can also customise the parameters of inputs to suit your needs
How to Set Up Your Aircall Dashboard and Your Salesforce Flows to Automate Case Creation Based on IVR Options
Step One: Configuring your Aircall IVR and Aircall Tags
The example used below is based on the Aircall Legacy Call Distribution which is currently still activated for existing numbers. If you are using Aircall Smartflows, you will configure the IVR options on the Keypad widget with the same logic.
It is also assumed that you already have an IVR configured in Aircall. If you do not, please see our guide here on Configuring an IVR
The configuration on the Aircall dashboard is going to be split into two different factions which will play an important role in the Salesforce flows we see later on in the tutorial:
- Issue Type: this is represented by the name of the IVR option, which is the issue that the caller would like to discuss e.g Shipping or Returns.
- Issue Sub-type: this is represented by the name of the special tag that the agent adds during the call to drill down the issue to a more granular level. The name of the IVR Option must be included in the tag e.g Returns: Faulty
To begin, navigate to your IVR to double check everything is configured suitably. Your IVR options can be named however you wish, but we recommend making them as concise as possible. These are now your Issue Types.
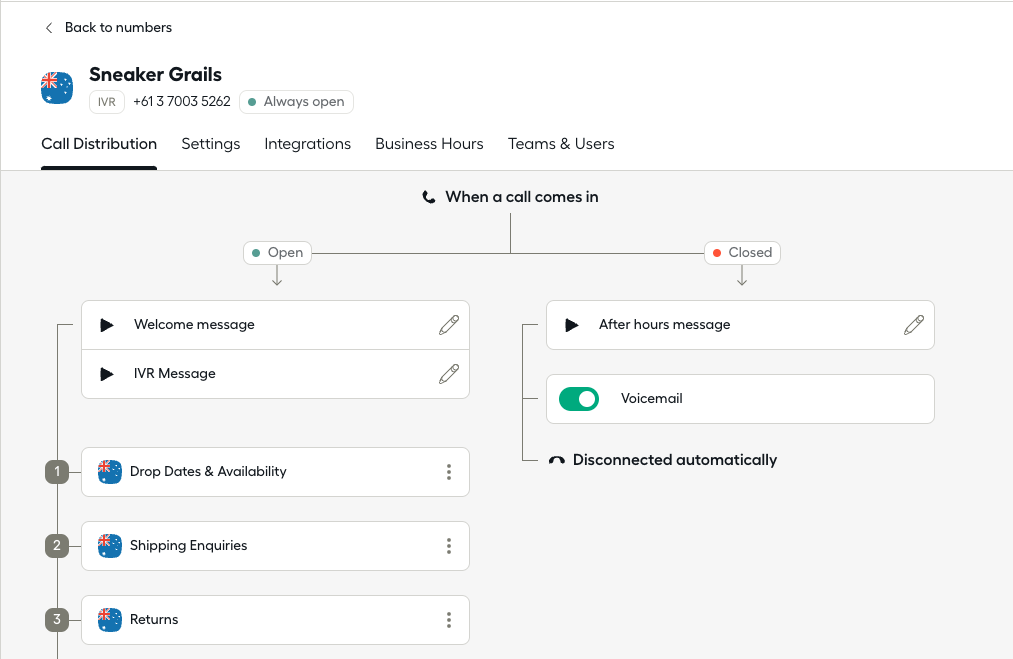
Next, we are going to navigate to the tags section to create our new tags to correspond to the Issue Sub-type. As previously mentioned, you must incorporate the Issue Type name into the tag which is the name of the options on your IVR. Each issue sub-type must have their own tag, so depending on how many issue sub-types you have will determine how many tags you have to create. In the example below, you can see that we have created the sub-types for both the Shipping investigations and Return reasons.
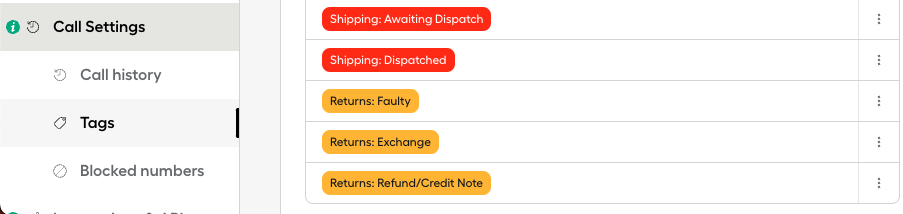
It’s a good idea to colour code your tags based on Issue Type. For example, all Shipping issue tags should be coloured red, all Returns issue tags should be yellow etc. This makes it visually easier for your agents when selecting tags on a call
Step Two: Building the Flow and Configuring the Flow Trigger
This section requires sufficient familiarity with Salesforce Flows. If you are new to this aspect of Salesforce or have not used their Process Automations before, see their help section dedicated to all things Flows here
Once you are happy with your IVR configuration and all your tags have been created, we now navigate to Salesforce to set up the Flow in Process Automation.
Select Setup → Process Automation → Flows and select ‘New Flow’. We are going to be creating a Record-Triggered Flow. This is because an Aircall call automatically triggers an update to the record by creating a Task object for each call.
Our first step is setting up the Record Trigger. This is the first step in the flow where we define what is going to trigger enrolment into the flow.
- Object=
Task - Configure Trigger=
Trigger the Flow when a record is updated - Condition Requirements=
Custom Condition Logic is Met- Condition Logic=
1 AND (2 OR 3)- Field=
CallDurationInSeconds→ Operator=Greater Than or Equal→ Value=0 - Field=
Subject→ Operator=Contains→ Value=Shipping Enquiries - Field=
Subject→ Operator →Contains→ Value=Returns
- Field=
- Condition Logic=
- When to Run the Flow for Updated Records=
Every time a record is updated and meets the condition requirements - Optimize the flow for:
Actions & Related Records
If you have more IVR options, you will have to change the Condition Logic to reflect this. E.g 1 AND (2 OR 3 OR 4 OR 5). You will also have to add these conditions as we did for the two Subjects above
Click on Done. We have now set the trigger enrolment, so only calls on those phone numbers will be able to be enrolled and go through the next steps of the flow.
Step Three: Configuring the Decision Element and Outcomes
The next step in our flow is to set the Decision action. In the Decision action is where we create our branching for each specific sub-issue.
Click on the + button directly under the start box we just configured to bring up the Add Element menu. Search and select Decision. To begin, configure the below parameters:
- Label=
Issue Sub Type - API Name=
Issue_Sub_Type
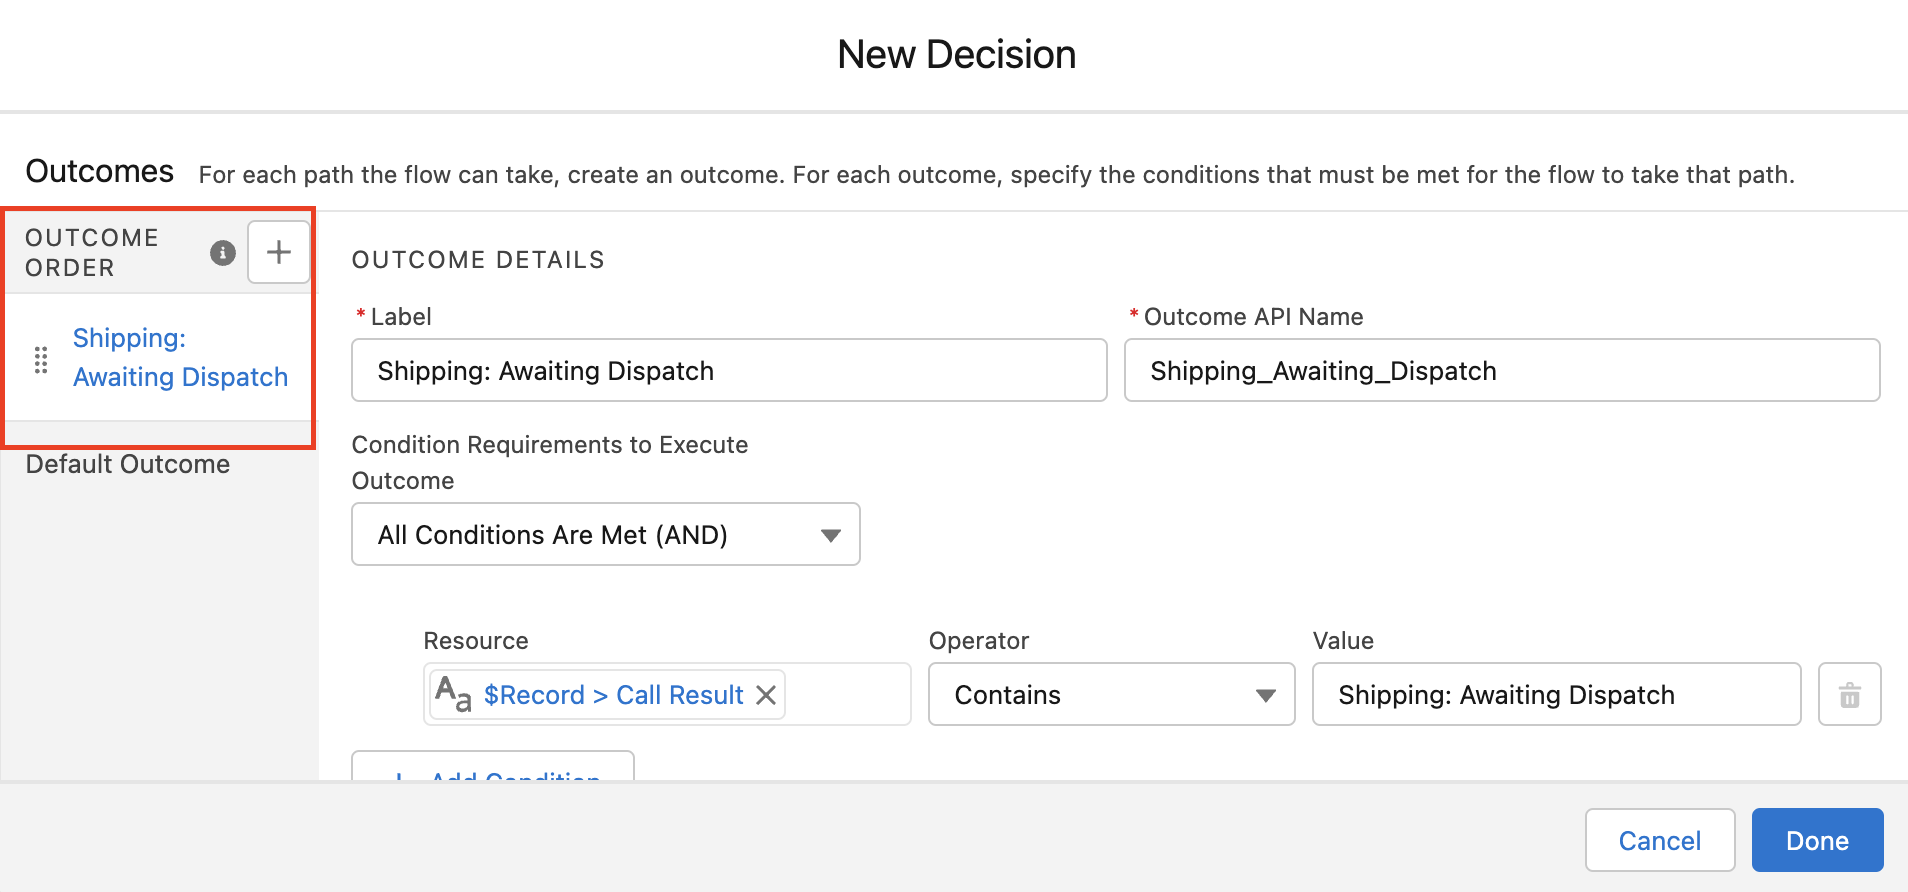
We now come to the Outcomes which is where we create the distinct branches for each tag/issue sub-type. Let’s do the first one. Configure the below parameters:
- Label=
Shipping: Awaiting Dispatch - Outcome API Name=
Shipping_Awaiting_Dispatch - Condition Requirements to Execute Outcome=
All Conditions Are Met (AND) - Resource=
{!$Record.CallDisposition}→ Operator=Contains→Shipping: Awaiting Dispatch - When to Execute Outcome=
If the condition requirements are met
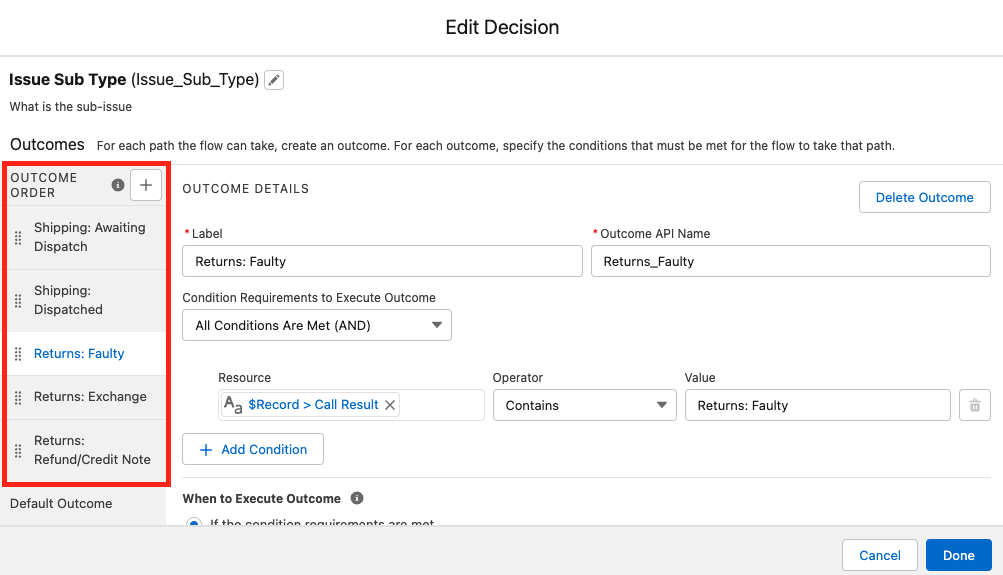
We have to create an Outcome for every tag/sub issue we have. So on the left-hand side of the page, you will the Outcome Order menu. Click on the + to add a new Outcome. Following the exact same format as the above Outcome, but just changing the Label, Outcome API Name and the Value to reflect each tag. You must be very precise when entering the tag name into the Value field, otherwise the tag will not meet the requirement conditions. You can leave the Default branch blank, as we do not require it.
The amount of Outcomes depends on the amount of tags you have, so follow the process until you have added an Outcome for every tag. Click on Done only once you have added all your Outcomes.
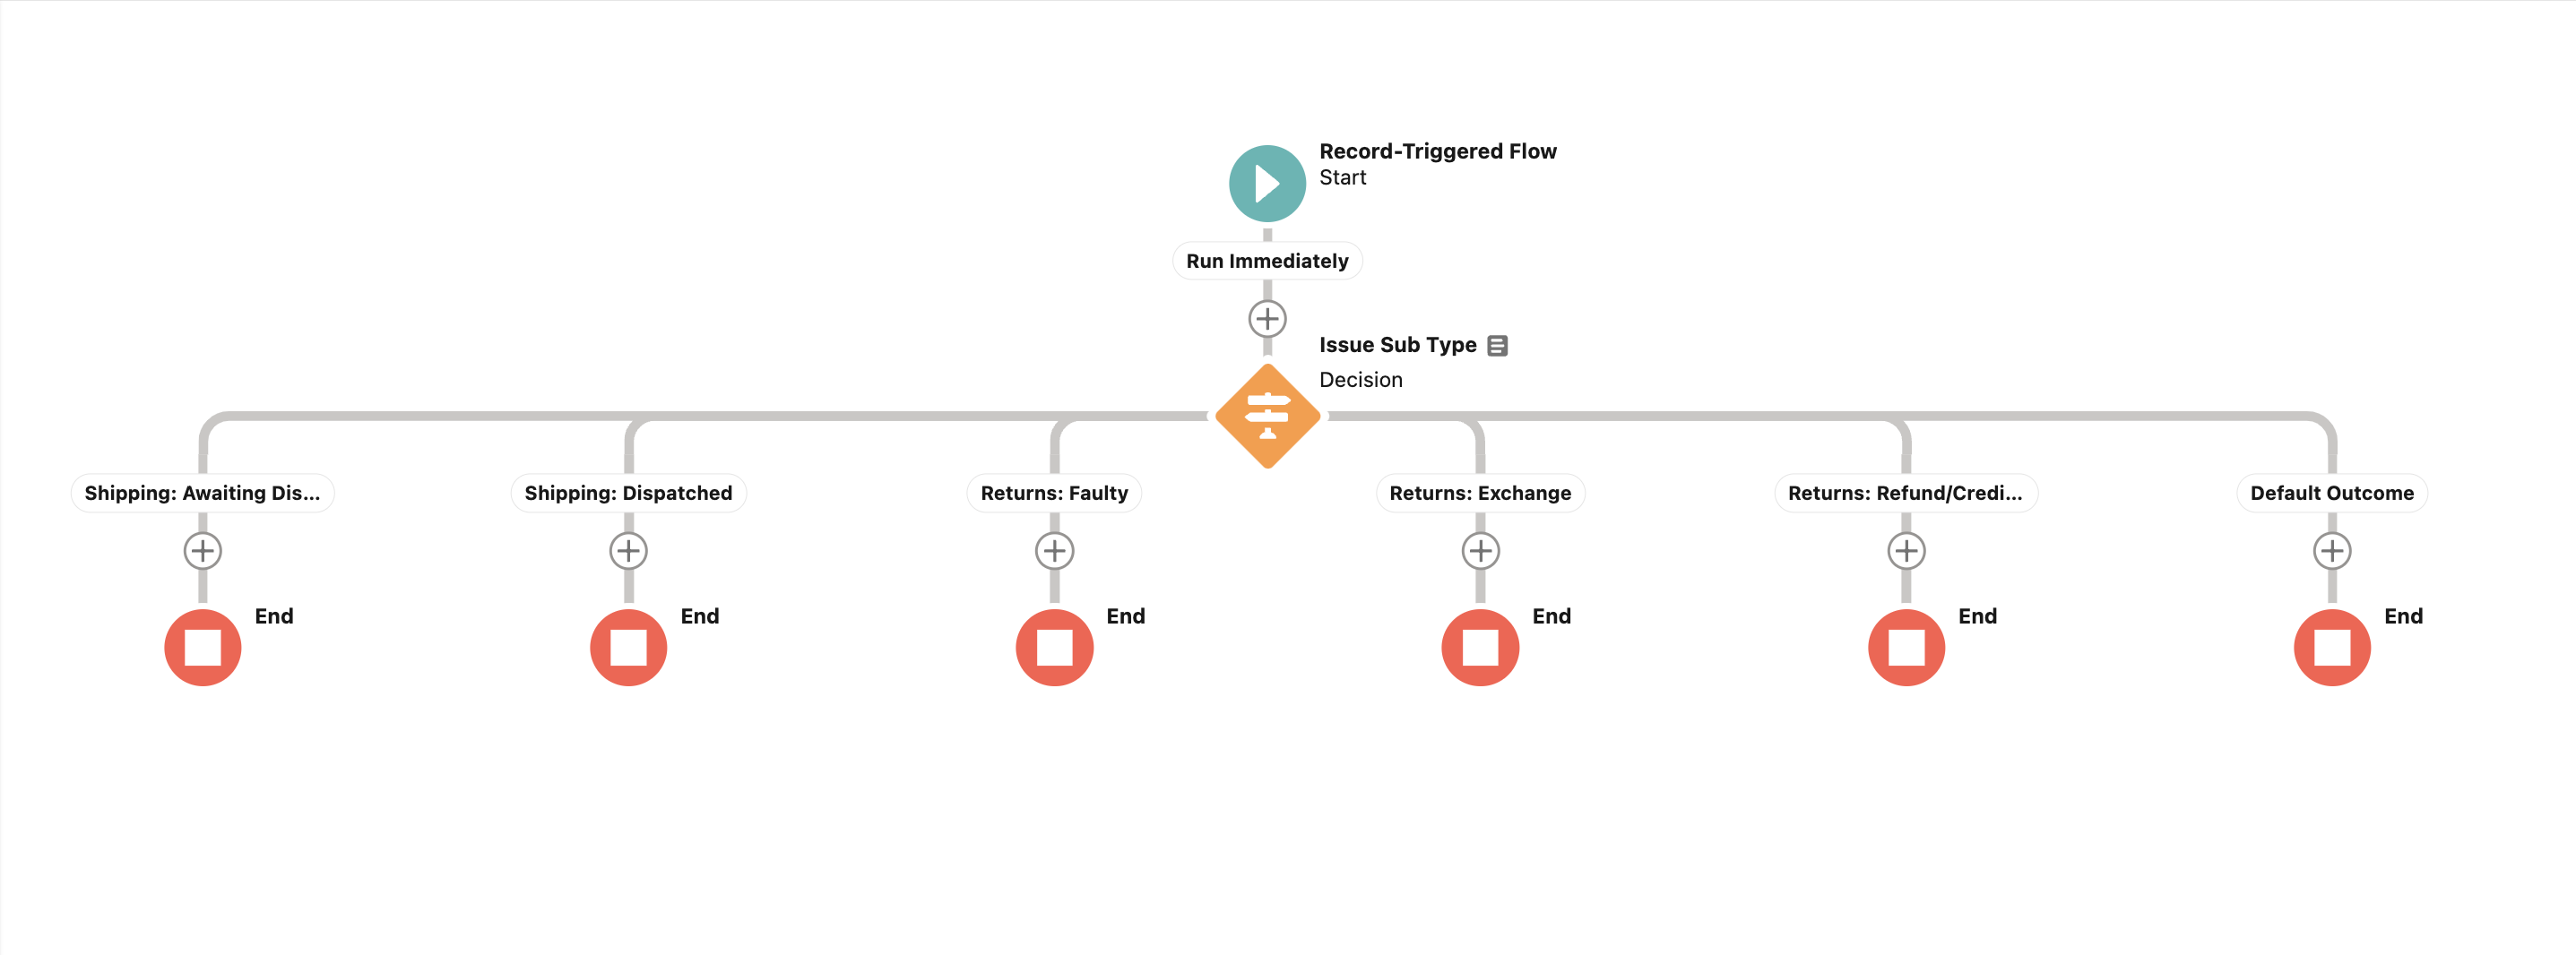
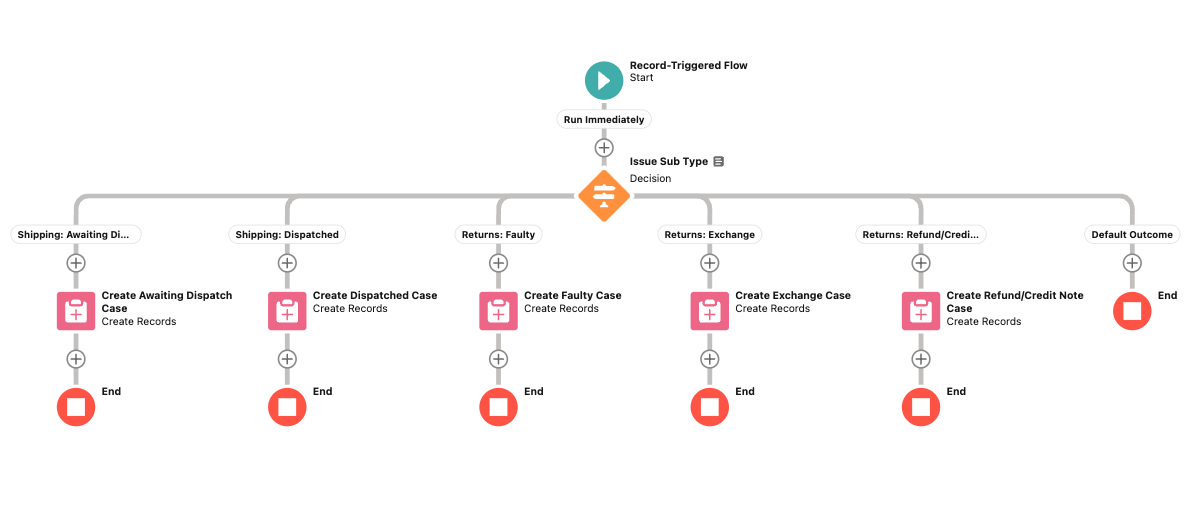
You should now see a flow consisting of multiple branches, each branch representing their respective tag. We must now go through and add the actions to each branch.
Step Four: Creating the Case Record
The first action we would like to create on our branches is the Create Record, where we are going to create a Case. Starting under the first branch, click on the + button to bring up the Add Element menu. Search and select Create Records. Configure the below parameters:
- Label=
Create Awaiting Dispatch Case - API Name=
Create_Awaiting_Dispatch_Case - How Many Records to Create=
One - How to Set the Record Fields=
Use separate resources, and literal values - Object=
Case- Field=
ContactID← Value={!$Record.WhoId} - Field=
OwnerID← Value={!$Record.OwnerId} - Field=
Subject← Value=Shipping: Awaiting Dispatch - Field=
Type← Value=Shipping Issue
- Field=
Click on Done. Under every branch, we have to add this Create Record action to create a Case for each relevant tag. So working down your branches, following the same process and format, add the Create Record action to each branch until every branch has one configured on it. Again, you can leave the Default Outcome empty as we do not require it.
Step Five: Updating the Task Record
By now you should have a symmetrical branching system with a Create Record action on all of them. We now have to do the final step and add the Update Triggering Record action to each branch. We are going full circle and updating the Task that we originally used to trigger the workflow. Starting at the first branch again, click on the + button to bring up the Add Element menu. Search and select Update Triggering Record. Configure the below parameters:
- Label=
Update Awaiting Dispatch Task - API Name=
Update_Awaiting_Dispatch_Task - How to Find Records to Update and Set Their Values=
use the task record that triggered the flow - Condition Requirements to Update Record=
None - Always Update Record - Field=
WhatID←{!Create_Awaiting_Dispatch_Case}
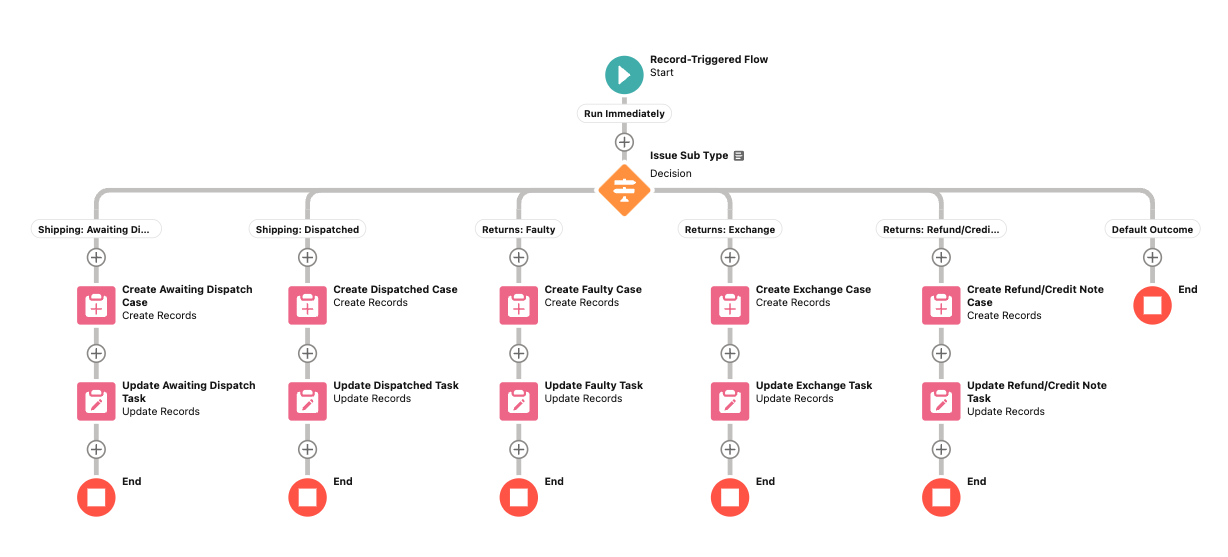
Click on Done. Like the Create Records action, we have to add a Update Triggering Record action to each branch for each relevant tag. So working down your branches, following the same process and format, add the Update Triggering Record action to each branch until every branch has one configured on it.
This brings us to the end of our flow, and should look like this when completed:
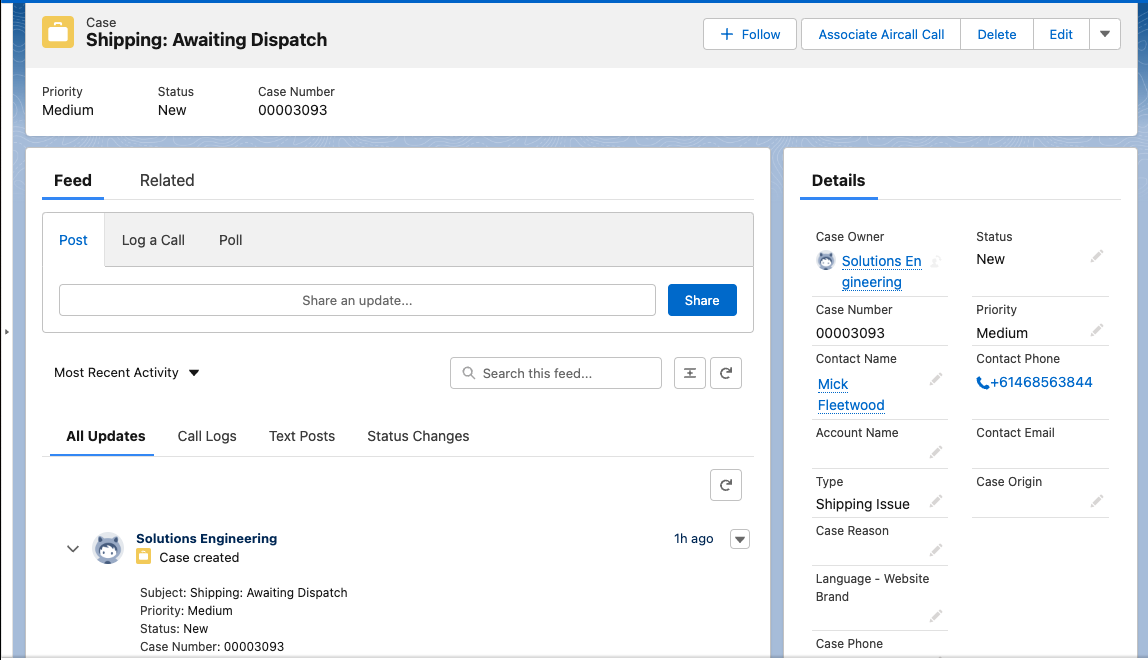
Be sure to click on Save and name your flow. Click on Activate and run a test. The easiest way to do it would be by creating a dummy contact with your personal number saved in the phone field, then calling your IVR, selecting one of the options, adding one of the tags and checking the Task created by that call for the related Case. Your case will appear as this:
Congratulations 🎉 You’ve just completed your Automatic Case Creation Based on IVR Options flow!
Food for Thought 💡
- If you are creating manual
Casesfrom communication over email, or chat, you can utilise theCase Originfield by adding an additional step in the Create Records action, by populating theCall Originfield with 'Aircall' or 'Phone'. This will allow reporting on how many cases are being created on the phone, via chat etc. - You could alternatively configure the the
Casecreation to be triggered as soon as the phone call is answered, and update the subject only once the tag is logged.
Need Some Extra Help?
If you need an extra hand with implementing this workflow, or you would like to learn more about similar automations to enhance your operations, check out our Professional Services page to book time with our Technical Consultants.