-
ExploreCategories
Allow agents to trigger the priority setting of a HubSpot ticket generated by an Aircall call

In this guide you will learn 🎓
- How setting up a ticket priority system in HubSpot allows for a more efficient standard of customer service and a smoother pipeline management experience for your agents
- How to Set Up:
- Configuring the Aircall Dashboard: Creating Tags
- Workflow One: Creating your Custom Property and Setting the Tag Value Property
- Workflow Two: Setting the Priority Automation Workflow
Please note- Hubspot Workflows are only accessible on Professional & Enterprise plans within HubSpot. Please reach out to your HubSpot account manager to discuss this further.
How setting up a ticket priority system in HubSpot allows for a more efficient and standardised pipeline
Ticket prioritisation is an approach to handling service requests that involves the agent making an active decision about which ones are important and should be tended to first. It helps support teams achieve the fundamental aspects of Customer Service such as:
- Meeting SLA’s
- Reducing overall response times
- Identifying urgency versus importance
By creating an internal process that sets criteria to indicate the priority of an issue, you allow your agents to make informed decisions about how to proceed with the customer's request based on certain parameters. The tricky part it creating the process, the simple part is adding the technology!
With Aircall and HubSpot, these two systems coherently connect to enforce your priority process. The use of a simple tagging action during an Aircall call triggers two workflows in HubSpot to work in conjunction with one another. The end result is an automatic setting of priority on the ticket which effortlessly organises your pipeline so your agents feel more in control.
How to set up your Priority Process Workflow 🔨
Step One: Configuring the Aircall Dashboard and Creating Tags
This section requires familiarity with creating tags in the Aircall dashboard. Please see our guide to Creating Tags
Navigate to the Tags section on the Aircall Dashboard and click on ‘Add a tag’. As HubSpot has three levels priority on the ticket property, it means we will create three tags to correspond with each setting. You can name these tags whatever you wish, however for simplicity we will be naming them High Priority, Medium Priority and Low Priority.

Step Two: Creating your Custom Property and Setting the Tag Value Property
This section requires some familiarity with creating and managing Workflows in HubSpot. If you are new to this aspect of HubSpot, please reference HubSpot’s guide to Creating Workflows
In our first workflow, we are going to copy the value from the existing property Last used Aircall tags and paste it into a custom property. The reason we are doing this is because in our second workflow, it requires us to clear the tag field in order to allow for re-enrolment. Since Last used Aircall tags is a dynamic field that can be used in a number of workflow triggers and also for reporting, we do not want to clear this field as it may interfere with other processes. We therefore copy the value from it and paste it into a field specifically created for this workflow.
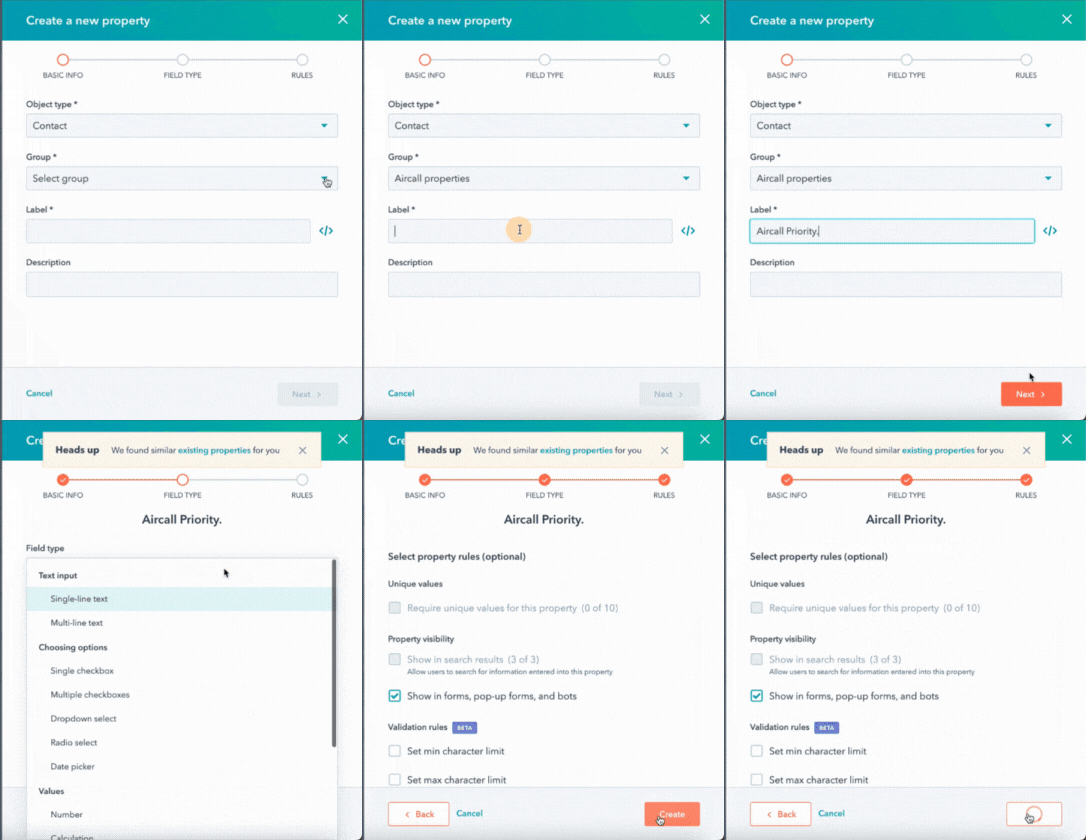
Create your custom property using any terminology you wish to name it. For the sake of this tutorial, we will be naming it Aircall Priority.
Group= Aircall Properties. Field Type= Single-line Text
Navigate to the Workflows section of your HubSpot environment. Select Create a New Workflow→ Contact Based→ Blank
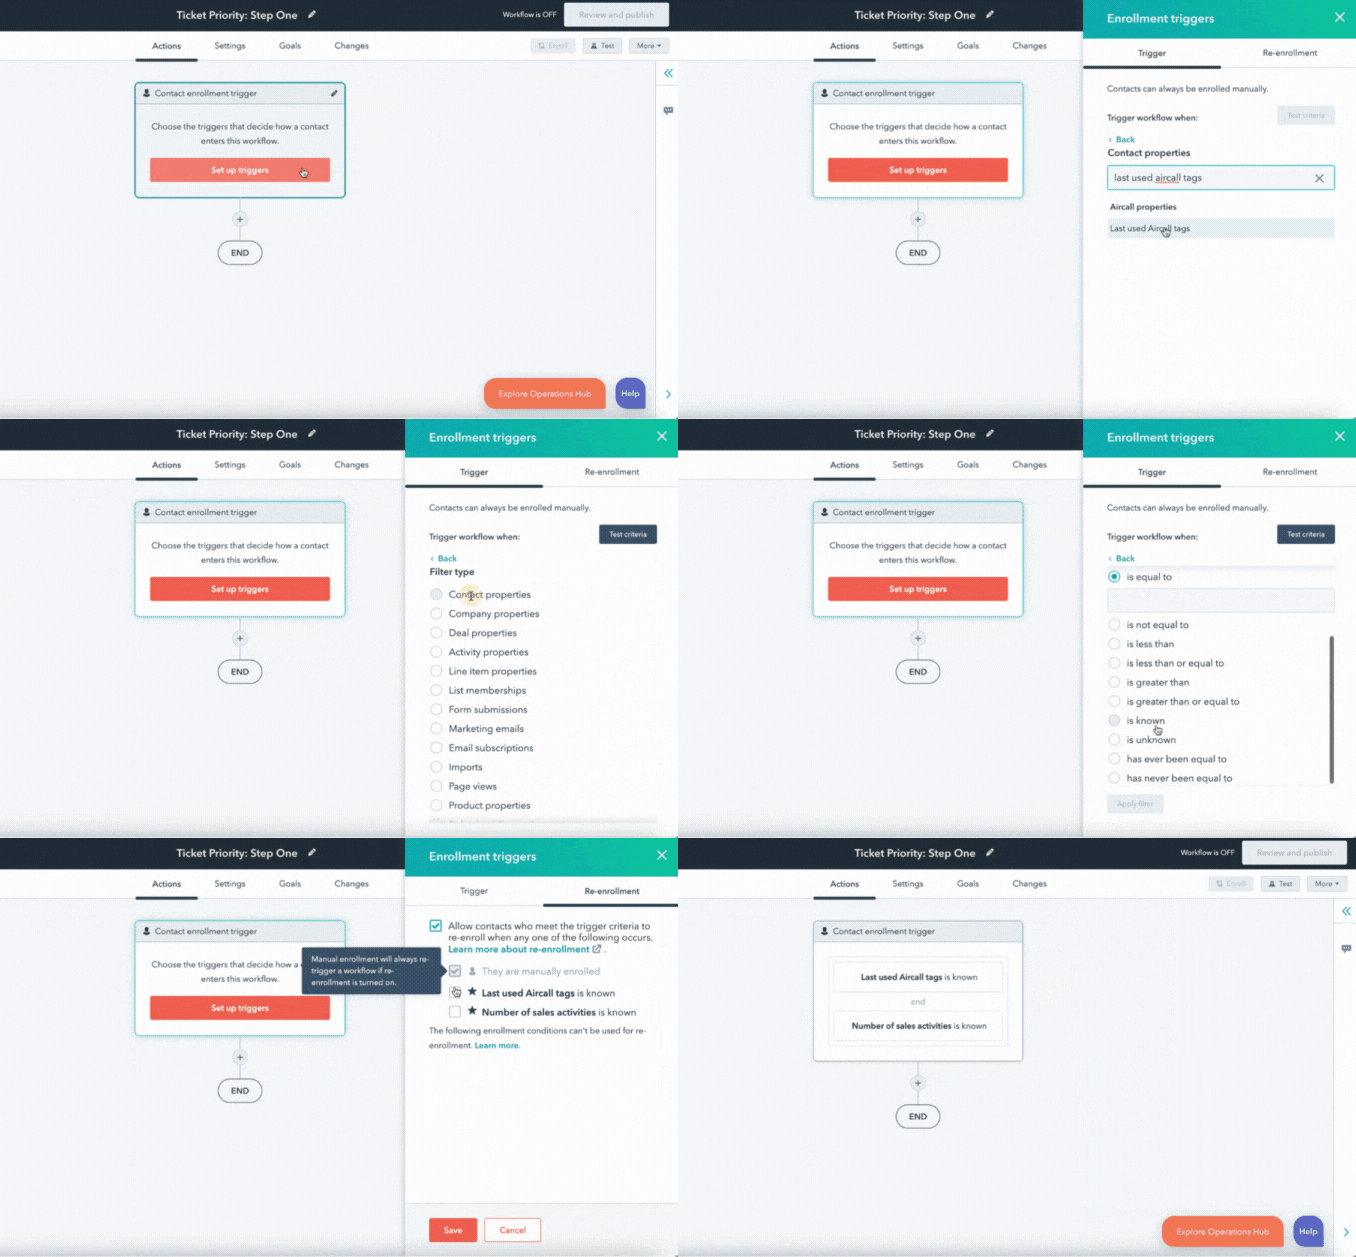
The enrolment trigger for this workflow is going to be based on two contact properties:
Last used Aircall tags- this a dynamic field that populates the most recently used tag in calls associated with the contact. The logic here is that when your agent has triaged the caller and assessed what level of priority the ticket requires, they would add the corresponding tag. This in turn would populate the fieldLast used Aircall tagsand therefore enrol the contact in the workflow.Number of sales activities- this is also a dynamic field and is used here as a method to allow re-enrolment should the same contact call again in the future. This field automatically updates any time there is an activity logged on the contact. We use this field to allow the re-enrolment because it is a given that it will be populated automatically by the phone call.
Filter Type= Contact Properties → Last used Aircall tags= Known
AND
Filter Type= Contact Properties → Number of sales activities= Known
Once you have set those in the Trigger tab, be sure to click on the Re-enrolment tab and select the options that allows re-enrolment.
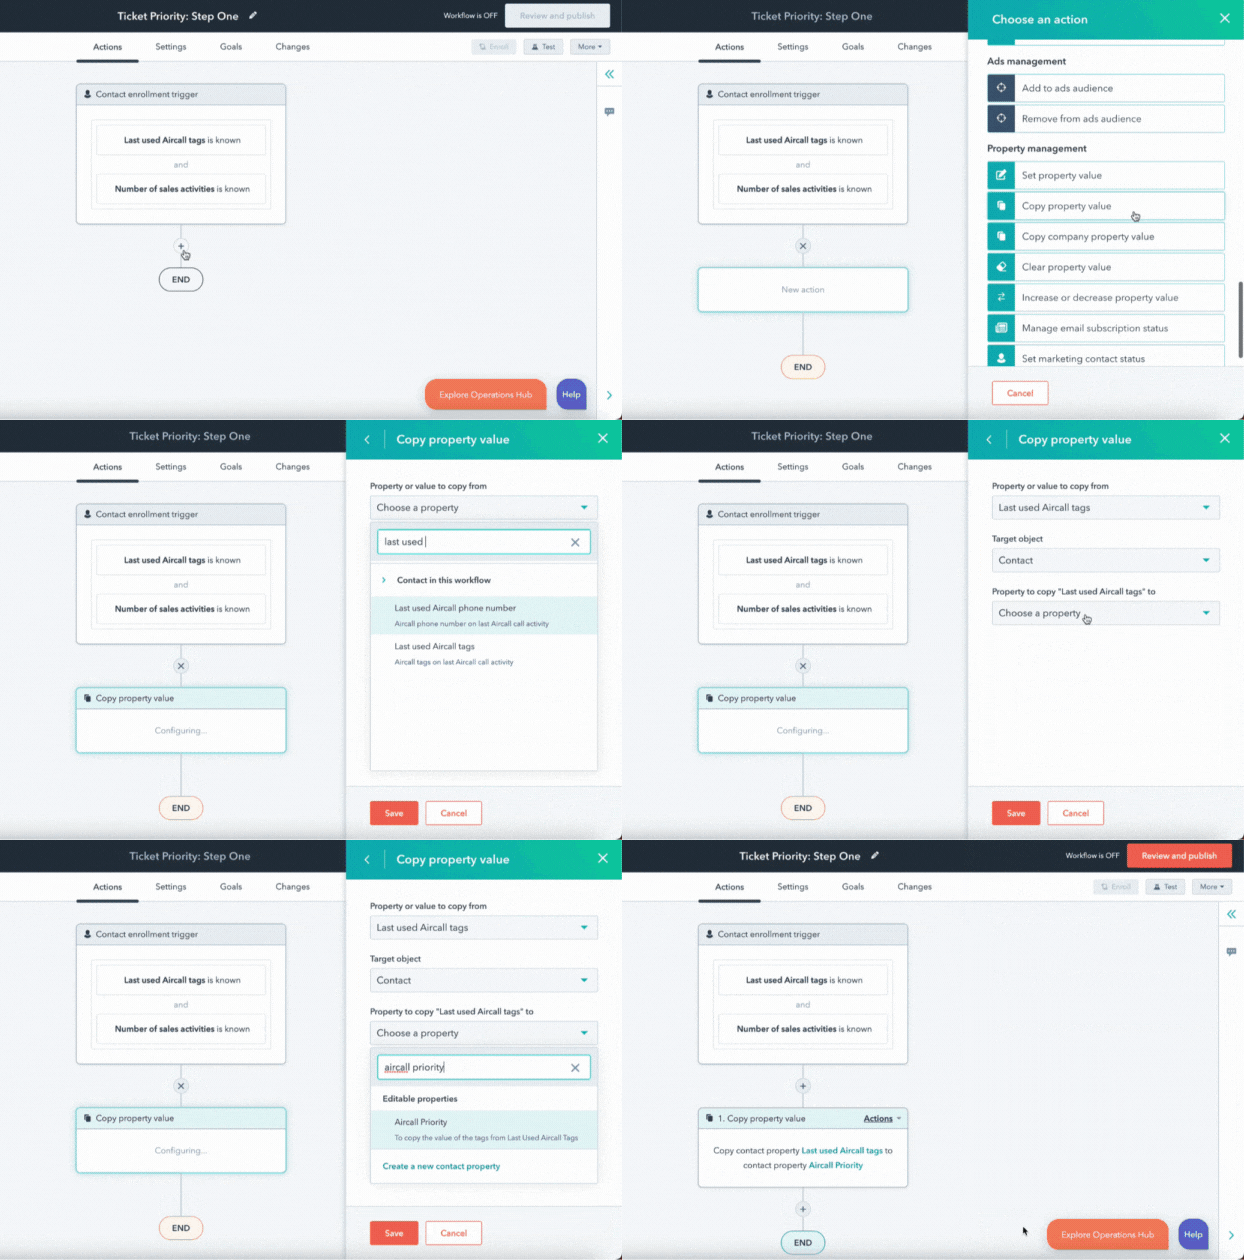
After this has been created, we need to trigger a Copy Property Value action once the caller has been qualified and enrolled in the workflow.
Copy Property Value → Property to Copy from= Last used Aircall tags
Target Object= Contact
Property to copy= Last used Aircall tags to= Aircall Priority
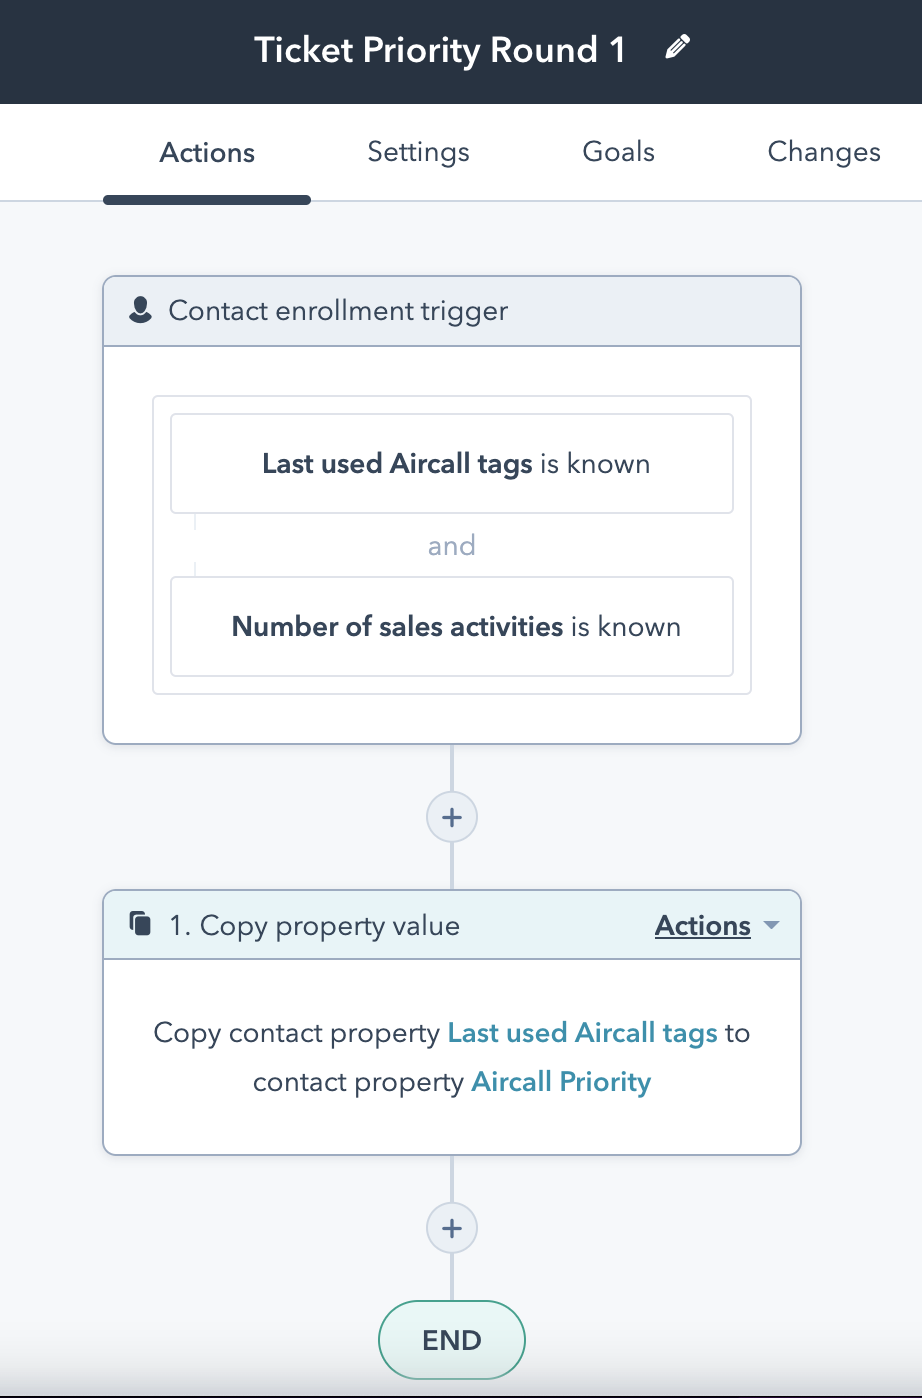
When you have concluded the above steps, your workflow should look like this:
Before you turn the workflow on, be sure to click ‘Review & Publish’. Turn the workflow on and run a test.
Step Three: Setting up the Priority Automation Workflow
This section requires some familiarity with creating and managing Workflows in HubSpot. If you are new to this aspect of HubSpot, please reference HubSpot’s guide to Creating Workflows
Navigate back to the HubSpot workflows landing page. We are now going to create a new workflow based on a combination of Ticket, Contact and Engagement properties, which is going to be the main engine driving this process. In this workflow, the Ticket object works as our base. We draw on the Contact object information we gathered in the first workflow (Aircall Priority) and finally, we use the Engagement object to enable the branching action we will see in a moment.
Create a New Workflow→ Ticket Based → Blank
The ticket enrolment trigger is going to be based on the below properties:
Ticket Status- our workflow is aimed at new ticket generated by Aircall calls, so in order to stop existing tickets enrolling we filter this property.
Filter type=Ticket Properties→ Ticket Status=is any of 'NewPipeline- this is to select which pipeline(s) you would like included in this workflow.
Filter type=Ticket Properties→ Pipeline=is any of 'Support Pipeline'(example)Source- since this is using Aircall call data and tags, we therefore set this to Phone.
Filter type=Ticket Properties→ Source=PhoneCall DurationANDCall Notes- Aircall logs this information in the engagement. The duration is important, as a ticket logs instantaneously when on a call. By putting a filter on theCall Durationvalue, it creates a slight pause in the workflow being triggered which allows time for the agent to complete the call, the tag being recognised and the priority being correctly executed. Aircall logs the tags in theCall Notessection also, so we use this for our branching later on in the workflow.
Filter type=Engagement Properties→ Call Duration=is greater than 0 seconds
AND
Filter type=Engagement Properties→ Call notes=contains any of PriorityAircall Priority- this is our custom property we created earlier where we will store the tags and will clear the value at the end of the workflow.
Filter type=Contact Properties→ Aircall Priority=Known

Once the enrolment trigger has been set, we move into a branching action. Select If/then branch. We then configure the 3 branching actions below:
Branch name=
High Priority
Filter type=Engagement→ Call notes=contains any of High PriorityBranch name=
Medium Priority
Filter type=Engagement→ Call notes=contains any of Medium PriorityBranch name=
Low Priority
Filter type=Engagement→ Call notes=contains any of Low Priority
HubSpot also offers the ‘None Met’ branch by default. Theoretically, all calls passing through this workflow should meet the branching requirements and this is not needed. However, it is good for initial testing purposes to enable this to see if your workflow is executing properly.
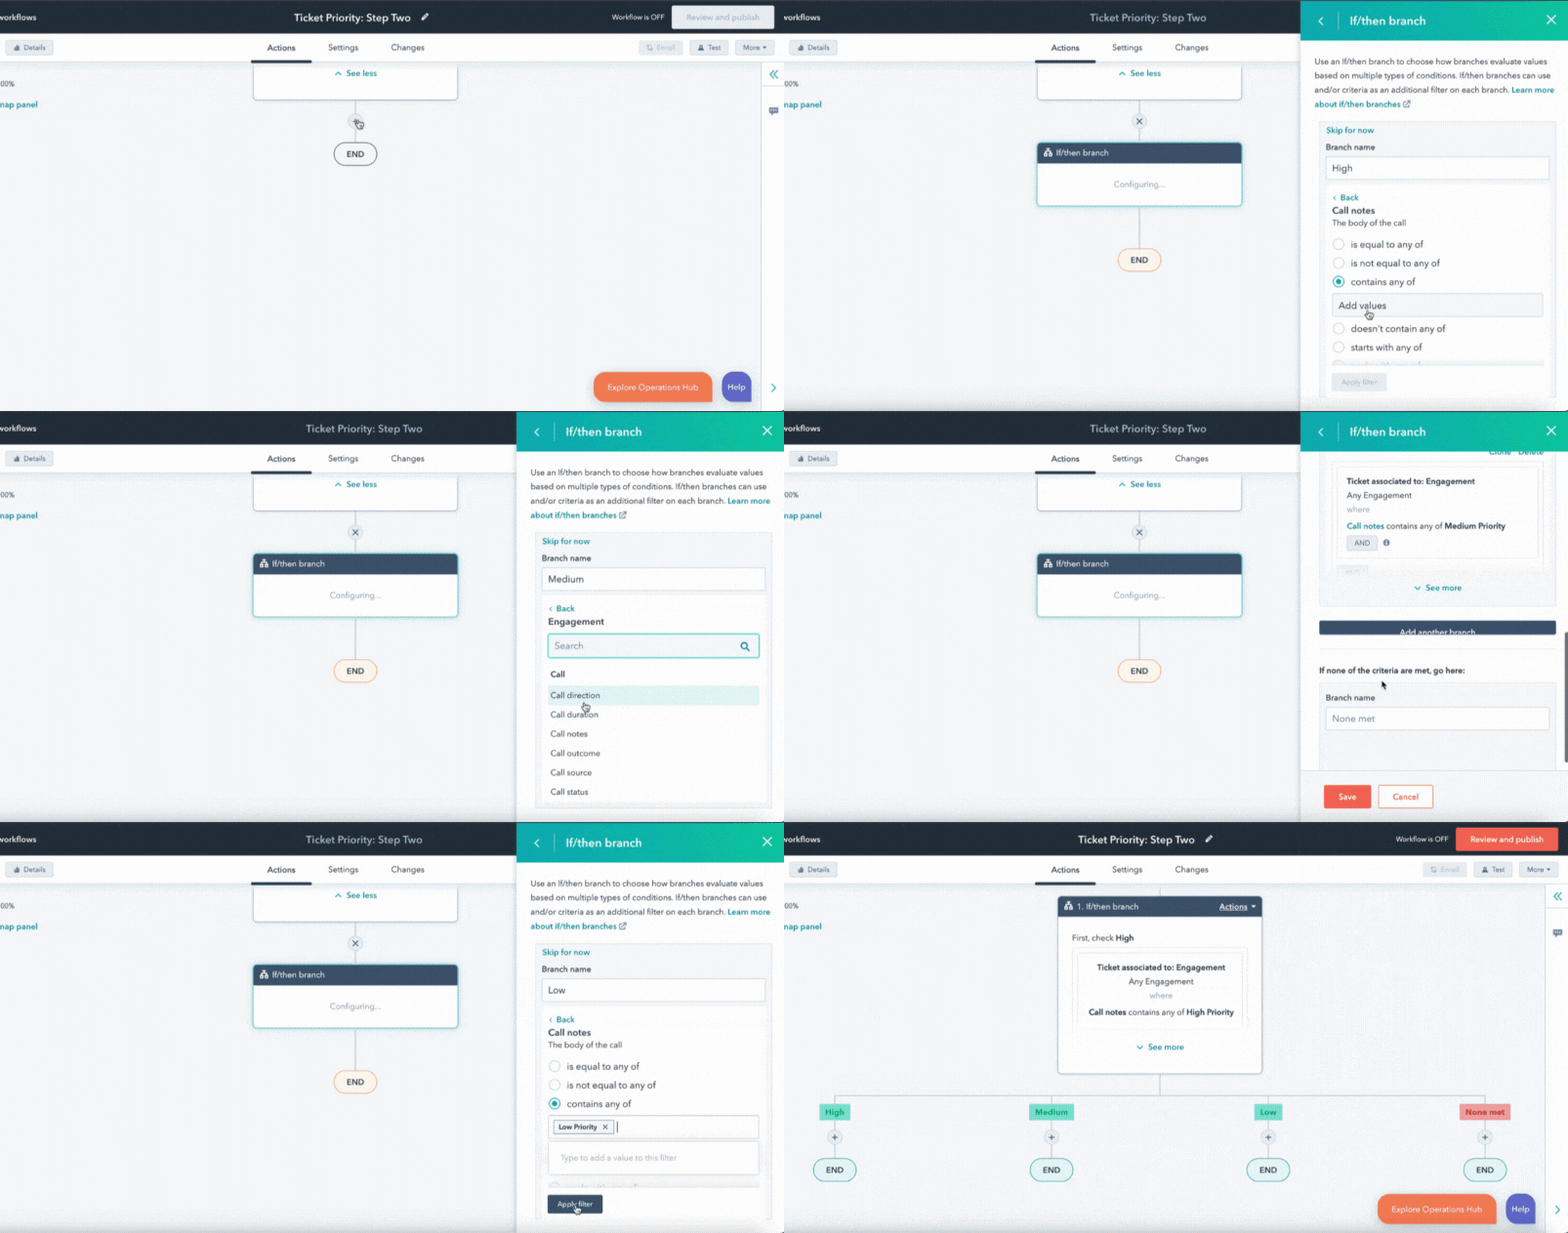
Now that the branches are set, under each one we have to set a property value. Our target property is the Priority field which is native to HubSpot.
High: Set Property Value→ Target Object= Ticket. Property to Set= Priority. Priority= High
Medium: Set Property Value→ Target Object= Ticket. Property to Set= Priority. Priority= Medium
Low: Set Property Value→ Target Object= Ticket. Property to Set= Priority. Priority= Low

The final step is we have to clear a property value for each branch. This brings us back to our custom property Aircall Priority which was a placeholder for our tags. In order to allow re-enrolment for contacts should they call back in the future, we have to clear this property. Under each branch, add the below action:
Clear Property Value →
Target Object= Contact. Association to Object= All Contacts. Property to Clear= Aircall Priority.

Once you had done that, your completed workflow should look like this:

Before you turn the workflow on, be sure to click ‘Review & Publish’. Turn the workflow on and run a test.
Make sure both Step One and Step Two workflows are turned on at the same time for this to behave as expected
Congratulations 🎉 You’ve created your Ticket Priority Workflow!
Food for Thought 💡
- To further expand on your priority process, each priority level set in the Priority field could trigger a respective SLA in HubSpot. You can read more about HubSpot ticket SLA’s here.
- If you offer Support as a product, you can use this workflow based on the level the customer is paying for, not necessarily the urgency. You would just have to change the name of the tags in step one to correctly reflect this.
- This workflow is particularly relevant if you have chosen to enable the Priority field as mandatory, which requires all tickets to have a priority set before being changed to a new status. You can read about this HubSpot feature more here
- Using further HubSpot workflows, you could use this as a way to escalate to different teams based on the priority. An example is that if it comes in High Priority, it leaves Level 1 Support and is assigned to Level 2 Support.
Need some extra help?
If you need an extra hand with implementing this workflow, or you would like to learn more about similar automations to enhance your operations, check out our Professional Services page to book time with our Technical Consultants.