-
ExploreCategories
Leverage the Aircall Tag feature to create granular reports in HubSpot based off Datasets criteria
In this guide you will learn 🎓
- How using Aircall Tags and HubSpot Datasets can enrich and elevate your reporting in HubSpot
- How to create Datasets and use them to generate reports:
- Step One: Creating the Dataset Foundations
- Step Two: Creating the Conditional Field
- Step Three: Generating your Report
Please note- this is enabled using HubSpot OperationsHub. This is only accessible on Enterprise plans within HubSpot. Please reach out to your HubSpot account manager to discuss this further.
How does using Aircall Tags and HubSpot Datasets enrich and elevate your HubSpot reporting?
No matter what industry you are in, an integral part of your operations is to analyse trends in the exchanges you have with your customers. Whether it is tracking outcomes in your first outreach to new leads, or customer pain points on your support calls, you need an accessible, visual accumulation of these insights. In Aircall, the tagging feature enables users to summarise the main conclusion of a phone call in a single click. This information in turn is seamlessly pushed into HubSpot where it can be framed into valuable data.
By leveraging Aircall data in HubSpot’s powerful datasets feature, it empowers you to report on a granular level with flexibility. Datasets open up almost endless possibilities in terms of data visualisation for the data we currently log on HubSpot.
How to Set Up your HubSpot Datasets and Reports 🔨
Step One: Creating the Dataset Foundations
This section requires some familiarity with creating Datasets in Hubspot. If you are new to this aspect of Hubspot, please reference Create and use Datasets
For example purposes of this tutorial, we are going to be looking at reporting on 3 tags. Our use case is going to be a Support team who work off a priority system, where they have to add a tag to each phone call to indicate whether the request is High Priority, Medium Priority or Low Priority. In our report, we would like to see these tags in a stacked, comparative view, to see how many times each tag is used over a set time period.
Navigate to Reports → Data Management → Datasets and select Create Dataset in the top left corner.
The first step is to set our Data Sources. Our primary data source is going to be Contacts which can be selected from the first drop down menu. For our secondary data sources, we are going to select Activities and Calls from the Sales section. Click the next button in the top right corner to proceed through to the preparation dashboard.
From the search bar menu on the left-hand side of the page, we are going to select the below properties to include:
Activity date- this allows us to set date parameters in the reporting phase.Call notes- Aircall logs the tags added to calls in the Call notes of each engagement.Activity type- this is to filter it to calls, which is what Aircall logs.Record ID- this is to get a distinct count of each call/engagement in the reporting phase
Those are the foundational fields that we will be using, and in the next step we will go through the conditional field we will be using to leverage the Aircall tags.
Step Two: Creating the Conditional Field
This section requires some familiarity with conditional fields. If you are new to this aspect of HubSpot, please see this guide here. Scroll down the ‘Prepare’ section to find ‘Adding Conditional Fields’ for more information.
Conditional fields enable users to group or bucket data based set conditions. It is similar to custom formula, but it works off the IF/THEN logic. We highly recommend making sure Formula Guidance is turned on which will provide you with visual assistance and error warnings when building formulas.
Click on the Create conditional field option. Name your field Aircall Tag so it is easily recognisable. We are now going to set the conditions. As previously mentioned, Aircall logs the tags in the Call Notes of each engagement. HubSpot defines this as the call body, and therefore the input is hs_call_body when creating this conditional formula.
We begin with the IF conditional. The function we will be using is CONTAINS. Click on Function, and select CONTAINS. In the value section, we are going to enter [CALL.hs_call_body] and in the substring is where you enter your tag name e.g “High Priority". Please see this as a reference:
CONTAINS([CALL.hs_call_body], "High Priority")
Now that is set, we continue to the THEN conditional. This where we indicate what should be classified if the above IF conditional is met. In this part, we simply indicate the name of the tag. Enter your tag name in quotation marks that you had in the IF conditional. e.g "High Priority"
Click on +Add additional block. You are going to repeat this step for each individual tag you have, using the same IF formula, but just switching out the tag name in both the IF conditional and the THEN conditional.
Once you have added all the conditions, scroll to the bottom to find the Define default value. In this section we define a default value to populate if none of the above conditions are met. The assumption here is that if none of the conditions are met, it means that there was no tag added to the call. We are therefore going to enter "No tag". This will make filtering in the reporting section much simpler, which we will see in the next step.

You can then click on Review in the top right corner, which will take you through to the review page. You can then click on Save to complete your dataset, ready to turn it into a report.
Step Three: Generating your Report
After saving your dataset, you will come to the Preview page which will give you an overview of the data being used in the dataset. We now have to aggregate this into a readable report. Click on Build report in the top right hand corner of the screen.
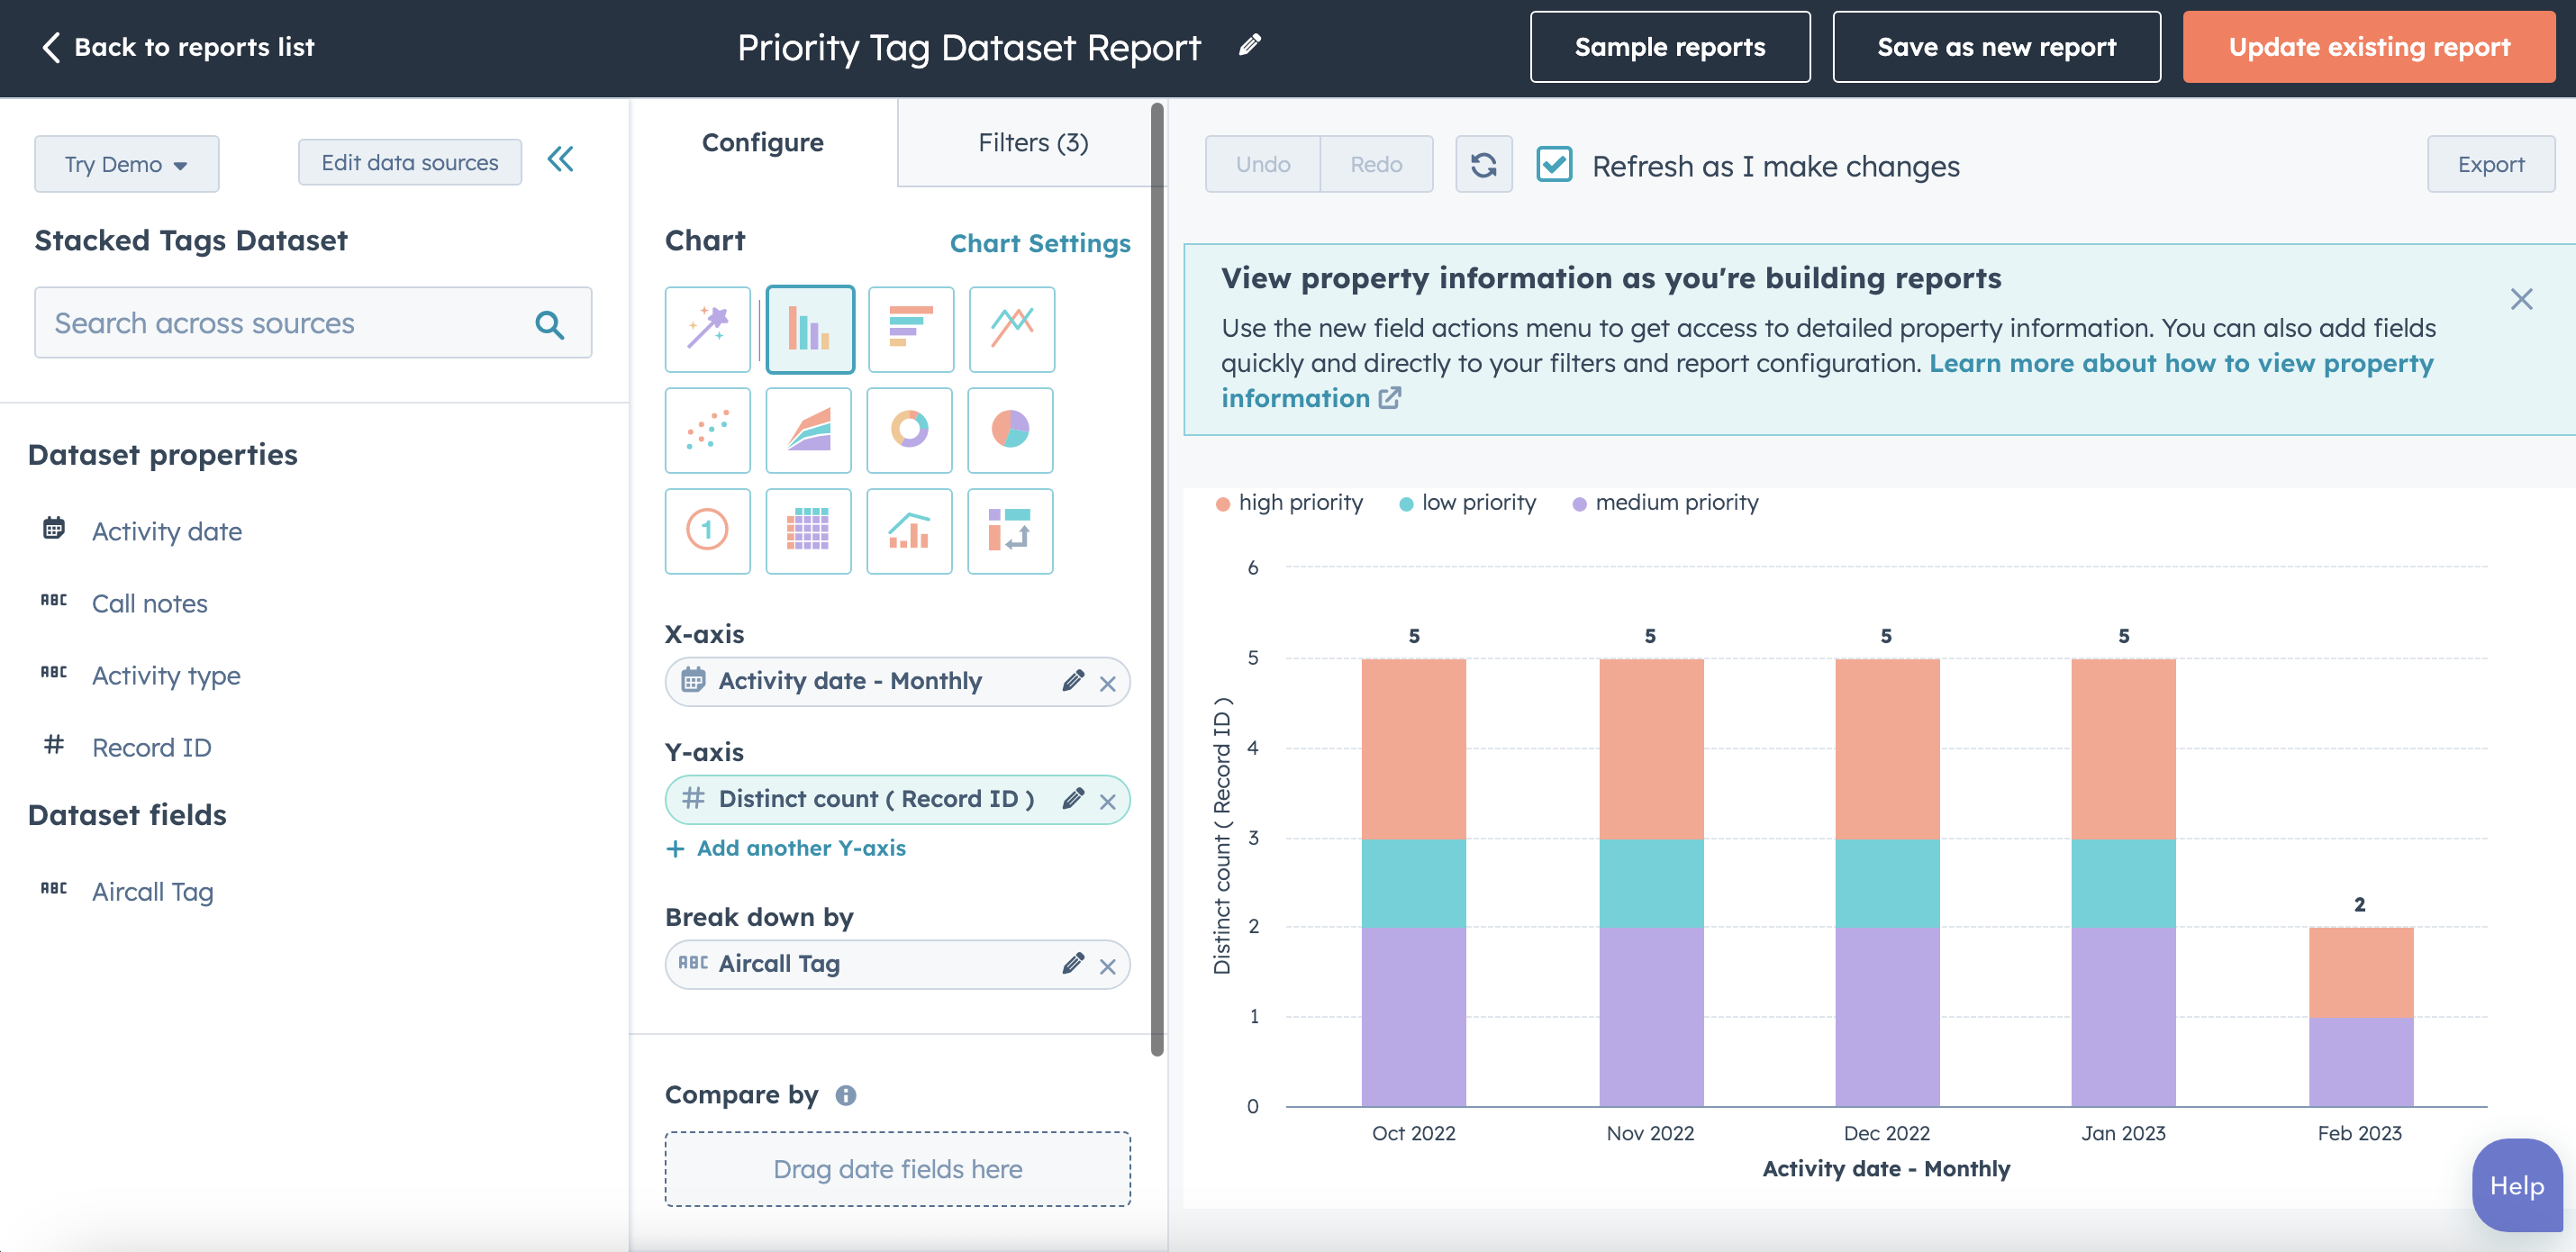
We will start on the landing page, under the Configure tab. Select the type of chart you would like to use. For this, we will be using the vertical bar chart. Then select the below properties:
- X-Axis:
Activity Date. It will default to monthly, but if you click on the pencil icon you will be able to change this if you wish. - Y-Axis:
Record ID. You will need to click on the pencil icon and selectDistinct Countunder aggregation. This is so each individual call is taken into account. - Break down by:
Aircall Tag. This is the conditional field we created in the previous step.
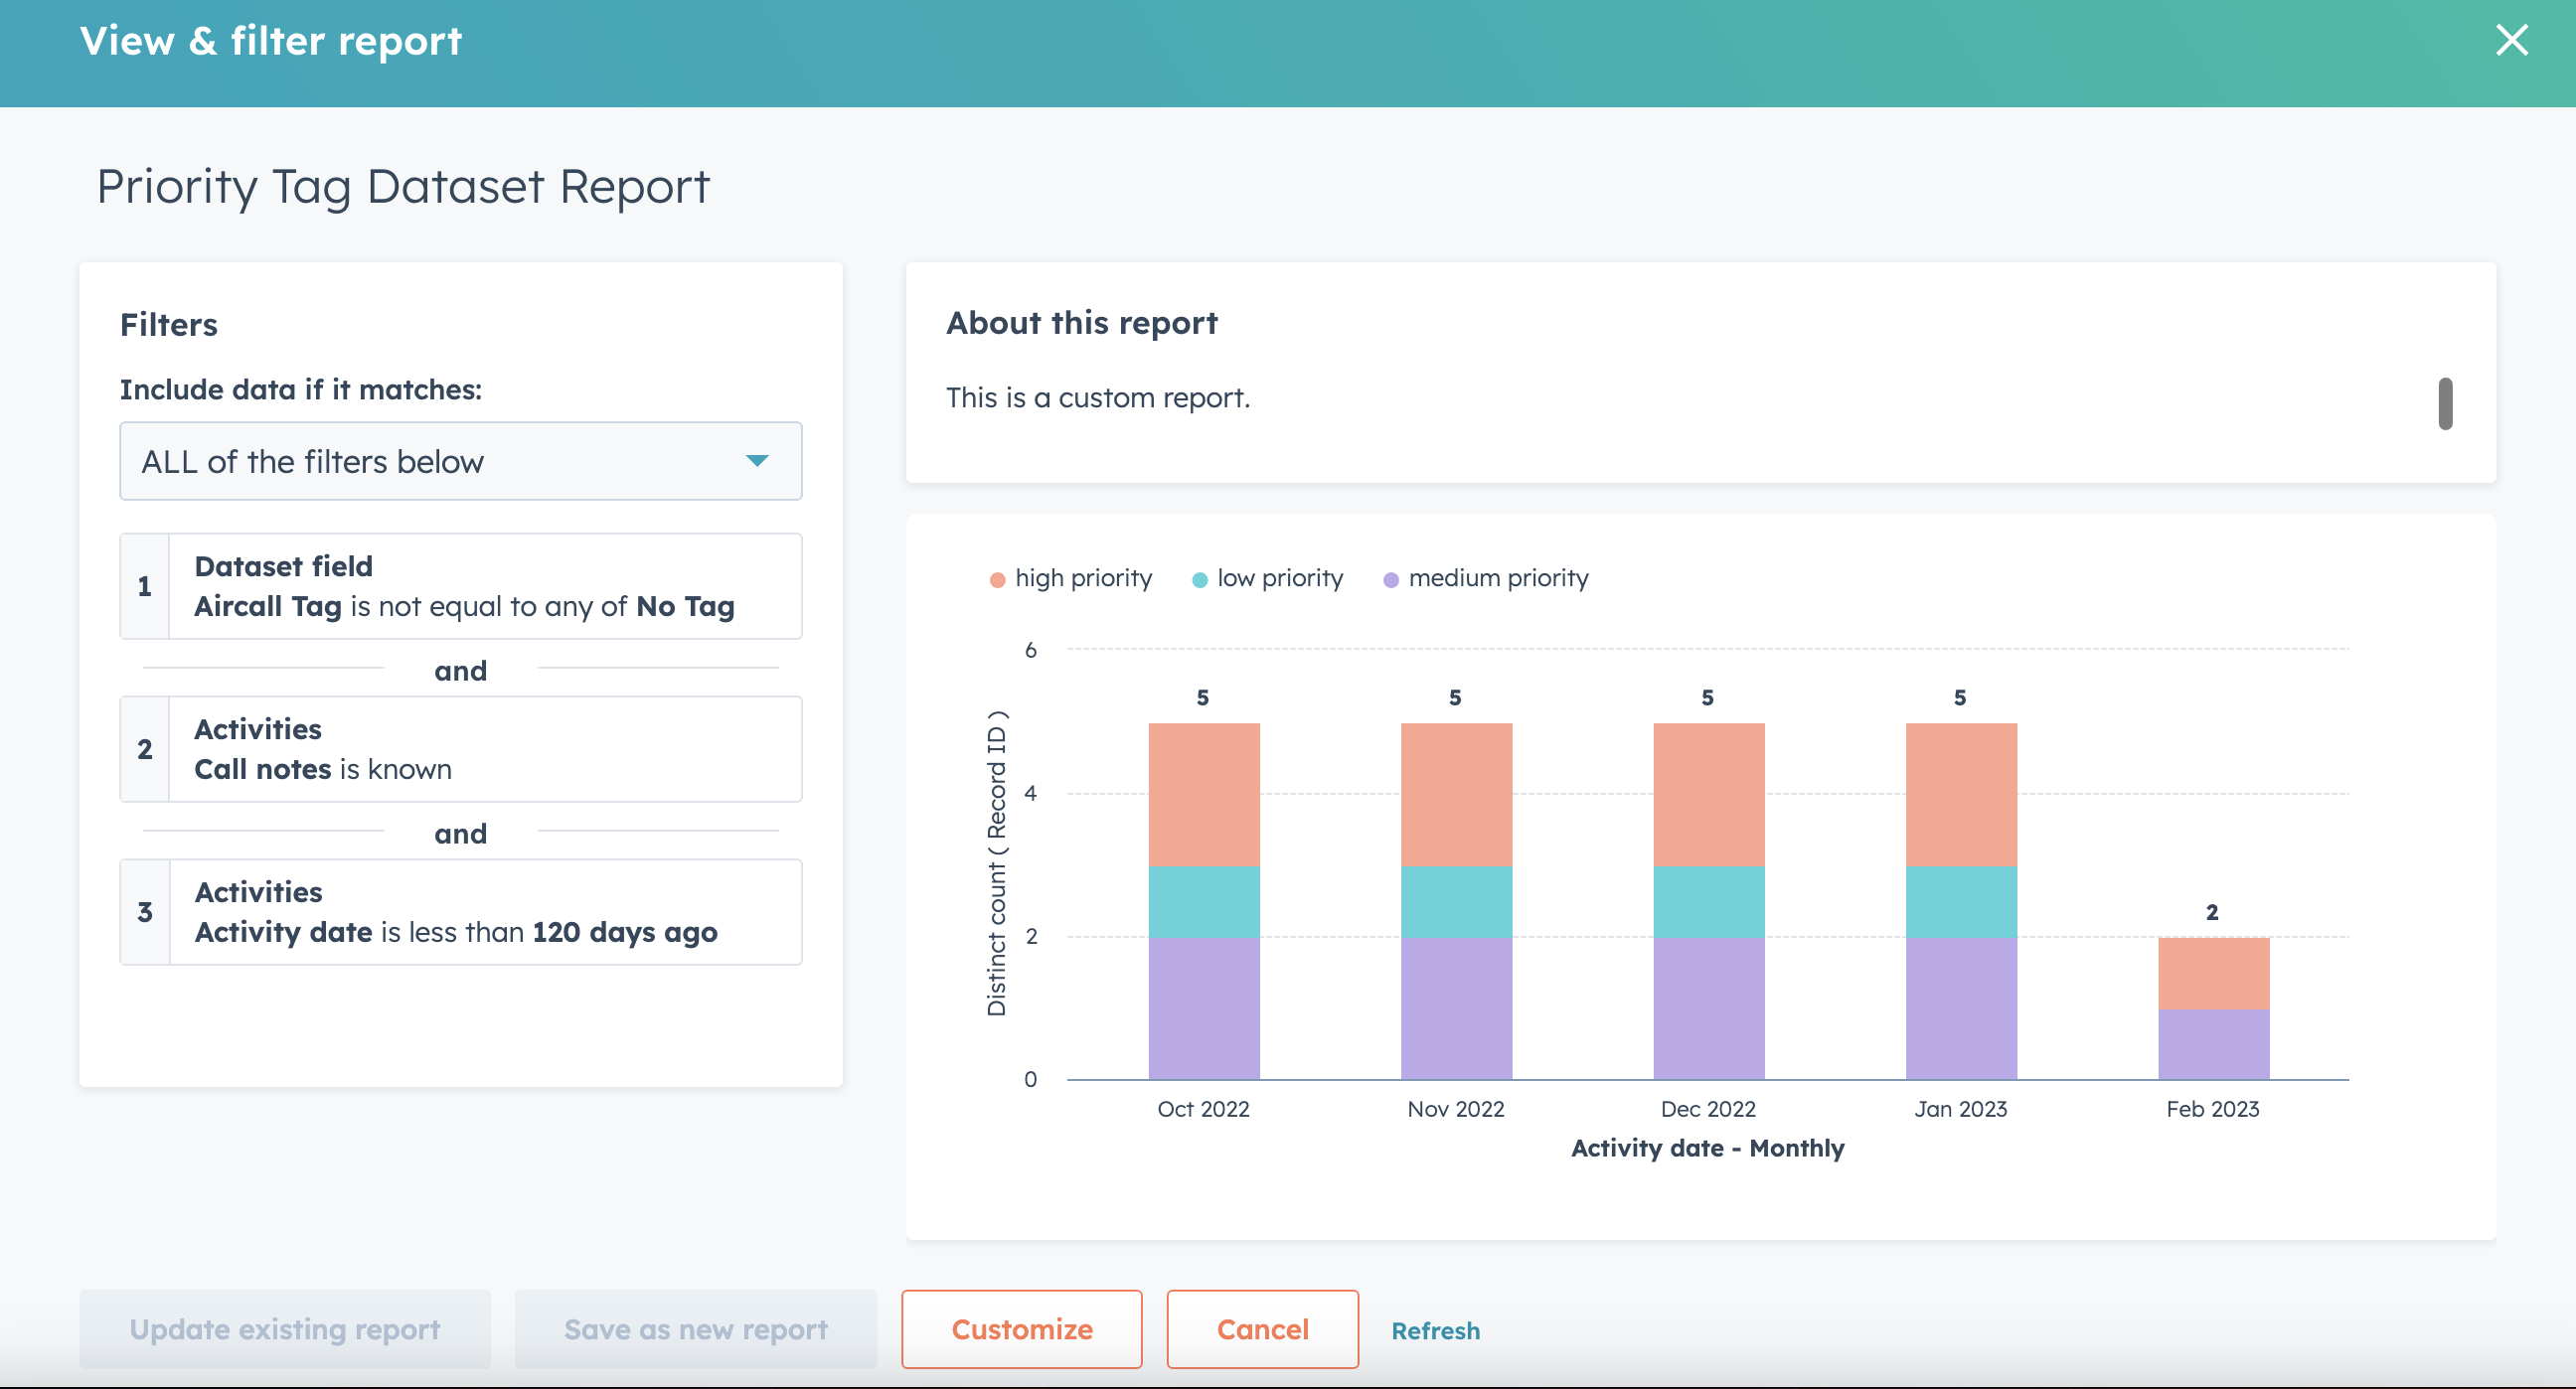
We now have to set the filters. Click on the Filters tab and select:
Include data if it matches → ALL of the below filters. Then drag the Dataset field from the left hand menu which will be the Aircall Tag conditional field. Click on this field to open it. We are going to set it with the default value we entered when creating the conditional field, which will be No Tag.
Aircall Tag = is not equal to No Tag.
Drag the Call Notes field from the left hand menu into the drop box. Click on the field to open it and set it to:
Call Notes = is known
Drag the Activity Date field from the left hand menu into the drop box. Click on the field to open it. Filter it to Is less than and enter the amount of days you would like to report on e.g if you would like to see the data from a 3 month parameter, you would enter 120 days.
You should now clearly see an interactive graph on your screen, and when you hover over the stacked bars it should tell you the distinct count of times each tag was used, and a percentage. Once you are happy with that, click on Save Report in the top right corner. It will ask you if you would like to save this to a Dashboard, which we recommend doing for ease of visibility.
Congratulations 🎉 You have just created your first Aircall Tag Dataset report & dashboard! This will be readily available to view and edit in the reports or dashboards section of HubSpot.
Food for Thought💡
- Stacked Tag datasets are created off the basis that there is only 1 tag being added to the phone call at a time. If you are adding multiple tags to a call, you will have to create a separate dataset.
- For consistent reporting, it is recommended to use the Mandatory Call Tagging feature to ensure all calls are tagged.
- With this new Datasets approach, we can substitute call outcome with more flexible call tags if call outcomes are used only for reporting purposes.
Need some extra help?
If you need an extra hand with implementing this workflow, or you would like to learn more about similar automations to enhance your operations, check out our Professional Services page to book time with our Technical Consultants.